Buy all your VW California Accessories at the Club Shop Visit Shop

aditionnal left hand side (original) awning for vw California T5???

urgent question about opposite side awning

  • cannot help you

    Votes: 0 0.0%
  • here is the answer

    Votes: 0 0.0%

  • Total voters
    0
R

Rudolf

Messages
1
Location
Beernem
Vehicle
T5 SE 180 4Motion
It seems very strange but neither Belgian or British VW dealers can give me the answer: or give this same boring answer: the vehicle is not made for an extra awning on the "not original side of the van".
I own a California 2010 bought new in Belgium so this is left hand steering and right hand standard awning.
I want to add an additional awning on the left side of my California for many reasons.
I already adapted the left side with the necessary changes to be able to fix the adaptors/brackets just under the roof.
Is there anybody that can confirm me that there exists a pare of Thule left hand side adapters to complete my wish? At what price and where to order? In Belgium all VW dealers say that this just can be ordered in UK but even there nobody can answer me....
We are leaving in 3 weeks time for 2 months so it is quite urgent...
I even want to by second hand left hand side awning with adaptors and collect it in UK. Preferable light grey!
Thanks for your help!!
 
Just Kampers sell Fiamma awnings too and they deliver to EU.
 
I have had the same considerations ;-)

First of all, the original mounts will not fit, they are not symmetrical, but side specific. The rear mount is fastened under the roof, and I am not sure if there are the same platform (and holes) to mount on the opposite side. And you can not use the mounts that sit on the roof railing if you want to pop up the roof at least ;-)

Anyway if you overcome that, you also need to modify the awning, so that the front door can open with the awning out (the arms of the awning are asymmetrically mounted on the base (the front arm is moved further back), due to the door to clear when opened.

After all, I think it is doable, it is just a question how much effort you want to put into it …

jPnDhjxGQCe7elYMt7db0g.jpg 8HTLL8DaR%68eT4KjHd9rw.jpg
 
Are you living in Belgium ? As your location says Beernem the flag showing is Brittisch...
Try to contact Camper Centrum Nederland and ask them for advise.
It's about 200km drive from Beernem , they are the best California dealer in the BeNeLux.
http://campercentrumnederland.nl/overons/contact
 
It seems very strange but neither Belgian or British VW dealers can give me the answer: or give this same boring answer: the vehicle is not made for an extra awning on the "not original side of the van".
I own a California 2010 bought new in Belgium so this is left hand steering and right hand standard awning.
I want to add an additional awning on the left side of my California for many reasons.
I already adapted the left side with the necessary changes to be able to fix the adaptors/brackets just under the roof.
Is there anybody that can confirm me that there exists a pare of Thule left hand side adapters to complete my wish? At what price and where to order? In Belgium all VW dealers say that this just can be ordered in UK but even there nobody can answer me....
We are leaving in 3 weeks time for 2 months so it is quite urgent...
I even want to by second hand left hand side awning with adaptors and collect it in UK. Preferable light grey!
Thanks for your help!!
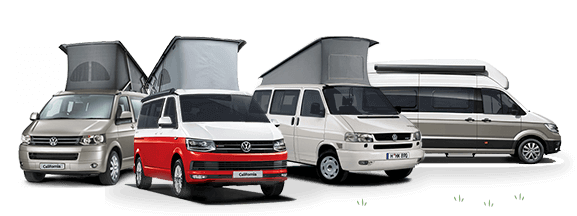
1. Thule make the same type of Awning that the California has, but for the T5/6 van conversions, with the legs etc: asymmetrical BUT for fitting on the L side of the vehicle.
Awning
https://www.thule.com/en-gb/gb/van-accessories/awnings/thule-omnistor-5102-260x200-_-30985231

2. You will not be able to fit the same type of Awning Brackets as the California uses as the roof is not built with the same fitting points on the Left side.

Adapters
https://cdn1.static-tgdp.com/assetl...awnings&id=576924&brand=Thule&market=GB&att=1
 
We use a tarp from Decathalon with Kador strip which can be put in the left hand side via the rubber strip we got with our beach. Quick and cheap if you don't want a full wind out awning.
 
We use a tarp from Decathalon with Kador strip which can be put in the left hand side via the rubber strip we got with our beach. Quick and cheap if you don't want a full wind out awning.
A much better option in my opinion.
 
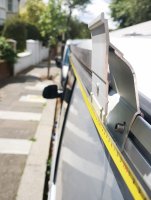
I have done this on my van. I have a California hydraulic roof fitted on mine and my sliding door is on the left hand side.
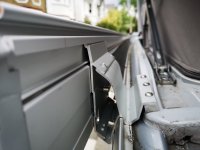
It involves making up two spacers and drilling and tapping the roof and adjustment one of the awning rafters so you can access the hole that need redrilling for the new awning position.. It's a bit of a faff but well worth the effort.

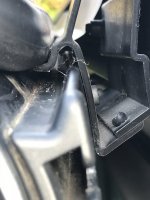
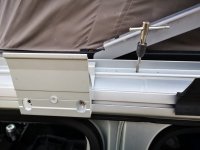
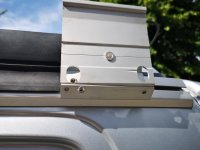
The front bracket is used as is but with a spacer.
IMG_20190603_171622.jpgIMG_20190605_143157.jpg
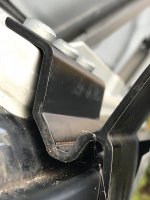
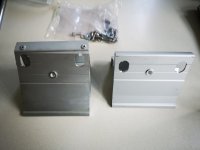
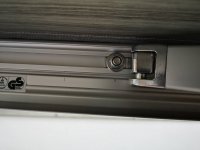
The rear needs the rivets drilling out and repositioning at the correct angle.
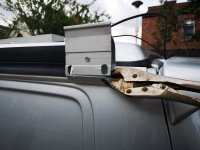
Drill a new hole at the bottom front first and swivel the bracket to the new angle. Clamp in place with mole grips.
IMG_20190603_115616.jpgIMG_20190605_094657.jpgIMG_20190605_095830.jpgIMG_20190605_143143.jpg

If you fit the front bracket first you can use a tape measure to check the angle.
IMG_20190605_095016.jpg

You will need to move the rear awing rafter toward the back of the van. Just loosen the screws and slide toward the back approximately 70mm.
IMG_20190605_132816.jpg
Measure the distance between the brackets then hang the awning on the van to get the new hole positions.
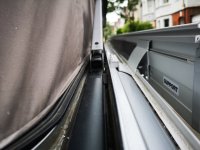
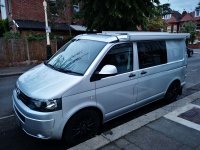
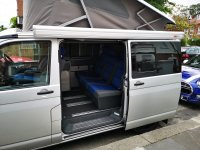
I'm really pleased with the result.
IMG_20190605_205958.jpgIMG_20190605_143333.jpg

Please excuse the dirty roof!
 
I have done this on my van. I have a California hydraulic roof fitted on mine and my sliding door is on the left hand side.
It involves making up two spacers and drilling and tapping the roof and adjustment one of the awning rafters so you can access the hole that need redrilling for the new awning position.. It's a bit of a faff but well worth the effort.

The front bracket is used as is but with a spacer.
View attachment 46134View attachment 46135
The rear needs the rivets drilling out and repositioning at the correct angle.
Drill a new hole at the bottom front first and swivel the bracket to the new angle. Clamp in place with mole grips.
View attachment 46137View attachment 46138View attachment 46139View attachment 46140

If you fit the front bracket first you can use a tape measure to check the angle.
View attachment 46141

You will need to move the rear awing rafter toward the back of the van. Just loosen the screws and slide toward the back approximately 70mm.
View attachment 46145
Measure the distance between the brackets then hang the awning on the van to get the new hole positions.
I'm really pleased with the result.
View attachment 46142View attachment 46144

Please excuse the dirty roof!
Nice job done there Spudster, :thumb
 
Hi can I ask where you got the brackets from to fit the awning to the left I can’t find them anywhere
 
I bought a complete kit including the awning as a package for a standard California. There is no off the shelf left hand side kit. As far as I know all off the awning brackets that are designed for a california are of a similar construction. The front bracket is a single extrusion so needs no modification. The rear bracket regardless of whether it is Fiamma, Dometic or Thule need the rivets drilling out and the bracket refitted as a mirror image. If you are looking for the fixing kit just buy the California mounting kit. It does not matter if you buy left or right hand drive as the brackets are the same. Hope this helps.
 
I bought a complete kit including the awning as a package for a standard California. There is no off the shelf left hand side kit. As far as I know all off the awning brackets that are designed for a california are of a similar construction. The front bracket is a single extrusion so needs no modification. The rear bracket regardless of whether it is Fiamma, Dometic or Thule need the rivets drilling out and the bracket refitted as a mirror image. If you are looking for the fixing kit just buy the California mounting kit. It does not matter if you buy left or right hand drive as the brackets are the same. Hope this helps.
Thanks I appreciate the help
 
Hi I’m wondering if you could give me a little more info please is there anything I should watch out for or depth when drilling into the roof and what was the height of your aluminium spacers and did you tap them m6 any help is really appreciated I’m selling my original f45 and I’ve ordered the California f45
 
Hi I’m wondering if you could give me a little more info please is there anything I should watch out for or depth when drilling into the roof and what was the height of your aluminium spacers and did you tap them m6 any help is really appreciated I’m selling my original f45 and I’ve ordered the California f45
You probably don't need to sell your f45. You just need the California brackets which are normally about £60-£70. I would be inclined to speak to Agent Fiamma or the like and ask specifically for F45 California bracket for a California. The 35 version won't fit. The spacers were drilled with clearance holes and the roof was tapped M6. I had to get longer screws than what we're provided in the kit. When drilling the roof you go through two layers. The aluminium goes through easily then there is the steel of the roof which is harder. There is a slight gap between the two that you will feel when drilling. A pilot hole helps and you could use stop like for wood dowel to stop the drill going too deep into the roof (set the stop 2mm above where you feel the hard steel roof. Make sure you don't overtighten the screws as you are tapping a relatively thin layer of aluminium and steel and most importantly use threadlock on the screws. Don't forget the sealing strip which is also available from agent fiamma.
 
I have also posted on the T4 forum with a little more info.
This has some dimensions of the brackets. I'm away at the moment but could give you some more detailed dimensions when I am back. Its a shame you are so far away, I could have given you a hand!
 
You probably don't need to sell your f45. You just need the California brackets which are normally about £60-£70. I would be inclined to speak to Agent Fiamma or the like and ask specifically for F45 California bracket for a California. The 35 version won't fit. The spacers were drilled with clearance holes and the roof was tapped M6. I had to get longer screws than what we're provided in the kit. When drilling the roof you go through two layers. The aluminium goes through easily then there is the steel of the roof which is harder. There is a slight gap between the two that you will feel when drilling. A pilot hole helps and you could use stop like for wood dowel to stop the drill going too deep into the roof (set the stop 2mm above where you feel the hard steel roof. Make sure you don't overtighten the screws as you are tapping a relatively thin layer of aluminium and steel and most importantly use threadlock on the screws. Don't forget the sealing strip which is also available from agent fiamma.
 
I tried getting the California brackets contacted Fiamma who said the won’t sell separate they’ only available in the kit with the California awning I’ve just sold my own tonight and ordered the California awning yesterday can I ask what thickness the blocks were you used to space the roof to the awning brackets
 
The material I used was aluminium flat bar in an Imperial size: (3/4" x 3/8") I cut these to 120mm lengths. For the front bracket you can just drill the clearance holes. The rear needs cutting at a slight angle. There are pictures on the T4 forum link I posted that will give you an idea of the angle. I just used a saw and a file to finish off.
 
The material I used was aluminium flat bar in an Imperial size: (3/4" x 3/8") I cut these to 120mm lengths. For the front bracket you can just drill the clearance holes. The rear needs cutting at a slight angle. There are pictures on the T4 forum link I posted that will give you an idea of the angle. I just used a saw and a file to finish off.
Thanks your a star thanks again for your quick replies and help
 
Thanks your a star thanks again for your quick replies and help
I would not get too obsessed by the depth and angle as the aluminium bracket has a certain amount of flex in it and if you are doing this on a California then there is no door that you have to allow clearance for. A couple of millimetres over 2.5 metres will make not a lot of difference!
 
I would not get too obsessed by the depth and angle as the aluminium bracket has a certain amount of flex in it and if you are doing this on a California then there is no door that you have to allow clearance for. A couple of millimetres over 2.5 metres will make not a lot of difference!
It’s not a California I’ve got but it’s a California electric roof I got fitted to it so just the one sliding door on the left thats the problem and that’s why I’m glad about your reply’s
 
It’s not a California I’ve got but it’s a California electric roof I got fitted to it so just the one sliding door on the left thats the problem and that’s why I’m glad about your reply’s
All makes sense now. You won't regret it. You should look at the Comfortz camping room as well. Very simple and gives you shade and rain cover where you need it without to much faff.
 
All makes sense now. You won't regret it. You should look at the Comfortz camping room as well. Very simple and gives you shade and rain cover where you need it without to much faff.
Hi your help was brilliant fitted the awning and it looks superb just one last question after I’d measured it all out according to the drivers side and fitted it seems to sit more to the rear than the front the winder for the awning sits level with the rear door spoiler would this be correct looking at one of your pics it seems to be sitting the same the front of the awning is about nearly the middle of the passenger door
 

Similar threads

L
Replies
9
Views
2K
Bigted
Bigted
Michael Meade
Replies
43
Views
7K
mojo doug
M
californiadreaming
Replies
6
Views
1K
californiadreaming
californiadreaming
Back
Top