Buy all your VW California Accessories at the Club Shop Visit Shop

Guide - iPixi Winycam X100FHD Vehicle Recording Device

S

Stu

Guest User
During the CarFest South event this weekend I happened upon a trade stand offering Security Video Recording devices. I've been mulling these over for some time, most notably to provide some evidence if I ever had to pursue an insurance claim resulting from an accident whilst we were travelling in Europe. Suitably impressed by the device, company selling them and of course price, I took the plunge and bought one.

Temptation got the better of me this afternoon and I couldn't wait to get going on the install!! :bananadance

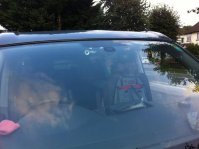
The device I chose is the Winycam X100FHD which offers some remarkable features for a device of its size and cost. I won't go over all of them here as you can all read the website but a couple that stood out to me were full 1080P HD recording, up to 32Gb Micro SD Card and power management to prevent battery flattening when hardwired and using the Parking Recording Function.

The device is supplied with a Cigarette Lighter adaptor and the additional hard wire kit can be purchased for a very reasonable £9.99. I think the hard wire kit is a must for the Cali.

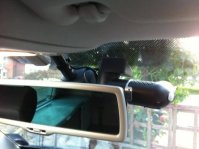
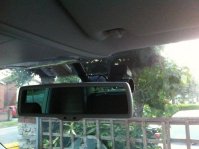
I decided I wanted to mount the device centrally and close to the rear view mirror so as not to stand out too much or obstruct the drivers view. The install is really quite simple thanks to the device simplicity.

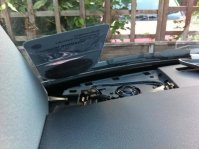
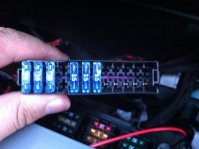
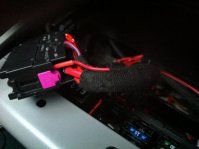
I wanted to find a permanent live with a spare busbar so that I could utilise the Parking Recording Function, I checked in the main dash fuse panel but nothing so I looked at the Auxiliary panel under the passenger seat and struck lucky, a whole row of spare fuse ways on a busbar which is also easily accessible.

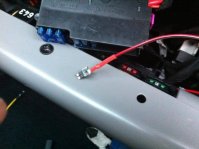
The plan was to run the cable down the passenger side A Pillar, into the footwell, under the carpet and then under the seat to the fuse panel.

I'm afraid one or two of the pictures are not as good as they should be but the light was closing in.

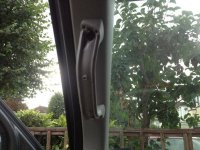
Remove the front cover from the grab handle by gently levering the cover off to reveal two torx screws, remove those and pull of the handle.

Handle_zpsd0119f02.jpg

Gently lever out the speak cover plate.

SpeakCoverRemoved_zps3dd29118.jpg

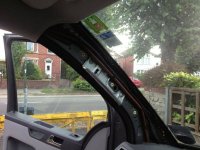
Now starting from the top pull the A Pillar cover away and put it to one side to reveal the A Pillar.

APillarTrimRemoved_zpsdb21f0e2.jpg
 

Attachments

  • Handle_zpsd0119f02.jpg
    Handle_zpsd0119f02.jpg
    73.1 KB · Views: 9
  • APillarTrimRemoved_zpsdb21f0e2.jpg
    APillarTrimRemoved_zpsdb21f0e2.jpg
    64.3 KB · Views: 11
  • SpeakCoverRemoved_zps3dd29118.jpg
    SpeakCoverRemoved_zps3dd29118.jpg
    58.5 KB · Views: 12
Tilt the passenger seat fully forward, rotate to face the rear and then slide to the rearmost position, this will give you best access to the under seat electrics.

Next we need access to the end of the dashboard and down towards the carpet area.

Gently lever out the dashboard end panel which contains the Airbag Deactivation switch. Unplug the switch and place the panel to one side. You are safe to unplug this so long as you do not switch on the ignition - If you do you will end up with an Airbag warning.

AirbagDeactPlug_zps893245bc.jpg

Next pull away the door rubber in the lower section of the door frame. Ease out the California light from the 'A' end and unplug it.

CaliforniaLightRemoved_zpsde058a80.jpg

With the California light removed you can pull up the door step. This is quite tight but it pulls straight up towards the roof so give it a good tug but don't pull it right out, leave the bit near the seat belt fixing in place. Now you have this out of the way you'll have good access to under the carpet.

Now reach under the seat and you'll find towards the centre it is quite usefully cut to allow cables through and there will already be plenty through there. It may take some tweakery but you can get the free end of the hard wire kit under the carpet from the step area and up under the seat.

At this point I discovered the whilst it is likely the hard wire kit is adequate for many installations, it's just not quite long enough for this Cali installation. Not a huge problem, I extended it using some Automotive 2 core cable I had. I cut off the supplied earth terminal and fuse carrier, crimped on the new cable.

CableExtensionCrimped_zps0f4eb826.jpg

AirbagDeactPlug_zps893245bc.jpg

CaliforniaLightRemoved_zpsde058a80.jpg

CableExtensionCrimped_zps0f4eb826.jpg
 
Some heat shrink added for good measure.

CableExtensionHeatShrunk_zpsb19ca4e4.jpg

Now run the cable from under the carpet, up the wheel arch and towards the A Pillar, work the cable up the roof lining

Fix the device in your chosen position on the windscreen and then plug in the power cable. I have Rain & Light Sensor so there is a tube that runs to the mirror with the cables in it. I added a black cable tie to this tube to hold the cable to it. Set the cable tail to a suitable length at the device and then feed the cable up under the edge of roof lining towards the A Pillar and secure it utilising the existing fixings that hold the roof drain tubes and other cable in place. Adjust the cable to take care of any slack, feeding this back under the carpet to the seat base.

The section of the fuse panel we'll use can be conveniently removed from the main housing by releasing the clip to the right end of it and pushing it out of the bottom of the holder.

In the this picture you can see the section removed and showing the spare busbars.

FuseHolderRemoved_zpsde1472dd.jpg

The terminals that fit into the fuse panel can be purchased from VW. The part number for these ones is TBC

CrimpTerm_zpsa4a02596.jpg
 

Attachments

  • CableExtensionHeatShrunk_zpsb19ca4e4.jpg
    CableExtensionHeatShrunk_zpsb19ca4e4.jpg
    41.3 KB · Views: 8
  • FuseHolderRemoved_zpsde1472dd.jpg
    FuseHolderRemoved_zpsde1472dd.jpg
    43.1 KB · Views: 9
  • CrimpTerm_zpsa4a02596.jpg
    CrimpTerm_zpsa4a02596.jpg
    58.7 KB · Views: 9
Here you can see the terminal fitted and some heat shrink applied. It is important to ensure you retain the correct polarity of the device as you have removed the factory supplied terminals.

LiveTermHeatShrunk_zps5c5ad097.jpg

You can also see from the above picture the pink locking tab which must be slid slightly to the right in order to allow the new terminal to be inserted from below.

Some VW wiring loom tape added to tie it neatly into the existing wiring loom. Part Number 000 979 950.

LiveTermTaped_zps62548c11.jpg

TapeNo_zps4a13d7e1.jpg
 

Attachments

  • LiveTermHeatShrunk_zps5c5ad097.jpg
    LiveTermHeatShrunk_zps5c5ad097.jpg
    47.3 KB · Views: 9
  • TapeNo_zps4a13d7e1.jpg
    TapeNo_zps4a13d7e1.jpg
    51.9 KB · Views: 7
  • LiveTermTaped_zps62548c11.jpg
    LiveTermTaped_zps62548c11.jpg
    40.7 KB · Views: 7
Now you'll need to attach an earth terminal. The most convenient location I found was to use an adjacent securing screw so after confirming it had a good path to earth I fitted a terminal and secured it under the screw head.

EarthTerm_zps5e628c7f.jpg

As in all good manuals, refitting is the reverse of taking it apart! :laugh2

Here is the empty bracket in place.

EmptyBracket_zps9e18e4f9.jpg

And with the device fitted. You'll notice i have installed it quite tight to the centre which has the effect of keeping the LED's almost obscured by the rear view mirror and thus should prevent them from becoming a distraction.

CamInside_zps098b1a53.jpg
 

Attachments

  • EarthTerm_zps5e628c7f.jpg
    EarthTerm_zps5e628c7f.jpg
    58.5 KB · Views: 7
  • CamInside_zps098b1a53.jpg
    CamInside_zps098b1a53.jpg
    45.8 KB · Views: 7
  • EmptyBracket_zps9e18e4f9.jpg
    EmptyBracket_zps9e18e4f9.jpg
    58.1 KB · Views: 6
And from the outside.

CamOutside1_zps56afb285.jpg

CamOutside_zps716584d5.jpg

I've not tried it in anger yet but from what I see with the van parked on the drive the quality is excellent, even in poor light.

Should people be looking to purchase one of these devices or another cam from the range I have been given some special discount codes for VIP's.

The offer is:-

1) 10% discount from the entire shopping basket. Discount code in VIP section.
2) 1 Free hardwire cable (£9.99) per order. Discount code in VIP section.

For the first 4 weeks (commencing 17 July 14), there is an additional 5% discount (15%) total. After the 4 weeks it will revert back to 10%.

Website - http://www.ipixi.com
 

Attachments

  • CamOutside1_zps56afb285.jpg
    CamOutside1_zps56afb285.jpg
    26.3 KB · Views: 5
  • CamOutside_zps716584d5.jpg
    CamOutside_zps716584d5.jpg
    44.1 KB · Views: 5
I have been considering dash cam, great post and info Stu thanks :thumb
 
You're welcome to come round and have a look Andy. :thumb

Also more than happy to help with an install if you need any.
 
:thanks
thanks for offer Stu. Do not feel I would have the confidence to hard wire think I would like to see how it works for me plugged in for a while. Hope you can geta forum discount aggreed to
Best Wishes Andy
 
HY09UMU said:
:thanks
thanks for offer Stu. Do not feel I would have the confidence to hard wire think I would like to see how it works for me plugged in for a while. Hope you can geta forum discount aggreed to
Best Wishes Andy

If you do buy one then I'd be more than happy to do the hard wire for you if you wanted. :thumb
 
Thank you may well take you up on that :thumb
 
I have noticed, when trying to use my mini HD camcorder that the car mode is supposed to turn the camera on and off determined by the power supply. Generally the dash 12v plugs come on and off with the ignition but it seems that in the Cali, mine at least, that the front 12v sockets stay live when the engine off. I had expected this of the rear 12v sockets which run from the leisure batteries but not those in the cab area. Anyone found this in their Cali? It doe mean that most dash cams will need some other form of power supply or the main battery will be on constant drain.

Andy80F
 
The two 12v sockets in the cab seem to always live in mine. Saw mention of this with another poster (another forum) but thats the only reference I could find. It makes my dash cam use a bit of a pain as cannot just leave it to start and stop automatically but might also be useful knowledge for those who leave GPS etc plugged in when away from the van and risk the battery discharging (though that would take a fair while).
 
For most Dash Cams what you have is exactly what is required, a permanent live.

The Dash Cam can record incidents whilst you are away from the vehicle. The low voltage protection circuit should prevent full battery drain.
 
One at the rear for the spare wheel thieves would be handy?
 
Stu said:
The section of the fuse panel we'll use can be conveniently removed from the main housing by releasing the clip to the right end of it and pushing it out of the bottom of the holder.

In the this picture you can see the section removed and showing the spare busbars.

FuseHolderRemoved_zpsde1472dd.jpg

The terminals that fit into the fuse panel can be purchased from VW. The part number for these ones is TBC

CrimpTerm_zpsa4a02596.jpg

Hi Stu, do you have the part numbers for the terminals? I'm thinking of doing a similar thing for my kitchen pod and also the elec feed to a recently installed parking heater. The pod uses 6mm cable (to combat voltage drop) so its quite 'chunky' , do the terminals have a size range?
:thanks
 
One of the original posts mentions a club discount may be available - did this ever happen? I don't see it in the list.

I've been thinking about getting something like this and this one looks good.

dan
 
Dan there up is a 10% discount until end of July

MYOPINIONdisCOUNTS
 
Owen,

I think it might have been you I waved at the other day. If so you'll know I'm not too far from you. If you want to drop by sometime you can have a look as I have a varied range of them.

Drop me a PM. :thumb
 
For anyone interested in purchasing one of these or another cam from the range I have been given some special discount codes for VIP's.

The offer is:-

1) 10% discount from the entire shopping basket. Discount code in VIP section.
2) 1 Free hardwire cable (£9.99) per order. Discount code in VIP section.

For the first 4 weeks (commencing 17 July 14), there is an additional 5% discount (15%) total. After the 4 weeks it will revert back to 10%.

Website - http://www.ipixi.com
 
Brilliant, thanks Stu.

dan
 
Will be getting one, spend a lot of time on country lanes and while I drive quite slowly and in the knowledge I have soviet era brakes, forever meeting people coming the other way who have great faith in their reaction times and modern brakes!

My fear is that having a LHD van that someone will try and use this against me in the event of a collision (ie, he was on the wrong side of the road type thing).

Do you have GPS? I like the idea, but more from a geeky toy point of view :D
 
Yes I have the GPS base and also a spare base for the car so one camera does two vehicles so long as only one is on the road of course.
 

Similar threads

Back
Top