Buy all your VW California Accessories at the Club Shop Visit Shop

ISO TOP FITTING - Please Help!

The Mighty Pauls

The Mighty Pauls

Messages
92
Location
BRISTOL
Vehicle
T5 SE 180 4Motion
Hey there lovely people!

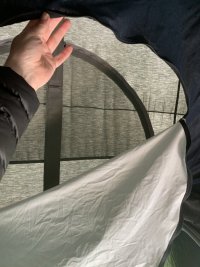
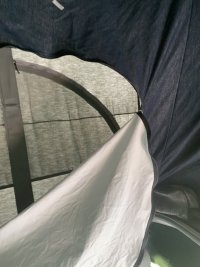
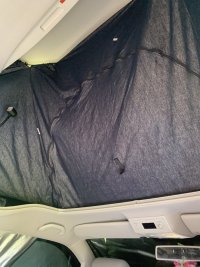
I purchased a second hand ISO Top from a club member back in the late Autumn, and have only just got round to fitting it (I was waiting for the 'warmer' weather for the adhesion). Upon inspection - it seems slightly different to the ones I've seen in the fitting videos on here - perhaps it is an older model.

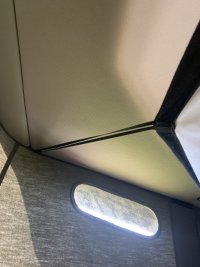
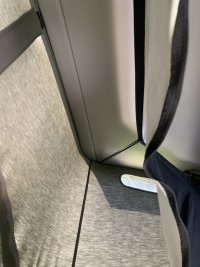
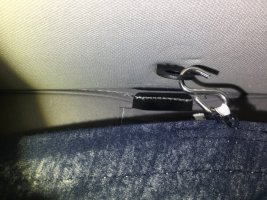
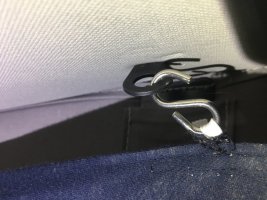
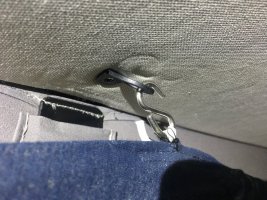
It doesn't seem to have any black tabs which attach it to the front, but has several hooks instead, which don't appear to attach to anything? Any thoughts?

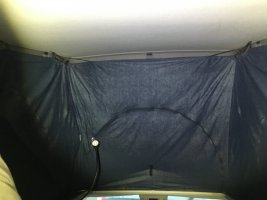
When i did manage to get the thing in - there is a large gap at the front which leaves about 9 inches of space between the iso top and the front window - I'm pretty sure the ISO top is supposed to fit up against the bellows?

Apologies if I am just being dumb - but any help would be hugely appreciated!

I have a 2013 SE.

All the very best.

Aaron
IMG_5446.jpeg

IMG_5443.jpeg

IMG_5442.jpeg

IMG_5445.jpeg

IMG_5444.jpeg
 
If it’s the one that was sold from the club shop, the elastic should be tied to the fixings for the child safety net, not the top corners of the roof, which your pic seems to show. But looking at your pics I don’t see that would resolve your issue.
Do you know what make your liner is?
 
If it’s the one that was sold from the club shop, the elastic should be tied to the fixings for the child safety net, not the top corners of the roof, which your pic seems to show. But looking at your pics I don’t see that would resolve your issue.
Do you know what make your liner is?
Thanks for getting back. It’s definitely Brandrup.

Some of the hooks attach to the loops further down towards the rear (I’m assuming that’s what you mean about the child safety net) but there are others too which I have attached to the front.
Best wishes.
 
Thanks for getting back. It’s definitely Brandrup.

Some of the hooks attach to the loops further down towards the rear (I’m assuming that’s what you mean about the child safety net) but there are others too which I have attached to the front.
Best wishes.
Hopefully someone with experience of the brandrup one can help.
 
My suggestion would be to Email Brandrup themselves. Send them your photos and they should be able to help answer your questions. They speak excellent English and could probably help over the phone.

I have fitted three Brandrup Isotops, the first being to our 2015 180 SE 4Motion. Looking at your photos I think that you're right in that you have an older model. The colour of the material used is a good indication. They are now light grey in colour. Don't despair though as I'm sure it will fit. The design of the SE hasn't changed that much over time.
Very much appreciated Borris. Perhaps perseverance is the key. But I will definitely try Brandrup.
Best wishes
 
Very much appreciated Borris. Perhaps perseverance is the key. But I will definitely try Brandrup.
Best wishes
If you discover that the fitting design is different on the earlier Isotops then why not ask Brandrup if they do a kit to modify yours to the current neater spec? I can't see any other reason why that couldn't be done. Failing that ask if they could send you the necessary parts. I think you may only need the three missing black stiff hinged Velcro roof tabs and three more light weight material tabs to sew to your Isotop liner. You could buy the latter from any haberdashery but the hard hinged velcro tabs are more of a purpose made item.

The front end of the Isotop is usually held up by the three aforementioned stiff hinged velcro tabs. They have to be inserted/forced into the transversal join in the ceiling headlining. Corresponding mating velcro tabs are incorporated (sewn) into the top outside edge of the Isotop with one tab in the middle and the others to either sides. I no longer have our SE so I suggest asking Brandrup or the forum for exact spacing measurements for these tabs. Providing you can lay your hands on the necessary bits, adapting your Isotop should be straightforward, It should only involve hand sewing the velcro mating tabs to the Isotop liner.

One further thought. I think the club shop does or did a fitting kit for those people that want to transfer their Isotops to their new vehicle. I don't know what that kit includes but it may be worth asking before you go any further.

As you haven't sent photos, I assume that the rest of the fit is satisfactory.

Good luck.
 
Last edited:
If you discover that the fitting design is different on the earlier Isotops then why not ask Brandrup if they do a kit to modify yours to the current neater spec? I can't see any other reason why that couldn't be done. Failing that ask if they could send you the necessary parts. I think you may only need the three missing black stiff hinged Velcro roof tabs and three more light weight material tabs to sew to your Isotop liner. You could buy the latter from any haberdashery but the hard hinged velcro tabs are more of a purpose made item.

The front end of the Isotop is usually held up by the three aforementioned stiff hinged velcro tabs. They have to be inserted/forced into the transversal join in the ceiling headlining. Corresponding mating velcro tabs are incorporated (sewn) into the top outside edge of the Isotop with one tab in the middle and the others to either sides. I no longer have our SE so I suggest asking Brandrup or the forum for exact spacing measurements for these tabs. Providing you can lay your hands on the necessary bits, adapting your Isotop should be straightforward, It should only involve hand sewing the velcro mating tabs to the Isotop liner.

One further thought. I think the club shop does or did a fitting kit for those people that want to transfer their Isotops to their new vehicle. I don't know what that kit includes but it may be worth asking before you go any further.

As you haven't sent photos, I assume that the rest of the fit is satisfactory.

Good luck.
Thanks SO much for all the info Borris - yes the rest of the fit seemed to work, however, I am still a bit confused as to why there is such a large gap between the front the ISO Top and the front of the bellows. Hopefully once I have the correct tabs, everything may be stretched a bit and things will work better.

Can't thank you enough.

Aaron
Can you easily stretch the Isotop to a position directly beneath where the three velcro tabs would be locacted: ie into the transverse ceiling joint? If you can then all should work fine. If not then the design and cut of the version you have may be entirely different. Again I'd advise having a chat with Brandrup. Look it up online and phone the number in the Netherlands. They are usually very helpful.

The later version's fixings ensure a much tighter fit to the ceiling all around the perimeter.
 
Thanks SO much for all the info Borris - yes the rest of the fit seemed to work, however, I am still a bit confused as to why there is such a large gap between the front the ISO Top and the front of the bellows. Hopefully once I have the correct tabs, everything may be stretched a bit and things will work better.

Can't thank you enough.

Aaron
Even if you fit the Brandrup velcro tabs the isotop is still a few inches away from the bellows but it works fine.
On the second link I sent you with the photos it appears the top cord attaches to the front hoops on the top corners (which I assume push or screw into the roof) then you tighten the cord to pull a line of cord across the roof and the isotop hooks onto this cord, have you tried that?
 
I purchased a second hand ISO Top from a club member back in the late Autumn, perhaps it is an older model.
You have an original Mk1 Goretex version. New versions improved the fit but dropped the Goretex fabric though.

It doesn't seem to have any black tabs which attach it to the front, but has several hooks instead, which don't appear to attach to anything? Any thoughts?
It won’t have the Velcro tabs because there isn’t any on this model only six elastic straps with plastic hooks. Four hook onto the child net tabs already fitted to the roof lining, two just push in-between the headliner and frame like in the photos I posted shown in the link above.

When i did manage to get the thing in - there is a large gap at the front which leaves about 9 inches of space between the iso top and the front window - I'm pretty sure the ISO top is supposed to fit up against the bellows?
Unfortunately no, only the new versions after the MK1. There is a gap and there is nothing really that can be done to make it fit like the versions that followed unless you are handy with a sowing machine and are able to sow new panels in the front corners to allow it to fit without the gap. I wouldn’t worry, those photos you posted look as if you have done a really good job at fitting it. I would recommend using the brandrup Velcro that would have supplied when new around the bottom base and the back edge. I used Velcro’s own Velcro at first and had no end of trouble with it always coming away. Bought the proper stuff and it’s been fine ever since. (mine was ex display so second hand) The other thing I would recommend is making the middle tabs fit better. There is a post showing a couple of ways to to this, one was to use plastic taps from an ice cream container and the other was what I done was to fit a couple of new roof tabs in the headlining, attach a hook and sew a piece of elastic on the hem, secured it by hooking to the roof tab similar to the front. Just stops the middle sagging and stops it coming away from the Velcro at the support ribs and at the back.

7F3A4DA5-E22F-4966-A10B-10C2E6E650DA.jpeg

1DB95FFA-FE6E-4007-9B00-BC558C0B0E9E.jpeg

B47D3EB0-624A-4F0A-B6E4-ED773FA7C2EE.jpeg

D5CDE993-A8DA-41E6-92F2-995B5F24E5A1.jpeg
 
Wow - thanks so much for this! You guys really are the best!!

Great to know I'm not going mad at least!

Quick question... in your experience - with so many gaps around the top etc, do you think the ISO Top still provides decent insulation? It did feel very drafty when I slept up there last weekend (although it was quite windy!).

I also contacted Brandrup last week as suggested and they have been most helpful with advice also, so between everyone's comprehensive guidance, I think I may have cracked this! I honestly think this is the greatest forum ever.

All the very best!

Aaron
Tbh I personally don’t think there is any insulation value in any of the iso-tops, if there is it’s very little. I would think of it as a inner tent that stops rain water getting the bedding damp from capillary action from the bellows and a very good dark shade, the bellows are far to light, the new white ones look even worse.
You shouldn’t try to eliminate drafts because you will just cause condensation inside. Our iso-top has been on after our first outing after purchasing because of the light bellows fabric, so a good eight years or so and I’ve never felt cold enough not to sleep in the roof in all seasons even at the opposite end of scale in summer in the south of France, never had a problem over heating. Doubt the new versions are any better anyways, they just look more tidier at the hatch end. All the versions that have been produced shouldn’t really touch the bellows, makes sense to have a gap. If you are wanting to ‘upgrade’ the middle fixing point I have the part number for the child net roof tabs, just order a couple from VW. No need to order the riv-nut and screw, just glue the tabs into a 8mm hole, (use expanding glue). Just don’t drill through the roof
The newer version definitely seems to be a better fit to the ceiling. However in any form they will keep the upstairs darker and pretty draft free. The majority of the insulation quality afforded by these Isotops is in the air being sandwiched between the two layers. They also helps to keep the top deck damp free.

Here are some photos of an Isotop fitted in our previous T6 Beach.
20191026_234314.jpg20190728_101730.jpg
 
Back
Top