Buy all your VW California Accessories at the Club Shop Visit Shop

What's wrong with our awning (collapsed in rain)?

Ting Tong

Ting Tong

Top Poster
Lifetime VIP Member
Messages
1,360
Location
South Wales
Vehicle
T6 Ocean 204
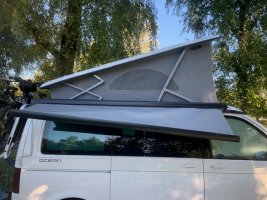
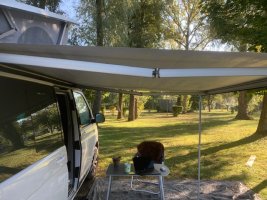
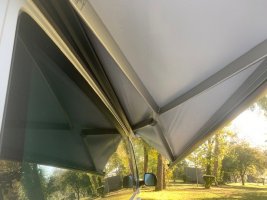
Besides being knackered, does anyone have any ideas what might be the issue with our awning before I rush out and buy the wrong part(s). We were using it as a rain shelter on Monday in Avignon to cook outside and whilst I'd set it at an angle and the rain was running off nicely, there was a huge downpour whilst we were inside having dinner followed by a crash. I went out to find the front end collapsed and the leg extended out but not broken or shortened.

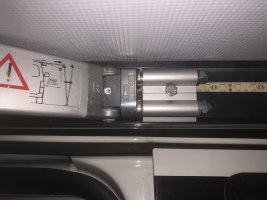
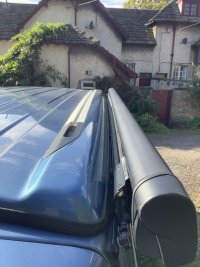
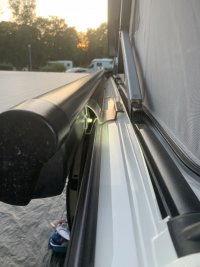
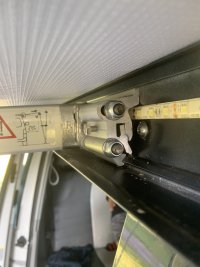
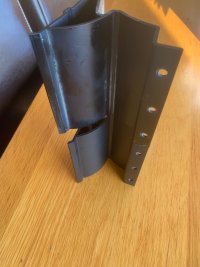
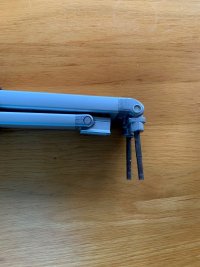
It works ok and looks fine when it's out but you have to close the door, otherwise the front catches when you wind it in. The front arm and joint look ok but the downwards force on the front support leg is now much more than the rear and the front end of the housing looks a bit more twisted clockwise (when viewed from the rear: see second pic). I'm wondering if the upper end of the front mounting bracket has bend outwardly as it is much more r-shaped than the rear one (see first pic). Any help appreciated. Thanks.

end.jpg


side.jpg


fully out.jpg


half out.jpg
 
What bad luck. It sounds like the rain just couldn’t run off fast enough during the deluge and once it started to pool the awning was doomed.

I can’t see it in the pictures, but I expect that the front support arm has twisted, possibly at the elbow but maybe at the bracket or bracket hinge.
 
Hi Ting Tong

sorry to hear your woes

it looks like the brackets holding the awning to the van have bent away from the van. The awning should be a lot closer to the van.

try either the club shop or Rose awnings for replacement brackets

alternatively you could remove the awning and brackets and whilst off the van bend them back carefully to the correct shape.
make a cardboard template of the side profile of the existing and as they should be so so can use it as a gauge when bending the bracket back

im surprised the pop rivets have not sheared ( be careful when bending that the rivets do not break )

edit I’m without my van at the mo, maybe someone could take a photo in the same profile as yours (along the van) to assist you in assessing how much the brackets have bent and how much to move them back into shape

Thanks. Yes, I suspect the front bracket (Part No. 7H7 877 238 B9P 7) but, as you say, a similar picture of another Cali would be useful or a meet up with another Cali owner in Cardiff when we're back before I drop £70 quid on a bracket or £170 on an arm. Typically, there were loads of Cali's last week on our site near Perpignan but none now we're heading north.
 
Last edited:
Hi ting tong

This thread may help it has photo in a similar orientation to yours and shows the brackets holding the awning close to the van


hope that helps some

7CA319C5-1EB7-4894-98F4-F9C4098D1939.png

20383674-4080-427E-87BA-C963DA63E4A5.png
 
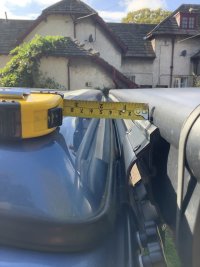
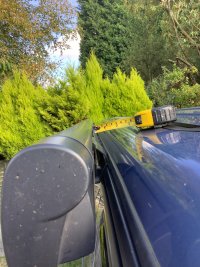
Just took these pics with a tape measure as a rough guide. You should get an idea if the brackets are bent or not.
First pic is rear bracket and last pic is front.

C30977C8-0F79-42F3-99BD-E2609804F8D2.jpeg

79CF5E50-4803-4872-BC46-F967B5C6E3FF.jpeg

F2E10E8C-6165-481F-890F-7BAB672009A9.jpeg
 
Hi Ting Tong

I know your away, so will be doing some mileage

just wanted to highlight something in your photo

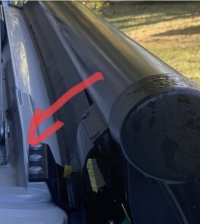
the rear bracket look like it has moved on it mounting the bracket looks to not be sitting square against the roof profile.
May be worth checking the screws are as tight as you can get them

see marked up photo I’ve tried to highlight

D7362228-425C-44FF-B771-BA70C35EF9AE.jpeg
 
Although possible the bracket is bent I’m not sure how that would cause the issue in the second photo of the 1st post.
If the arms don’t look bent have you checked whether the fixing point at each end of the arms has moved on the awning casing or the front of the awning.
The awning brackets always look a bit wonky as they compensate for the curve in the roof line.
If you do determine that the brackets are bent I would recommend replacing rather than trying to strengthen as they are likely to end up weakened.
 
Just took these pics with a tape measure as a rough guide. You should get an idea if the brackets are bent or not.
First pic is rear bracket and last pic is front.
That’s really useful thanks. I’ll measure it when we get back to the UK. It certainly looks further out at the front.

Hi Ting Tong

I know your away, so will be doing some mileage

just wanted to highlight something in your photo

the rear bracket look like it has moved on it mounting the bracket looks to not be sitting square against the roof profile.
May be worth checking the screws are as tight as you can get them

see marked up photo I’ve tried to highlight
Thanks! Yes I wondered that and went back up to have a look but I think it’s because of the roof curve.
Although possible the bracket is bent I’m not sure how that would cause the issue in the second photo of the 1st post.
If the arms don’t look bent have you checked whether the fixing point at each end of the arms has moved on the awning casing or the front of the awning.
The awning brackets always look a bit wonky as they compensate for the curve in the roof line.
If you do determine that the brackets are bent I would recommend replacing rather than trying to strengthen as they are likely to end up weakened.
I can’t see any evidence that either end of the arm has moved as there would either be scrapes or a difference in appearance of the newly exposed surface. I don’t mind buying a bracket if I know it’s that.
Hi ting tong

This thread may help it has photo in a similar orientation to yours and shows the brackets holding the awning close to the van


hope that helps some

View attachment 85385

View attachment 85386
Thanks. It’s difficult to compare whilst our roof is up but the rear looks ok but there’s a 7 degree difference in the attitude of the awning at the front vs the rear along its longitudinal axis, so I reckon the front bracket…but this doesn’t look bent to me: BB048652-7663-489F-8073-84BD9EC72ED4.jpeg
 
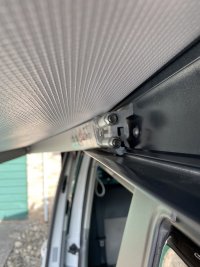
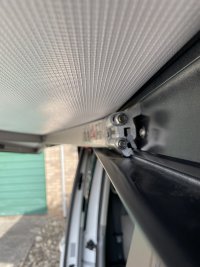
Where the arms join the awning there are 2 bolts, the bottom one is in a round hole but the top one is in a slot / elongated hole that allows the arms to move up and down. Could be worth checking these for damage / if they need tightening. I seem to remember having to tighten one of them to stop the arms scraping on the bottom of the casing.
 
Where the arms join the awning there are 2 bolts, the bottom one is in a round hole but the top one is in a slot / elongated hole that allows the arms to move up and down. Could be worth checking these for damage / if they need tightening. I seem to remember having to tighten one of them to stop the arms scraping on the bottom of the casing.
Yes thanks: it’s definitely slipped back in the upper hole but moving it forwards just makes the downwards angle of the arm worse.631598A6-A27C-4CD5-9264-F19E2C9A1228.jpeg
 
Could the top bolt be bent? Just had a look at mine and if I lift the awning arm so that the bolts look like that the arm is pointing up not down.
14773213-E9DB-4336-95D2-BED3783135EB.jpeg92EA41A0-FFB5-4A3B-BC80-9348E8B4F5DB.jpeg
 
Update: I ordered the black front bracket (Part No. 7H7 877 238 B9P 7) for £68.45 and you can see from the photo it was quite bent. Unfortunately, that didn't cure the problem and the arm still sagged, so I decided to take the front spring arm off and you can see the upper pivot bolt has bent back and it's actually the cast end piece that's twisted not the bolt. I've tried to bend it back but it's impossible, so it looks like I'll have to stump up £187 for the complete spring arm, unless I can find someone with an old arm that's damaged elsewhere and swap the end piece.

bracket.jpg
The bottom one is the new one.spring arm.jpg

You can remove the end casting by punching the pivot out but the part isn't available separately.
 
Thanks everyone: I discovered what's wrong with that our awning and it is now fixed. There were in fact 4 things wrong with it and I am posting this in case it helps anyone else whose awning has collapsed and broken in the rain.

1) the front awning support bracket was bent. I could have tried to straighten it but I couldn't work out how or where it was bent and I was also concerned that the bent one would be inherently weak as it takes all the strain. The brackets are only available directly from VW or indirectly e.g. via the club shop or TPS. They are about £70 each. The VW part numbers are:

Front (black) 7H7 877 238 B9P 7 (silver) 7H7 877 238 C8Q 8
Rear (black) 7H7 877 238 D9P 7 (silver) 7H7 877 238 B8Q 8

This substantially improved the sag but it still wasn't right.

2) I then decided to remove the spring arm and discovered that the upper pivot bolt on the inner end of the arm was bent back and it was actually the cast end piece that was twisted not the bolt. No parts are available for the spring arms of Thule 5102 awnings and you have to buy them complete for £187 each from the club shop. Before I did this, I decided to peruse the Thule awning spares list and saw that a similar part was offered as a spare for the bigger Thule 4900/6200 awnings, so I emailed Hill View Awnings to ask them if it would fit a 5102. They very kindly got one out of stock to compare with the one on a 5102 spring arm and emailed back to say it was different but it looked like it would fit. So, I took a punt and bought it on line from them.

As you'll see from the photo below, it is chunkier but it was dimensionally identical and fitted perfectly. It came with fitting instructions and you have to drill the old one where I have circled in order to be able to remove the hinge pin. Then you have to punch the old in a dimple that's provided.

The Thule part number is 1500602811 and the same part will fit either spring arm: £30.85 plus p&p

This again substantially improved the sag but not enough to be able to wind the awning in without it catching on the open sliding door.

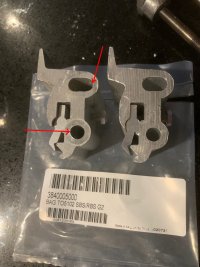
3) The lower pivot bolt of part number 1500602811 rotates in an extruded aluminum bracket fixed to the awning housing. The upper bolt moves transverse itself in an oval-section slot in the bracket according to the angle of the spring arm. On further inspection, I could see that the bracket had some bruising and that the oval slot looked wider at one end meaning that the arm could sag more than it was supposed to (see pic). Again, this part comes as complete assembly with the spring arm and isn't available separately. However, before I resigned myself to a new arm, I again perused the Thule awning spares list and right at the end, just as I was losing heart, I saw a mounting bracket used for fitting a G2 side blocker panel to a 5102 awning that looked the same.

Again I took a punt and luckily the bracket is identical to the one used for the spring arm.

The Thule part number is 1500603376 and the same part will fit either spring arm. £21.80 plus p&p

4) This fully cured the sag but it still just caught the sliding door. I then noticed that the front rail was tiny bit distorted near the outer end of the arm, so I bent it back with a plumbers wrench and I'm pleased to say it now works perfectly and the damage cost me about £132 all in as opposed to the £250 it would have cost if I'd bought a new arm.

Lesson learned though: never leave an awning in the rain unless there's a huge side-to-side angle because a small angle may not be enough if there's a biblical downpour!
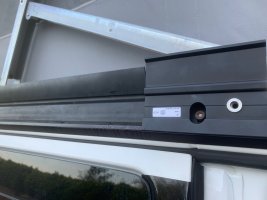
Bracket2.jpg

New front bracket fitted: note the long rubber drip seal pressed into the awning rail behind.
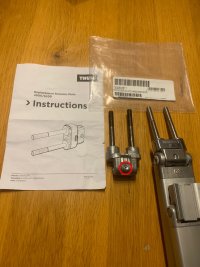
part.jpg

Bracket.jpg

Fitted parts.jpg
Note the top bolt only has a Nylon washer on its outer end. I thought I'd lost it at first then noticed the other arm only had 3 Nylon washers. Don't tighten them too much as they need to move.
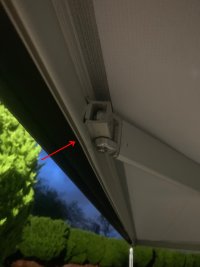
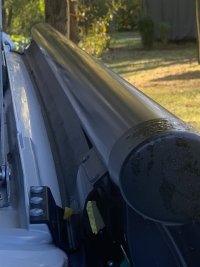
Bend in front rail.jpg
 

Similar threads

inthemidnighthour
Replies
7
Views
2K
briwy
briwy
Vincent123
Replies
41
Views
10K
briwy
briwy
M
Replies
2
Views
2K
Michael Fuller
M
ThomasHJ
Replies
3
Views
373
Ozzy Pete
Ozzy Pete
nigpdreadingfc
Replies
4
Views
385
nigpdreadingfc
nigpdreadingfc
Back
Top