K
King64
I drill a few holes, tighten the panel and seal it. The connection is on the underside of the panel.
I drill a few holes, tighten the panel and seal it. The connection is on the underside of the panel.
It's glued on and seems to form part of the insulation .... at least mine is.I just don't know how to get the headliner off the pop-up roof. is there anyone who can help me with that?
wild camping (if you follow the rules like in scandinavia) also means maximum 2 nights at same site .. never needed more power than batteries could deliver.. I wonder if solar power users ever tried doing without before deciding to drill holes in their roof...Any wild campers ever hooked up a wind turbine for off grid power? Some fairly small vertical ones available.
My roof, my holes, my responsibility ... lol.wild camping (if you follow the rules like in scandinavia) also means maximum 2 nights at same site .. never needed more power than batteries could deliver.. I wonder if solar power users ever tried doing without before deciding to drill holes in their roof...


First off, you don't need to drill holes; there are other ways of installing a solar panel cleanly without drilling (see @Roger Donoghue 's solution).wild camping (if you follow the rules like in scandinavia) also means maximum 2 nights at same site .. never needed more power than batteries could deliver.. I wonder if solar power users ever tried doing without before deciding to drill holes in their roof...
You make some fair points @Roger Boeken but for me solar was a no-brainer. As others have said it removes any charge anxiety if you are off grid. By the way i’d also class campsites without EHU as off grid even though it’s not wild camping.wild camping (if you follow the rules like in scandinavia) also means maximum 2 nights at same site .. never needed more power than batteries could deliver.. I wonder if solar power users ever tried doing without before deciding to drill holes in their roof...
Agree: wild camping is not the same as off grid, many have very good reasons to choose for solar panels but we do wild camping every summer and never needed solar panels.You make some fair points @Roger Boeken but for me solar was a no-brainer. As others have said it removes any charge anxiety if you are off grid. By the way i’d also class campsites without EHU as off grid even though it’s not wild camping.
Just wanted to point out that those who consider wild camping, solar panels is not a must, you better trie before buying. many of you have good reasons to install solar panels no doubt about it.First off, you don't need to drill holes; there are other ways of installing a solar panel cleanly without drilling (see @Roger Donoghue 's solution).
It's not only about wild camping. I've had 2 separate outings already in Italy where I left the camper on a camping site parking (not on a pitch) for a several days while I went off to stay with friends. I think this is safer and more economical than finding a parking garage.
I installed solar so I wouldn't have to worry about the cooler draining the batteries or having to empty and later refurbish its contents. I've now had the cooler running nonstop for over a month through the successive heat waves without a worry. It's as good as I was hoping it would be
Interested to know what the fuel consumption is at 180kmh ?Had this discussion already .... in Germany where I live, I use autobahns. I also use car washes and carry things on the roof.
If I lived in the U.K. and tootled around at 60-70 all the time, didn't use a roof-rack and was prepared to wash the bus by hand, then I'd consider a curly cable - but my requirements are for something a bit more robust. I'm happy for those who choose curly cables, I just don't want one thank-you.
- There is no such thing as an aerodynamic "dead zone" on a vehicle roof when you start using a roof rack loaded with canoes, or other odd-shaped stuff.
- Autobahns are fast ... cruising at 180 km/h is normal - for hours, 200 km/h is not impossible. I simply don't want a curly cable on my roof at those speeds. (I try not to go over 120 with a laden roof-rack).
- I live in a Wasserschutzgebiet (where the groundwater is protected by law) I have to use either a washbox - which is miles away, or a car-wash which is 200m from my front door. It is illegal to wash a car on your driveway - big fines. I don't want to take a curly cable into a car wash.
Everyone has different requirements, and what suits one person may not suit another - it doesn't make anyone "mad" IMHO.
On my 2018 Coast a bit over 11l/100 km while cruising, but much more while trying to reach it. That’s why I never have fuel consumption on display. Too stressful.Interested to know what the fuel consumption is at 180kmh ?
thats not as bad as I feared, I rarely exceed 112 kmh for economic reasons.On my 2018 Coast a bit over 11l/100 km while cruising, but much more while trying to reach it. That’s why I never have fuel consumption on display. Too stressful.
Also, I don’t find it fun driving for long periods at those speeds — even highways have turns that make things slide inside, if you have to slow down (which often you have to) then it’s couple of minutes to get to 180 again. And then you remember you have awning there and all fun is over…
Training myself to enjoy 140kmh…
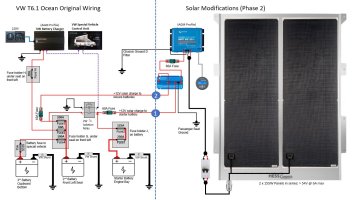
Hi, California,Update .... after much messing around with panels, panel carriers etc. this is the way I have decided to go with a 310W setup ...
Parts List:
2 x Phaesun 310424 MARE FLEX 155 ETFE 155w Solar Panels
1 x Hess Campers 320W Solar mounting plate
1 x Scanstrut DS-H10-BLK cable seal
1 x Aluminium cable conduit 110mm x 50mm x 20mm
1 x 3M VHB Tape GPH-160GF, Grey, 25 mm x 33 m, 1,6 mm
1 x Victron SmartSolar 100/30
1 x 2 pole circuit breaker for isolating panels
1 x 40A waterproof circuit breaker (MPPT to Batteries)
Looks like this ...
View attachment 90225
Next question is where best to attach to the batteries for charging so that the CU continues to function properly ? ... any info would be gratefully received.
Thanks for your commentsHi, California,
I think the work you have done and the information you have shared is just fantastic. A really professional job.
Also thanks for the information etc that other posters have added,
Since seeing your efforts I think I want to go down a similar route. ( I have a portable 150w at the moment)
Firstly can you tell me how well it has performed to date and has it reached your expectation?
Have you made any changes?
On the construction I like the use of the Hess panel plate, so low it seems not to increase the height of the Cali in anyway. Is there any noticeable added wind noise?
The VHB tape mentioned, is that is used to stick the panels to the plate?
Does the Hess plate touch the roof? I am thinking would Helicopter tape be needed to protect the paint on roof surface.
With me the jury is still out on how the cable gets inside. I have in my head that I don’t want to permanently modify the camper in anyway. On the other hand, I do like the neat and professional way you have fitted the cable seal, very neat and smart indeed. So I will decide on this later.
Thank you one again for sharing. A great project.


Hi California,Thanks for your comments
So far I have done 3 weeks in the UK. We weren't stationary for any length of time so it's difficult to say how it will work out long term. The fridge was on setting 4 permanently (setting 5 started to freeze things). We never hooked up to power anywhere. The highest yield was 0,78 kWh and the highest output I saw was 214W .... the weather was mixed for the 3 weeks.
There is no additional wind noise, the increase in height is around 10mm and the solar panels are stuck to the carrier with Sikaflex 291i.
The Hess carrier does touch the roof but is very smooth anodised aluminium, I have lifted it and looked underneath and there is no paint damage so far. It is pretty immobile so there is no reason why the paint should get abraded.
The cable through the roof is really an individual choice. I have done similar installations before on my boat and had no problem with Scanstrut products ... but I can understand the reluctance to put holes in the pop-top. The inner headlining in the pop-top is a layer of insulation and a headlining bonded to the roof, so it's not that easy to get a clean install ... need to be as close as possible to the edge of the headlining and routing the wires through the bonded insulation is not for the faint hearted.
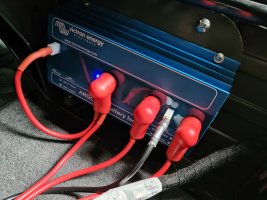
Since my 3 week holiday I have modified the system to charge the starter battery too ... some updated pics ....
View attachment 98109View attachment 98108View attachment 98106View attachment 98107
The battery isolator is a Victron Argofet 100-2Hi California,
I hope you enjoyed your trip to the uk.
Thank you so much for your reply and again superb info.
I agree on comments re hole or no hole. It is a personal thing. But I think i would follow your example as it is a professional fitment with the gland and looks really good.
Can you tell me the Victron number of the additional battery isolator etc you have now added?
A great block schematic that will help me immensely when it comes to fitment.
Thank you.
I am in the process of trying to locate a Hess camper plate which I think makes the the whole job look so good. I do have friends in Switzerland who could maybe help or if worst comes to worst my next trip will incorporate a trip to Switzerland . Do a similar purchase as yourself and fit whilst there.
My Cali is a 2016 T6 and not a 6.1 but I assume the schematics are very similar if not the same.
Big thank you once again.


Hi Californi,The battery isolator is a Victron Argofet 100-2
e.g. https://www.batterymegastore.co.uk/...gofet-100-2-two-batteries-100a-arg100201020r/
If your Cali has a battery isolation relay like the Beach/Ocean then it should be the same wiring. I have never had a T6 so I can't really say either way if they are the same or not.
When I picked up the Hess carrier, there is a small wall next to their premises ... you can park next to the wall and simply lift the carrier onto the roof and bolt it down - 4 hex bolts on each side - I used a blanket to slide it over the roof. I was done in 15 mins. and there is a wonderful campsite a few miles away ...

Home | Camping Giswil
Inmitten intakter Natur, umringt von einer imposanten Bergwelt am ruhigen Südwestufer des Sarnersees gelegen.camping-international.ch
View attachment 98112
... excellent facilities and a great restaurant on site. The owners are very friendly too.
I have tested the battery voltage on starter and leisure batteries when the solar is running and they are both charging ... both were at the same voltage too, give or take 0,01V
The main point is that the MPPT reached float every day ... which means the batteries were always fully recharged after the night before. The idea is to ensure that when the sun starts to fade each evening, you have enough solar to replace all the energy you have used in the last 24 hours with a bit of contingency for bad weather.
This will improve your fuel economy. I would leave it as is and charge to 100% as required.Update on the use of an Argofet to split the solar charge between the starter battery and the leisure batteries. It doesn’t work, or to be more accurate, it works if you never drive anywhere.
Seriously, don’t do this on your van – fit a trickle charger to charge the starter.
I could not understand why I was getting a massive daily yield and poor leisure battery performance from the solar while driving on sunny days, but I think I’ve figured it out.
The Argofet splits the charge between the two battery banks, and the bank with the highest load will draw the most power – great if you want all batteries at 100% SOC, but it is actually a problem in a T6.1.
What exactly do I think is happening ….
The smart alternator/recuperation logic is trying to regulate the starter battery to around 80% SOC (State of Charge), so it can run its recuperation strategies and dump current into the starter battery when braking, slowing down. When the SOC is above 80%, the smart alternator turns off and the vehicle electronics run from the battery to help bring down the SOC to the 80% target.
In my case, when this is happening, the solar is responding to the load on the starter battery and the MPPT controller is pumping out as much energy as possible, most of which is going to the vehicle electronics and not the leisure batteries. The alternator is as good as off, trying to get the starter down to 80%, so it isn’t charging the leisure batteries either - unless I switch Max Charge on.
The upshot is that if I leave the van sitting on a sunny day, everything ends up 100% charged. As soon as I start driving, the recuperation logic tries to run the starter battery back down to 80% SOC while the solar fights to keep it at 100% … I get a situation where the solar is pumping around 11A constantly into the system while the smart alternator is taking the day off. I end up producing a daily yield of around 0.9 kWh, most of which gets used to run the vehicle electrics instead of charge batteries.
This is obviously not working as I intended.
The same will be happening to a much lesser degree with vans fitted with starter trickle chargers, but the effect will be very much reduced as the current drawn by a trickle charger is relatively low – but it will still make any solar installation slightly less efficient in a vehicle with a smart alternator.
I’m now looking at putting a switch on the charge line to the starter battery which will only be closed when I park up the van for a long period of time.
Unfortunately this doesn't happen.And the split charge relay will always leave all the batteries at a similar soc when you are driving anyway. Rather harvest the energy.
? Ignition controlled relay on charging wire to engine battery to cut solar charging when ignition on thus diverting solar output to Leisure Batteries. Ignition Off all Batteries on Solar charging.Update on the use of an Argofet to split the solar charge between the starter battery and the leisure batteries. It doesn’t work, or to be more accurate, it works if you never drive anywhere.
Seriously, don’t do this on your van – fit a trickle charger to charge the starter.
I could not understand why I was getting a massive daily yield and poor leisure battery performance from the solar while driving on sunny days, but I think I’ve figured it out.
The Argofet splits the charge between the two battery banks, and the bank with the highest load will draw the most power – great if you want all batteries at 100% SOC, but it is actually a problem in a T6.1.
What exactly do I think is happening ….
The smart alternator/recuperation logic is trying to regulate the starter battery to around 80% SOC (State of Charge), so it can run its recuperation strategies and dump current into the starter battery when braking, slowing down. When the SOC is above 80%, the smart alternator turns off and the vehicle electronics run from the battery to help bring down the SOC to the 80% target.
In my case, when this is happening, the solar is responding to the load on the starter battery and the MPPT controller is pumping out as much energy as possible, most of which is going to the vehicle electronics and not the leisure batteries. The alternator is as good as off, trying to get the starter down to 80%, so it isn’t charging the leisure batteries either - unless I switch Max Charge on.
The upshot is that if I leave the van sitting on a sunny day, everything ends up 100% charged. As soon as I start driving, the recuperation logic tries to run the starter battery back down to 80% SOC while the solar fights to keep it at 100% … I get a situation where the solar is pumping around 11A constantly into the system while the smart alternator is taking the day off. I end up producing a daily yield of around 0.9 kWh, most of which gets used to run the vehicle electrics instead of charge batteries.
This is obviously not working as I intended.
The same will be happening to a much lesser degree with vans fitted with starter trickle chargers, but the effect will be very much reduced as the current drawn by a trickle charger is relatively low – but it will still make any solar installation slightly less efficient in a vehicle with a smart alternator.
I’m now looking at putting a switch on the charge line to the starter battery which will only be closed when I park up the van for a long period of time.
Funnily enough one of my first circuit digrams had a relay on the charge to the starter battery - In my wisdom I decided not to fit it ....? Ignition controlled relay on charging wire to engine battery to cut solar charging when ignition on thus diverting solar output to Leisure Batteries. Ignition Off all Batteries on Solar charging.
The VW California Club is the worlds largest resource for all owners and enthusiasts of VW California campervans.

