Buy all your VW California Accessories at the Club Shop Visit Shop

CONTROL PANEL KNOB

Thanks for that, I haven’t done it yet, couldn’t find the torx 5 I used to have, so I’ve ordered one from eBay. Was the date and time easy to set afterwards? I’ll be super careful with everything, it’s bettter to try this for £35 rather than give vw close to a grand. Really sick of dealerships and their greed.
I’ll post how I get on, if I have anyone with me I’ll get them to make a video maybe of the process
No problem with the date and time settings. When your remove the small heater plug (the smallest of the three) this has a metal tab, just be careful you don't ping it off as I did, I spent an hour looking for it!, I just reattached it with superglue and it works without a problem. Follow the download sequence for reinstalling, small heater plug first, then you'll have no problems. Best of luck!
 
No problem with the date and time settings. When your remove the small heater plug (the smallest of the three) this has a metal tab, just be careful you don't ping it off as I did, I spent an hour looking for it!, I just reattached it with superglue and it works without a problem. Follow the download sequence for reinstalling, small heater plug first, then you'll have no problems. Best of luck!
Thanks. Dreading it, but has to be done. Probably try this weekend
 
Took myself and a friend away for the weekend to Elan Valley Wales, found a nice campsite and went on to set up camp. Went to pop the roof up but felt the button didn’t feel right on the control panel. It was spinning and only catching randomly, so I was too worried to pop roof up in case I couldn’t get it back down again if button didn’t catch again. So we both had to sleep on bottom bed with a dog. Not too much sleep had lol

Anyone know what this will cost to fix? Can I buy a button panel without forking out silly money for a complete control panel? Keep reading things like it will cost 500 quid when it’s just a button issue. If that’s so, then VW are taking the pee and are designing stuff to make them more money, and make us considerably poorer.

If there is a button panel to purchase, are they easy to fit? Any instructions posted here at all? Would I need to disconnect battery/batteries? Would disconnecting batteries bugger anything up like settings that I couldn’t reset without a computer or something ridiculous? Lol

I’ve always been super careful and gentle with this knob button because I read they were delicate from day one of owning my Cali, really don’t understand how it’s gone wrong so quickly as I haven’t camped that much to justify any real wear and tear on that button.

Anyone ever done this job themselves?
Thanks in advance for any advice.
Hi dod4luce, takes no more than 45mins, buy new knob from shop there is a down load on the page, step by step, very easy and a better quality knob.
 
Hi dod4luce, takes no more than 45mins, buy new knob from shop there is a down load on the page, step by step, very easy and a better quality knob.
Got one from the shop already, and now my screwdriver has arrived I’m all set for the weekend hopefully. Thanks
 
Bought a little set for mobile phones. Probably a t6 in there hopefully. Thanks for that info though
 
Can anyone explain these plugs which are meant to be connected with the smallest first? I don’t see them in the instructions, or is it the one with the clip that folds back? Are there two in there? Help lol going to attempt this tomorrow
 
I’m assuming it’s this, found this image whilst trolling through the forum

EB038887-39B4-48C5-85FD-27DD36A4C9C9.jpeg
 
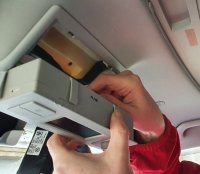
I recently did the control knob repair. There's information in the download section on how to do it, but I think it's not detailed enough. To get the control panel out, there's two retaining clips left and right at the bottom, just put a thin screwdriver in one at a time and move the bottom outwards, now what the download doesn't say is there's two clips on the top about 30mm in from each side. With the bottom partially out, put your thin screwdriver in from the front (as this can't really be done from the rear) and work the clips down to bring the unit out. Having got the unit on a table, break the seal to open the unit. Please be careful you don't strain the contact strips. The rest of the download detail is correct, but you have to adjust the retaining screws to get the knob to work properly. Best of luck though, I found this quite difficult and tricky!
What you told me there was soooooooo useful. I wouldn’t have got it out or might have broken something. Thanks for that info. Really helped me
 
Just done mine and want to say thanks to everyone who had contributed to this knowledgebase! It don’t think it’s particularly easy and every little piece of advice was useful.

So, for people doing this in the future, I’ll add my thoughts:

1) Treat your rotary knobs on thé control panel with extreme care; although possible, the repair is not a bundle of fun. I’d rotate them very gently.

2) If you get early symptoms (basically the rotation not appearing to have its desired effect), I would try and do the job at home to prevent a campsite job. The inability to lower the roof from the menu would be the worst - but I suspect you get early symptoms before a total failure . Mine was slipping one way, working the other.

3)All the forum info was useful - all thé chat and the 2 shop videos and the video in Spanish.

4) A precision tool set with the T6 Torx bit and the pry tools is very useful (eBay)

5) Tricky bits were:
a) removing the control panel...releasing the top tabs on the control panel, mine seemed to self release on rotating the unit out, having released the side tabs. I started to put a thin spoon handle behind the surround at the top just to one side of the display ... but it all then released.
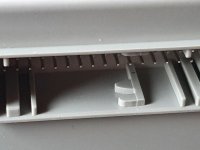
b) releasing all the little tabs to open the unit. Slightly pulling apart at you push the tab seemed to work for me.
The rest was straightforward following the videos carefully.

6) A few forum Qs asked about cable connection order when putting the control panel
I did: Disconnnect big-med-small and connect small-med-big ... worked for me.
 
Just did mine whilst travelling in Greece, video and instructions together cover it nicely along with a little patience.

I found it was a Torx T6 rather than T5 it says in instructions, also used a dinner knife and small flat head screwdriver.

Trickest for me was extracting the Control Panel from fascia. No specific beta on this, just patience.

The Torx screws were tricky to tighten, I fear I may have slightly rounded one when tightening to get the circuit board tight enough for the buttons to engage and work. Not sure how I'll get round that next time when re-opening, any suggestions welcome.

Thanks everyone for all the info.
 
I recently did the control knob repair. There's information in the download section on how to do it, but I think it's not detailed enough. To get the control panel out, there's two retaining clips left and right at the bottom, just put a thin screwdriver in one at a time and move the bottom outwards, now what the download doesn't say is there's two clips on the top about 30mm in from each side. With the bottom partially out, put your thin screwdriver in from the front (as this can't really be done from the rear) and work the clips down to bring the unit out. Having got the unit on a table, break the seal to open the unit. Please be careful you don't strain the contact strips. The rest of the download detail is correct, but you have to adjust the retaining screws to get the knob to work properly. Best of luck though, I found this quite difficult and tricky!
Thank you for your help. We have never done anything like this before but the instructions on this forum are amazing, we couldn't have done it without you all!
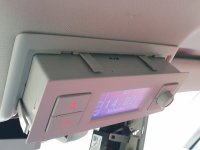
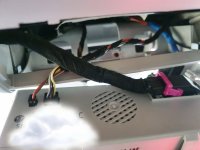
Here are some extra photos!
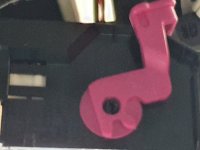
When reconnecting the big connector it took us a while to realise that the pink thing helps to pull in the connector to tighten the whole thing up.
It was a fascinating exercise and we were so pleased when everything worked when we finished. This forum is the best, thanks everyone

20201128_140232.jpg

20201128_224248.jpg

20201128_135746.jpg

20201128_135712.jpg

20201129_210047.jpg
 
Last edited:

Similar threads

E
Replies
22
Views
2K
CityCali
C
Brianc26
Replies
11
Views
2K
Grumpy Mike
Grumpy Mike
I
Replies
17
Views
1K
Irishladdie
I
Back
Top