Pop-top vent covers

  • Thread starter Almost bought a california
  • Start date
Almost bought a california

Almost bought a california

Messages
14
Location
Kettering
Vehicle
T6.1 Ocean 150
I’ve been looking for a way to block one or both pop-top vents when the temperature drops a bit or the wind gets up. I was looking for a method that would be invisible when not in use and could be left in place when raising and lowering the roof.

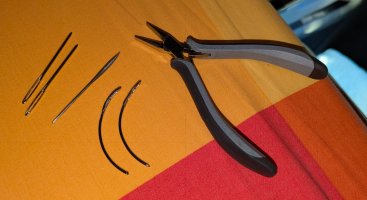
Velcro would have been the easy option but I thought the Velcro would be unsightly and wasn’t sure how well it would last so I opted for some darning needle inserts and fabric covers with magnet inserts – I used 2mm thick nickel plated steel needles (not the stainless steel needles which would non-magnetic) and 10mm*20mm*2mm magnets.
1733153154487.png
The end needles are easily bent to match the 40mm radius of the piping surrounding the vets
1733153180254.png

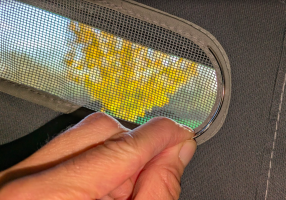
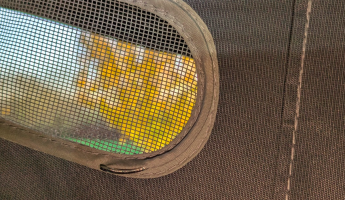
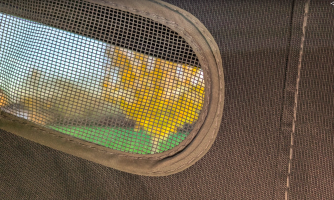
I used 4 needles per side and they are easily inserted and worked around the piping surrounding the vent without making a hole or damaging the piping material and once fitted are almost invisible
1733153216092.png
1733153253108.png
The 4 magnets have just been sown into an 80mm*200mm scrap of quilted material for now for proof of concept but properly road tested now and I can confirm a good nights sleep without all of the cold drafts. This arrangement works very well and stays in place quite happily when the roof is lowered and raised again. Neater Mk 2 covers now on the job list :)
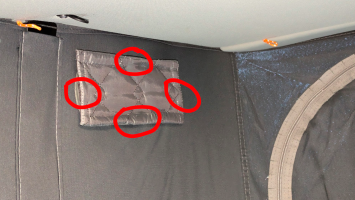
1733153275706.png
 
Its the little things that make a big difference - genius idea! :thumb
 
I’ve been looking for a way to block one or both pop-top vents when the temperature drops a bit or the wind gets up. I was looking for a method that would be invisible when not in use and could be left in place when raising and lowering the roof.

Velcro would have been the easy option but I thought the Velcro would be unsightly and wasn’t sure how well it would last so I opted for some darning needle inserts and fabric covers with magnet inserts – I used 2mm thick nickel plated steel needles (not the stainless steel needles which would non-magnetic) and 10mm*20mm*2mm magnets.
View attachment 131150
The end needles are easily bent to match the 40mm radius of the piping surrounding the vets

View attachment 131151

I used 4 needles per side and they are easily inserted and worked around the piping surrounding the vent without making a hole or damaging the piping material and once fitted are almost invisible

View attachment 131152
View attachment 131153
The 4 magnets have just been sown into an 80mm*200mm scrap of quilted material for now for proof of concept but properly road tested now and I can confirm a good nights sleep without all of the cold drafts. This arrangement works very well and stays in place quite happily when the roof is lowered and raised again. Neater Mk 2 covers now on the job list :)

View attachment 131154
I love your ingenuity and this is a very neat solution to your draft issue. However, the van is designed with these vents in place. I don’t know if there might be unintended consequences. Increased condensation maybe?
 
I love your ingenuity and this is a very neat solution to your draft issue. However, the van is designed with these vents in place. I don’t know if there might be unintended consequences. Increased condensation maybe?
There will be. :mute
 
Completely agree that ventilation is very important, especially when cooking, hence I was after a easy way of reducing drafts when sitting or sleeping if its a bit nippy outside or the winds in the wrong direction. After all if it's not quick and easy it'll just get left in place ;-)
 
This area has been on my list for a while. In my case just for when it's raining hard as I agree the ventilation is important. Removable like your idea would be ideal.

Watching as you progress ...

Thanks!
 
I've sewn midge netting on the inside of ours, just using a curved needle to sew it to the seam where you have hidden the needles, but I've been thinking about a complete cover like this as well. I would want it on the outside to stop the occasional horizontal rain! I would think that your method would work with the cover on the outside as well.
 
I've sewn midge netting on the inside of ours, just using a curved needle to sew it to the seam where you have hidden the needles, but I've been thinking about a complete cover like this as well. I would want it on the outside to stop the occasional horizontal rain! I would think that your method would work with the cover on the outside as well.
Ditto, the midge netting is finer so it's a bit less drafty while still providing ventilation
 
These vents are there for a reason I think. Wouldn’t cover those up.
 
I’ve been looking for a way to block one or both pop-top vents when the temperature drops a bit or the wind gets up. I was looking for a method that would be invisible when not in use and could be left in place when raising and lowering the roof.

Velcro would have been the easy option but I thought the Velcro would be unsightly and wasn’t sure how well it would last so I opted for some darning needle inserts and fabric covers with magnet inserts – I used 2mm thick nickel plated steel needles (not the stainless steel needles which would non-magnetic) and 10mm*20mm*2mm magnets.
View attachment 131150
The end needles are easily bent to match the 40mm radius of the piping surrounding the vets

View attachment 131151

I used 4 needles per side and they are easily inserted and worked around the piping surrounding the vent without making a hole or damaging the piping material and once fitted are almost invisible

View attachment 131152
View attachment 131153
The 4 magnets have just been sown into an 80mm*200mm scrap of quilted material for now for proof of concept but properly road tested now and I can confirm a good nights sleep without all of the cold drafts. This arrangement works very well and stays in place quite happily when the roof is lowered and raised again. Neater Mk 2 covers now on the job list :)

View attachment 131154
Can you share where you purchased the darning needles from? All the sites I have found offer either stainless or an assortment of various bunting needles. Thanks.
 
Can you share where you purchased the darning needles from? All the sites I have found offer either stainless or an assortment of various bunting needles. Thanks.
HI GollyOlly,
I bought the darning needles from Amazon - hopefully this link will work;
As a bonus I found these very easy to bend to the correct radius by hand with a small pair of pliers.
The magnets were also from Amazon;
I put all the magnets in the same way around (polarity) so if only one side needs to be covered the 'spare' can be stuck on top of the side being used.
Just for grins, what is the length of one of your needles?

I bought some that are 58.48mm in length and don't seem to cover the radius as completely as your pictures. I've measured mine against a 40mm radius circle and one needle only covers about !/4 of the curve. Your needles look like they cover almost half or at least 33% of the curve (120-180 radians :cool: ). Thanks.
My needles came in a pack of 3 sizes, 50.8mm, 59.94mm and 69.85mm. I used the longest ones for the curved ends and the shortest for the top and bottom however the magnets I used were 20*10*3mm and so anything over around 20mm was just there to allow for misalignment or the cover peice not being bang in the centre.
Very happy to see you're having fun though!
I have also made a quilted liner for the poptop which has now been road tested and works very well :cool:
Thanks! That was exactly my problem. I'd ordered some darning needles before I posted my reply to you and they were too short. I ordered some others from the ink you sent and they look like they'll do the job.
 
Thanks! That was exactly my problem. I'd ordered some darning needles before I posted my reply to you and they were too short. I ordered some others from the ink you sent and they look like they'll do the job.
These needles were a bit blunt and so I found it easier to use a sharper (fat) needle I had to open up the material initially at the starting point before going in with the blunter 'keepers' - a bit of a rub when done and the hole completely vanishes. I didn't want to sharpen the needles because this would have removed the nickel plating and may have resulted in rust marks in the future and having nice blunt needles in the piping felt like a nice thing to have.
 
My needles came in a pack of 3 sizes, 50.8mm, 59.94mm and 69.85mm. I used the longest ones for the curved ends and the shortest for the top and bottom however the magnets I used were 20*10*3mm and so anything over around 20mm was just there to allow for misalignment or the cover peice not being bang in the centre.
Very happy to see you're having fun though!
I have also made a quilted liner for the poptop which has now been road tested and works very well :cool:
Unable to PM you.... VW Cali Club constantly gives an error....Oops! We ran into a problem....
 
Unable to PM you.... VW Cali Club constantly gives an error....Oops! We ran into a problem....
I'm not a VIP member but saw that you were and so assumed you would be able to PM me but not sure if this is the case?
 

Similar threads

VW California Club

Back
Top