Brandrup Iso top install is this right ?

I

icic

VIP Member
Messages
574
Location
UK
Vehicle
T6 Ocean 150
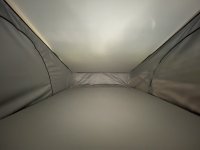
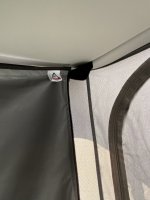
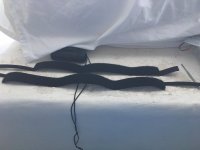
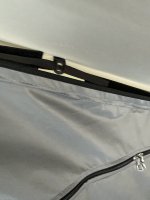
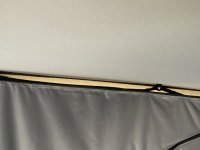
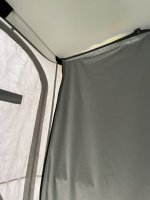
Just installed an iso top. There is a gap between the top of the iso top and the roof of the pop to top is this correct. ? Also the iso touches the front of the Canvas on the curve of the front if that makes sense. But my main question is the gap at the top. Here are some pictures. Be great if anyone who has put in an iso has some advice. The model is the one for othe ocean full front zip out (2019) thanks
E8A2EB7B-2FAF-4C20-A041-4E0329C9EB22.jpeg

F62265C4-309C-4BCD-AD4B-2897DB47FB10.jpeg

8F3F3746-F58A-425A-B233-625FAFA9C6D9.jpeg

96A66718-58E2-475A-A168-FBA7F702296A.jpeg
 
Just installed an iso top. There is a gap between the top of the iso top and the roof of the pop to top is this correct. ? Also the iso touches the front of the Canvas on the curve of the front if that makes sense. But my main question is the gap at the top. Here are some pictures. Be great if anyone who has put in an iso has some advice. The model is the one for othe ocean full front zip out (2019) thanks
View attachment 60122

View attachment 60123

View attachment 60124

View attachment 60125
Hi there. I have the same van as you with the later ISOTOP and yes I do have a gap, but not quiet as big as yours in the picture. The gap was about the same as yours when I first installed it, but over the past few weeks of using the van a little more I have tweaked the tension on the Velcro straps so as to make them a little tighter. I have also moved the top a title higher on the Velcro strip at the top. Also, did you slip the plastic tongue thin where the Velcro fastens fully into the stitched pocket on the side. The plastic tongue has a sort of hinge bit and I initially only inserted it in the pocket up to the hinge bit. I went back and realised that the tongue should be pushed right down until the Velcro strip is in contact with the pocket. This closed the gap up a lot. Hope that makes sense ? I can take some pictures tomorrow if that would help. Nick.
 
Also I see that your Velcro tap on the strip in picture 1 is at the top of the strip, this does not allow you to position the Velcro as high as possible on the ISOTOP. I placed my Velcro tap at a kind of 45degree angle so that I had some clear Velcro a the top edge to attach the Velcro to, this make a big difference with the gap. Nick.
 
Hi Nick thanks so much, that makes sense, so it’s just a case of fiddling with it until it’s tighter ? also does yours touch the canvas on the curve where the side of of the pop top meets the front ?
 
nick can I ask another question. Are you front tabs pulled forward 45 degrees due to the tension form the side panel. Am I right in thinking you can leave the front panel in when the roof is closed, so needs to be taken out completely ? all hard to tell with such confusing instructions .. thanks Iain

AFAFE614-EE34-45C3-991D-D2A8E8D6D6FC.jpeg
 
No problem you are very welcome, the instructions are really bad, so a little extra help is to be expected for a good install I think. I guess you mean at the bottom edges at the front corners ? Well yes kind of, mine were only just attached by the Velcro as it was really tight around the corner. To rectify that I moved around half to two thirds back to the rear at the bottom and undid the Velcro and tried to gain a little more slack as I moved along un doing and re attaching the Velcro. By the time I got back to the front I had gained enough material to allow a nice fit in the corners.

I have taken another look at your pictures and your top strip in picture 1 is pretty slack, I would tighten that up a little and check the tongue Is inserted fully and the gap should close up a lot more. It will not however close up completely as the weight of the material pulls the ISOTOP down a little, but it Will certainly be tighter than in your pictures. All the best best. Nick.
 
nick can I ask another question. Are you front tabs pulled forward 45 degrees due to the tension form the side panel. Am I right in thinking you can leave the front panel in when the roof is closed, so needs to be taken out completely ? all hard to tell with such confusing instructions .. thanks Iain

View attachment 60129
Hi Iain
Ah no the velcro tabs from memory do not attach to the side panels and only the front panel. The side panels from memory attach to the Velcro strips running backwards. Only the front panel uses the Velcro tabs that are inserted in the roof. When you close the roof, I found the best way to do this is to unzip the front ISOTOP flap and leave it attached at the bottom and hanging down. Lower the roof making sure that the bellows folds down nice and neatly, stopping the roof lowering and pausing for 5 secs just before it shuts allows the final rush of air to escape and prevent the bellows getting pinched in the roof. Then when the roof is fully down carefully tuck the flap above the sliding hatch as you slide it shut. Make sure the two buttons for the ties do not get stuck in the gap of the sliding hatch and poke them up by hand, and that should work well. Oh and we found a bungee works really well for us and makes the roof fold down nice and neatly, it is difficult to see this complete from the inside with the new ISOTOP fitted. Regards Nick.
 
Last edited:
Thanks Nick that makes sense. One thing, the reason my front tab is being pulled at such an angel is from the tension From the side strap Velcro. I suppose I need to attach the side velcro to the front flap higher up and hopefully that will not cause it to pull so much, is that what you did, sorry for all these questions
 
Thanks Nick that makes sense. One thing, the reason my front tab is being pulled at such an angel is from the tension From the side strap Velcro. I suppose I need to attach the side velcro to the front flap higher up and hopefully that will not cause it to pull so much, is that what you did, sorry for all these questions
Hi Iain
No problem, happy to help. Yes I think it would help if you attached the Velcro strip as high as possible, as you say this is being pulled from the tensioned strip, this will also help to shut up the gap more as the strip will be close to the roof. It took me a few tweaks to get it to fit how I wanted, but I am cursed with being a perfectionist I am afraid.
 
No that good, I finished it and had to go something else, just felt poorly fitted, so great to know I can get it better with some fiddling. Thanks so much for your help
 
Any chance of some pics for an Isotop Mkv1 fitting ... struggling here ! Also does anyone happen to know what these two different pieces of Velcro are for (ignore the binoculars in the background) . Its ironic that the instructions say the front bit / tabs is the hardest - that was very easy as it is actually covered in the instructions - here with the mk V1 they have updated the fittings but not the instructions

velcro.JPG
 
Hi there, the Velcro parts that you have shown go between, the front tab that has been inserted into the roof and the VW fitted attachment where the child net would normally fit. The other Velcro part then goes from the attachment back to the inserted plastic part that goes in the slot in the pop top. You can see this in first picture that Isic posted at the top of this page. The pop top is then attached using Velcro onto these parts and it is hung from these. hope that makes some sense ? I cannot take pics at the moment, but can do so when I am back home on Wednesday if that would help ? Nick.

Any chance of some pics for an Isotop Mkv1 fitting ... struggling here ! Also does anyone happen to know what these two different pieces of Velcro are for (ignore the binoculars in the background) . Its ironic that the instructions say the front bit / tabs is the hardest - that was very easy as it is actually covered in the instructions - here with the mk V1 they have updated the fittings but not the instructions

View attachment 66239
 
Hi there, the Velcro parts that you have shown go between, the front tab that has been inserted into the roof and the VW fitted attachment where the child net would normally fit. The other Velcro part then goes from the attachment back to the inserted plastic part that goes in the slot in the pop top. You can see this in first picture that Isic posted at the top of this page. The pop top is then attached using Velcro onto these parts and it is hung from these. hope that makes some sense ? I cannot take pics at the moment, but can do so when I am back home on Wednesday if that would help ? Nick.
Thanks we got there in the end though not really happy with the finish - it is a bit, shall we say baggy, will have a go at sharpening it up a bit later - instructions are really awful. Don't know how a firm can update a product and the fixings and not update the instructions. It is something like you would expect from a cheap Chinese brand not a £500 plus product !!
 
Back
Top