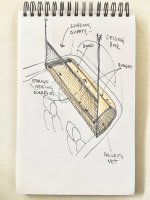
If you (like us) sleep downstairs in your Cali you may like our idea for a false ceiling above the cabin as a place where you can store all the stuff that you don't need at night and that you want to have handy when you get up in the morning.
For our first Cali (a 3-seater Beach) we made this board in 10mm ply, which lived on the Multiflex during the journey but in our current Cali (a Coast) we needed a solution that's thin enough to live on top of the roof mattress when the roof is down. I chose to re-make our ceiling from DiBond (two layers of aluminium with a layer of polyethylene in between), which is only 3mm thick and strong enough. Fortunately, DiBond (and similar brands) is available in several colours, including a red that comes very close to the colour of our Coast.

I ordered a rectangular sheet of 50 by 123 cm and created the two rounded edges using a dinner plate with the correct rounding. DiBond is very easy to cut, either with a jigsaw or a Stanley knife. The holes were made with a hole saw and give access to the 12V socket and the switches for the ceiling lights. (In our Beach we had cutouts to accommodate the roof's fastening brackets.) I glued an aluminium U-profile to the (unsupported) front to give the board more strength and to prevent head injuries (DiBond is very sharp).

The second picture shows the false ceiling in place. In our case it holds cushions, our laundry bag, the clothes we need in the morning and other paraphernalia.
Total cost of this project: 60 euros for the DiBond, 10 euros for the profiles. A bargain for the comfort and extra space it gives us!
For our first Cali (a 3-seater Beach) we made this board in 10mm ply, which lived on the Multiflex during the journey but in our current Cali (a Coast) we needed a solution that's thin enough to live on top of the roof mattress when the roof is down. I chose to re-make our ceiling from DiBond (two layers of aluminium with a layer of polyethylene in between), which is only 3mm thick and strong enough. Fortunately, DiBond (and similar brands) is available in several colours, including a red that comes very close to the colour of our Coast.

I ordered a rectangular sheet of 50 by 123 cm and created the two rounded edges using a dinner plate with the correct rounding. DiBond is very easy to cut, either with a jigsaw or a Stanley knife. The holes were made with a hole saw and give access to the 12V socket and the switches for the ceiling lights. (In our Beach we had cutouts to accommodate the roof's fastening brackets.) I glued an aluminium U-profile to the (unsupported) front to give the board more strength and to prevent head injuries (DiBond is very sharp).

The second picture shows the false ceiling in place. In our case it holds cushions, our laundry bag, the clothes we need in the morning and other paraphernalia.
Total cost of this project: 60 euros for the DiBond, 10 euros for the profiles. A bargain for the comfort and extra space it gives us!
Last edited:


