Buy all your VW California Accessories at the Club Shop Visit Shop

Fuse location to fit dash cam in T5 SE 2012

Dylan

Dylan

Member
VIP Member
Messages
69
Location
Birmingham
Vehicle
T5 SE 180
D48ABB91-A2A4-4BEE-9ECD-72336887F65C.jpeg Hello,

I wish to hardwire a dash cam and I’ve attached a photo of the dashboard fuse layout in my 2012 T5 SE. I want to piggyback onto a switched live fuse. Can anyone please advise me on an appropriate fuse?

Martin
 
View attachment 39359 Hello,

I wish to hardwire a dash cam and I’ve attached a photo of the dashboard fuse layout in my 2012 T5 SE. I want to piggyback onto a switched live fuse. Can anyone please advise me on an appropriate fuse?

Martin
Mine is a 2014 so could be different. I used a 7.5amp fuse in the upper section that was an Ignition live for the AirCon Blower Fans.
Remove the fuse and the blower fans stop working.
 
Your panel looks the same as mine but knowing VW that may not be the case.

I have done the same and was told the following fuses on a 2010 are ignition live by a reliable source....I can't say who though;)

On the bottom section:
Sc28
Sc22
Sc10 or if you need it to be at the top section use sb22.
These will all active when ignition switches on and turn off when ignition is off.

The fuse holders are numbered from left to right in the centre between the slots. Difficult to see in poor light though. One is a mini fuse so not a lot of use.

I used S28 on the bottom section. Don't know what it feeds as I didn't turn on the ignition while the fuse was out. I tested the feed before I connected it to the dash cam though, and it did switch with the ignition.

Hope that helps

Alan
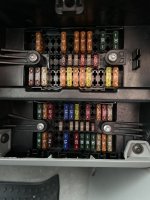
 
Mine is a 2014 so could be different. I used a 7.5amp fuse in the upper section that was an Ignition live for the AirCon Blower Fans.

Thank you WelshGas. This is very helpful.
 
Your panel looks the same as mine but knowing VW that may not be the case.

I have done the same and was told the following fuses on a 2010 are ignition live by a reliable source....I can't say who though;)

On the bottom section:
Sc28
Sc22
Sc10 or if you need it to be at the top section use sb22.
These will all active when ignition switches on and turn off when ignition is off.

The fuse holders are numbered from left to right in the centre between the slots. Difficult to see in poor light though. One is a mini fuse so not a lot of use.

I used S28 on the bottom section. Don't know what it feeds as I didn't turn on the ignition while the fuse was out. I tested the feed before I connected it to the dash cam though, and it did switch with the ignition.

Hope that helps

Alan
Thank you Allan.
 
Hello again,

When you wired-in your dash cam, what earth connection did you use?

Also, how did you route the wires from the fuse through to the side piller? Did you have to remove any of the dash trim?

Thank you

Martin’s
 
I used the leisure batteries so can't help with the earth connection, except to say the ones I tested round the front fuse box do not seem to be an earth. I guess they are screwed into plastic.

Where a trim panel would come off easily I ran cables behind it, where not I just pushed the cables under the edge of the trim with the supplied plastic tool.

I bought a BlackVue Dashcam with a rear camera so my problem was running the cable back to the tailgate tidily.

Alan
 
Thank’s Alan,

I’ve bought the Nextgear 512GW which has a rear camera feeding directly into the front one, so I’ll also have to route the wiring to the back of the van. I’ve read some posts suggesting doing this via the side trim panel above the kitchen units by removing the front, middle and rear light clusters to feed it through. The main problem I foresee is passing through the side of the wardrobe into the rear storage areas.

Any advice on how you accomplished this would be very helpful.

Martin
 
The trim above the kitchen does not come off easily and I did as others have advised by removing the lights and passing the cable down that way. You are right, the difficult part was getting the cable over the wardrobe and to the rubber cable tube between the tailgate and the van body. BTW the B pillar trim is easy to remove and replace which is helpful.

I pulled the rubber tube away from the body and fed a single 2.5mm mains cable forward as a guide cable wriggling it through the various holes in the body. After a few goes it appeared and I was then able to tape the coax cable to it and pull it back.

I then fed the guide cable trough the rubber tube from the tailgate end, re-taping the coax plug to is and pulled the coax through the tube. This took time as the two cables often parted. There is not a lot of space left in there and I was careful not to damage any other cables or tubes (the rear washer tube is in that too). A spray of silicone helped a lot and then it was just patient squeezing the rubber and pulling.

I was unable to get the trim round the rear window off, (my van has recently has a new one fitted so it is all very tight), so I fed the cable out of the bottom of the tube flange on the tailgate and eased it under the edges of the trim. It has to pass from the outside of the trim over it to the inside window side of the trim, There is a joint between the light grey window trim and the darker chair storage trim and looping the cable over this joint was the best I could do. I have a bike rack and to get a clear view the camera had to be on the O/S of the wiper motor housing at the bottom of the rear window. If you mount it at the top of the rear screen the bike rack rails block part of the view rearwards as will the bikes.

Good luck.

Alan
 
Alan,

Your advice has been very helpful to me. This afternoon, I removed the internal lights above the kitchen unit and managed to pass a 5amp electrical cable from the rear storage cupboard through the upper channel until it appeared at the rear light recess. I could not believe my luck when this happened. It was easy to attach the camera wire to the cable and pull it through. A similar procedure was successful in passing it on to the left A pillar.

Martin
 
Glad I was of some help.

Alan
 
Vehicle info, 2012 180 SE with xenon headlamps, both dash 12v sockets permanent live from engine battery.

Just taken the cover off the fuses in the dashboard expecting to see something like the photo above, as it's the same age. Not a chance of course, not even a removal tool.
For the install of dash cam I'm favouring the lower 15amp (SC28?) any ideas as to it's function ? Only going for that one as there's plenty of room to use fingers to remove it, and I only have a normal size piggy back fuse.IMG_0144.jpeg
 
@vmaxkiddy According to the fuse chart sc28 should/could be the door mirror adjustment switch.
I used sc19 . Dipping rear view mirror.
 
Some of the fuses are powered as permanently live and some are switched by the ignition switch. All depends on the feed you need.
All of those are fed from the engine battery.

Have a look at my post No3 from 2018 which may be helpful. My van is a 2010 facelift.

I picked up a live feed from the leisure batteries and the ignition sensing one from that fuse box.
Alan
 
Back
Top