Buy all your VW California Accessories at the Club Shop Visit Shop

How to - replace a gearbox on a factory fit awning (Thule omnistor 5102)

steve_b

steve_b

Lifetime VIP Member
Messages
372
Location
North Devon
Vehicle
T5 SE 130
In case it is useful to anyone, the factory fit awning on my 2008 SE would wind out but not retract - the mechanism just made a clicking sound when winding it back in and the awning had to be helped considerably to get back in - also it didn't go tight against the rail so I was concerned that one day I would see it in my rear view mirror when driving.

Anyhow - gearboxes are available from the club shop here:


The bit needed is part 8 - LH assembly and gearbox.

Installation is pretty easy , you need a short medium philips and surprisingly a small philips head screwdriver.

Firstly open the awning completely and prop up on legs as usual - you want the canvas rolled out all of the way to release the tension on it.

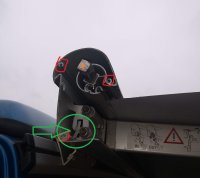
Then at the inside left end of the awning there is a single screw that needs to come out which holds the decorative end cap on. It's a pain to get to so you need a short screwdriver, I used a stubby Philips #2. I have outlines it red here (note I have already taken the end cap off before I took the picture)

The end cap then needs to be pulled away and down - apart from the screw you just removed there are 4 clips on the sides of the cap which hold it to the gearbox - you can see where they are by examining your new gearbox and look for the indentations in the side, but after some ineffective faffing a good tug out and down sufficed for me. Just make sure you go down as well as out as you need to go over the metal nipple where you put the handle in.

IMG_20200203_113453208.jpg

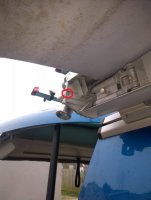
You can then either stand on something sensible or balance precariously on the rear bumper and see the back of the gearbox with three obvious screws - which had surprisingly small heads on, Philips #1 - a "normal" #2 head was far too big and would have rounded them off. unscrew these three and the gearbox just pulls off of the shaft - the canvas is fine as you have unwound it so nothing springs or jumps out at you.

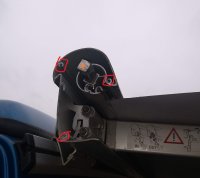
What you are then left with it this below - you can see the shaft end marked with an orange X, and the 3 screw holes in red. Slide the new gearbox over the shaft , plastic faceplate side first, wiggle the lot back up to the rail so that the plastic face plate goes inside the rail , three screws here, cover clips back on, one screw inside, job done - good as new, it winds out and back in smoothly and winds in tight.

Ten minutes including a cup of tea if you have the right tools handy.
IMG_20200203_111844205.jpg


Now does anyone know how to open the old gearbox to see what is wrong.. I have read that there is a plastic gear inside, I wonder if that is replaceable somehow.
 
In case it is useful to anyone, the factory fit awning on my 2008 SE would wind out but not retract - the mechanism just made a clicking sound when winding it back in and the awning had to be helped considerably to get back in - also it didn't go tight against the rail so I was concerned that one day I would see it in my rear view mirror when driving.

Anyhow - gearboxes are available from the club shop here:


The bit needed is part 8 - LH assembly and gearbox.

Installation is pretty easy , you need a short medium philips and surprisingly a small philips head screwdriver.

Firstly open the awning completely and prop up on legs as usual - you want the canvas rolled out all of the way to release the tension on it.

Then at the inside left end of the awning there is a single screw that needs to come out which holds the decorative end cap on. It's a pain to get to so you need a short screwdriver, I used a stubby Philips #2. I have outlines it red here (note I have already taken the end cap off before I took the picture)

The end cap then needs to be pulled away and down - apart from the screw you just removed there are 4 clips on the sides of the cap which hold it to the gearbox - you can see where they are by examining your new gearbox and look for the indentations in the side, but after some ineffective faffing a good tug out and down sufficed for me. Just make sure you go down as well as out as you need to go over the metal nipple where you put the handle in.


View attachment 54897

You can then either stand on something sensible or balance precariously on the rear bumper and see the back of the gearbox with three obvious screws - which had surprisingly small heads on, Philips #1 - a "normal" #2 head was far too big and would have rounded them off. unscrew these three and the gearbox just pulls off of the shaft - the canvas is fine as you have unwound it so nothing springs or jumps out at you.

What you are then left with it this below - you can see the shaft end marked with an orange X, and the 3 screw holes in red. Slide the new gearbox over the shaft , plastic faceplate side first, wiggle the lot back up to the rail so that the plastic face plate goes inside the rail , three screws here, cover clips back on, one screw inside, job done - good as new, it winds out and back in smoothly and winds in tight.

Ten minutes including a cup of tea if you have the right tools handy.

View attachment 54899


Now does anyone know how to open the old gearbox to see what is wrong.. I have read that there is a plastic gear inside, I wonder if that is replaceable somehow.
There is a Plastic gear wheel, easily rounded off if closed very forcibly, but I don't think the manufacturer sells parts for the gearbox just the complete unit.

If you want to clean the inside surface of the awning canvas, ECOVER Surface Cleaner spray seems very effective. Spray on and leave for 30 mins or so then each off with a roughish wet cloth.
 
Excellent informative post, thanks. :thumb
 
There is a Plastic gear wheel, easily rounded off if closed very forcibly, but I don't think the manufacturer sells parts for the gearbox just the complete unit.

Yes, I can imagine that selling a 50p gear against a £80 part is not attractive for Thule! I have a 3d printer so there is a possibility of a "make it yourself" option, or if an off the shelf replacement were available elsewhere it might save a load of unnecessary waste.

I haven't tried to open the unit yet , there were no obvious screws in the cover which I was kind of hoping to see - looks like punch out the pin that holds the turning nipple on and then see what I am left with
 
Great instructions for replacing the gearbox, thanks @steve_b
I seem to have broken/sheared something off though
Can anyone ID it

IMG_20200725_101351.jpg
 
So helpful! Just replaced mine, really simple thanks to your post!
 
Another vote of thanks to Steve for the original post. I had removed my awning for a while to save on transporting the considerable weight for several months whilst not camping. Unfortunately when fitting back, it fell off the bracket before I could secure it and broke the right hand end cap and the plastic inner which holds the cross rail. How I did not cause considerable body damage I will never know but it seems that other than a very small dent, I got away with it.
Purchased the parts from CampervanBits and using Steve's post as a guide, easily replaced the broken parts.
 
Great! Just replaced mine as well. Very useful, detailed and clear info! Thanks!!
 
Great post. On a T6.1 all the Phillips screws have been replaced with Torx 20, just in case that helps anyone.
 
I just replaced mine. The original post was brilliant and so helpful. Took away all the stress of pulling it apart thanks steve_b
Awning now working better than when I first got the van
 
In case it is useful to anyone, the factory fit awning on my 2008 SE would wind out but not retract - the mechanism just made a clicking sound when winding it back in and the awning had to be helped considerably to get back in - also it didn't go tight against the rail so I was concerned that one day I would see it in my rear view mirror when driving.

Anyhow - gearboxes are available from the club shop here:


The bit needed is part 8 - LH assembly and gearbox.

Installation is pretty easy , you need a short medium philips and surprisingly a small philips head screwdriver.

Firstly open the awning completely and prop up on legs as usual - you want the canvas rolled out all of the way to release the tension on it.

Then at the inside left end of the awning there is a single screw that needs to come out which holds the decorative end cap on. It's a pain to get to so you need a short screwdriver, I used a stubby Philips #2. I have outlines it red here (note I have already taken the end cap off before I took the picture)

The end cap then needs to be pulled away and down - apart from the screw you just removed there are 4 clips on the sides of the cap which hold it to the gearbox - you can see where they are by examining your new gearbox and look for the indentations in the side, but after some ineffective faffing a good tug out and down sufficed for me. Just make sure you go down as well as out as you need to go over the metal nipple where you put the handle in.


View attachment 54897

You can then either stand on something sensible or balance precariously on the rear bumper and see the back of the gearbox with three obvious screws - which had surprisingly small heads on, Philips #1 - a "normal" #2 head was far too big and would have rounded them off. unscrew these three and the gearbox just pulls off of the shaft - the canvas is fine as you have unwound it so nothing springs or jumps out at you.

What you are then left with it this below - you can see the shaft end marked with an orange X, and the 3 screw holes in red. Slide the new gearbox over the shaft , plastic faceplate side first, wiggle the lot back up to the rail so that the plastic face plate goes inside the rail , three screws here, cover clips back on, one screw inside, job done - good as new, it winds out and back in smoothly and winds in tight.

Ten minutes including a cup of tea if you have the right tools handy.

View attachment 54899


Now does anyone know how to open the old gearbox to see what is wrong.. I have read that there is a plastic gear inside, I wonder if that is replaceable somehow.
Thanks for posting this. It gave me the information and courage to replace this myself. I have a 2019 Ocean and screws mentioned in your post have been updated. The four screws were Torx T15. Thanks again, a most helpful post.
 
Back
Top