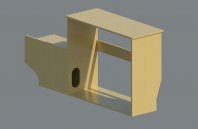
Kitchen Pod (almost) complete

Any update on your Pod ? :D

Any regrets or anything your would do differently ? Think I'm going to get someone to make us one, I dont have the skills unfortunately :(
 
Hi Bigbud,

Been using the pod almost a year now and still very pleased with it. Since the original posts were made I have:
Sorted out mains hookup under the rear bumper (detailed on another thread).
Added a shelf on the left hand side to hold cups & crockery.
Added a low shelf on the right hand side. Camping pots fit underneath and a fabric box fits above.
Changed the black webbing strap for a blue one to match the door rails (what a colour tart!)
That’s about it really.

Overall it all works quite efficiently, the fabric boxes allow me to pack in the house and just transfer to the van if going out for the day or longer. For short and day trips the single burner is enough to heat up meals or make tea/coffee. On longer trips I use a Camping Gaz ‘Party Grill’ outside the van as an additional cooking source, it can work as either a grill or large burner. With the small canisters gas is expensive per g but then the stove was only £25 rather than the £300ish of a proper plumbed in setup so that difference will buy a lot of canisters. The coolbox is a fantastic bit of kit, also really useful for day to day shopping.
What I have noticed is a lack of worksurface when both flaps are open. If I was going to rebuild I would make the right hand side a fixed top and have a large drawer underneath. I don’t miss having a fixed sink at all. Sliding doors are great and allow access. I can still get at most of the storage when the bed is made (enough to make breakfast in bed anyway :D ). They took quite a bit of fiddling to slide smoothly and not rattle though.

I have started making another unit that will fit behind the coolbox in the rear of the van. Basically extending the run of units back to the tailgate. Did consider a wardrobe but have gone for a much lower storage box to gain myself worksurface and also maintain visibility out of the nearside rear quarter when driving. The idea is that this will bolt to the multiflex board and be used on longer trips. Over the year I have mellowed to the multiflex board. I got a protector made for it and now find it perfect for laying a bike on. Bike is then inside the van and I don’t need to worry about security quite as much. For longer trips or if using the muddy MTB I will still fit the bike rack.
Other task at some point is to fit some dedicated wiring back to the leisure battery rather than using the 12v power socket. Will then be able to use thicker cable and not get so much of a voltage drop to the coolbox. While doing that I will put a dedicated CTEK charging socket in and maybe a battery monitoring gauge

Still going through retrofit heating options as you have prob seen from that thread! That’s one job I won’t be doing myself.
 
The hook up we have has been great, travelvolts did a great job :)

Thanks for your feed back :)
 
Contacted a few people near us but every one is booked up, not sure I have the time or patience to make my own :crazy Might have to wait till next year I think :(
 
This must be a busy time of year for converters, weather improving and people wanting to get vans sorted out before the summer.
You do have to dedicate a fair bit of time if doing it yourself.
 
Tempted to knock one up in MDF and use that until winter :D
 
An MDF mock up would be a good idea regardless. You can then see what works for you and also use it as a template for the finished article. Far better to make mistakes with cheap MDF rather than the laminated board + £120 a sheet.
 
How did you do your joints ? The guy you got your timber from used a jig of some sort in the video's not found out what its called yet :crazy

Clearing out the garage this week in preparation xD
 
In the T4 forum videos he’s using a pocket hole jig. I do know that he’s now changed to jointing using a Domino jointer. This is a serious bit of kit with a serious price tag to match.

What I have done is use glued biscuit joints. You cut a groove in both panels you are joining and then insert a ‘biscuit’ made of compressed wood in the grooves. The glue makes the biscuit expand forming a very strong joint. You can cut the grooves using a router cutter but because there are so many to do I bought a dedicated biscuit jointer power tool (De Walt for about £150 as I prefer to pay a bit more for nice tools). You can hire them by the day as well.
My feeling is that a proper glued joint will always be stronger and more stable that a screwed joint. The pocket hole jigs are ~ £70 anyway so in the grand scheme of costing pods another £70 for a biscuit jointer seemed worth it.
For the glue I went for one of the PU (polyurethane) ones. Initially tried PVA but wasn’t getting good adhesion on the laminated surfaces. The PU glues are harder to work with as they foam up and you need to clean any overspill (with white spirit) before it sets. Use disposable gloves as well as any that gets on your skin will be there for days. The one I liked the best was Elmers Glue All Max as it was less viscous that Gorilla Glue.
Good idea to do some test samples/joints before embarking on a critical panel.
All of the above was what I did for the finished pod. For the MDF mock up it was just the knock down joints or screwed battens.
 
Would you mind if giving me a few dims that you have used if I mark up one of your photos ?

Have sorted a work bench and tools so baout to start the MDF build :D
 
Hi Owen_h

Could you tell me a few dimensions of your pod and van please?

I would like to know:

How deep your pod is
The width and depth of the beach 2 seater flexiboard
The available height under the flexiboard

Thanks for your help - just trying to decide between the two and three seat beach at the moment

Steven
 
ournumbernine said:
Hi Owen_h

Could you tell me a few dimensions of your pod and van please?

I would like to know:

How deep your pod is
The width and depth of the beach 2 seater flexiboard
The available height under the flexiboard

Thanks for your help - just trying to decide between the two and three seat beach at the moment

Steven

Hi Steven.

the pod is 36cm wide. At the worktop height this goes up to 40cm to fit around the existing trim.
The flexboard itself is 139cm wide by 80cm deep. The actual usable width is more as there is an approx 5cm gap either side of the board.
Clearance under the board (and the reinforcing frame strut) is 32cm.

Hope this helps your decision, 2 or 3 seater beach seems to be quite a frequently asked question on here. Probably because the VW brochure isnt much help in explaining the differences.
 
have you got any photos of the back of yours ? just looking at the shape of the van and how best to construct it.
 
I assume you have used the base as a solid piece ? what have you done for feet/runners for the unit to elevate it above the alu slider ?

Not decided which route we're going yet with the cooker/sink, may well end up with a solution similar to yours but its drawn as we're having a smev in the top atm

3d pod.jpg
 
yes very similar to that drawing. There is also another mid vertical divider and the top tray for the cooker / bowl storage that gives it more rigidity.
To raise the base up I have created a plinth. Its made from lengths of pine stripwood painted grey. Key dimension is 10 or 11mm thick to clear the floor rails but still allow the T fixings to work. The wood is approx 50mm wide but this is not critical. Stuck some 1mm thick felt on the bottom to prevent and squeaks.

I think I have some photos taken during construction that might show the back. Will check later. Also got a drawing of the unit which I will try and pm to you.
 
Awesome, thanks :)

Once I've finished it I'll update the drawings I've done with any tweaks and uploads them for others to use :)
 
owen_h said:
yes very similar to that drawing. There is also another mid vertical divider and the top tray for the cooker / bowl storage that gives it more rigidity.
To raise the base up I have created a plinth. Its made from lengths of pine stripwood painted grey. Key dimension is 10 or 11mm thick to clear the floor rails but still allow the T fixings to work. The wood is approx 50mm wide but this is not critical. Stuck some 1mm thick felt on the bottom to prevent and squeaks.

I think I have some photos taken during construction that might show the back. Will check later. Also got a drawing of the unit which I will try and pm to you.

Hi Owen,

Any chance you could send me some photos and the drawings to ensure I have all the things I need for the pod.

Back in the UK for a few weeks and stocking up on tools and goodies that are expensive in NZ. Going down biscuit/slot jointer route for joints (going to buy Makita 18v cordless) and also order a few things from Nick at Comfortz.

When I get back to NZ Spring is on the way so I'll need to get cracking with the pod. The MDF one may need to last a few months as they failed to pack the Vohringer board in my first container. :sad

Andy
 
Bigbud said:
have you got any photos of the back of yours ? just looking at the shape of the van and how best to construct it.

Not many of the back but I have just uploaded the ones I took during construction to my personal album on this site.
Hope they are of some use.
 
Awesome fella, you have all the tools don't you :D Going for the mdf tonight :clap

Another question sorry :crazy What are you using for sliding the doors ? Can't find anything suitable atm :sad
 
Bigbud said:
Awesome fella, you have all the tools don't you :D Going for the mdf tonight :clap

Another question sorry :crazy What are you using for sliding the doors ? Can't find anything suitable atm :sad

I had all the clamps certainly (mine & borrowed) :lol:

The sliding door channels are lengths of U section aluminium from B&Q screwed into the wood.

http://www.diy.com/nav/fix/nails-screws ... mm-9283878

Prime with an etching primer (dont want to get any paintwork bubbles :laugh2 ) and then blue top coat. On the bottom of the channel I stuck some 1mm thick felting (sold to stop rattles) for the doors to run on. On the sides of the channel and also the sides of the doors I stuck some UHMW tape (clear low friction). Think both tape types were off eBay.
I did have quite a search around for suitable sliding door systems to use but couldnt find anything suitable for 15mm think doors that wouldn't take up loads of space. The DIY arrangement works well in the end but did take quite a bit of fiddling to fit and get a smooth slide. Oooo Er
 
Bigbud said:
I assume you have used the base as a solid piece ? what have you done for feet/runners for the unit to elevate it above the alu slider ?

Not decided which route we're going yet with the cooker/sink, may well end up with a solution similar to yours but its drawn as we're having a smev in the top atm

Keep it simple and ditch the sink bigbud ..
I've had be campervans for years now and never used the sink as its intended to only to store things in ... lol .. Same with the Cali..
 
choplee said:
Bigbud said:
I assume you have used the base as a solid piece ? what have you done for feet/runners for the unit to elevate it above the alu slider ?

Not decided which route we're going yet with the cooker/sink, may well end up with a solution similar to yours but its drawn as we're having a smev in the top atm

Keep it simple and ditch the sink bigbud ..
I've had be campervans for years now and never used the sink as its intended to only to store things in ... lol .. Same with the Cali..

I know what you mean, the kitchen (sink & hob) are for making a brew really so could most likely do away with both but its about making at easy as possible for SWMBO to make a drink when I'm not there.

I have realised that the smev unit I was looking at doesn't actually fit so its back to the drawing board on that front anyway :(

on the plus side I've found a couple of company's near by, one that sells the board and another that will cut it all out if I supply the drawings :upsidedown
 

VW California Club

Back
Top