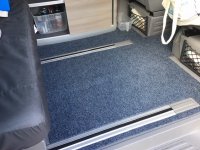
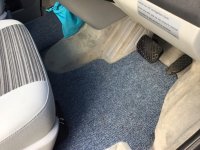
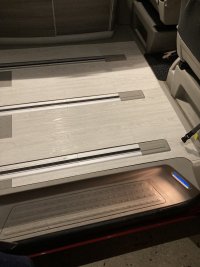
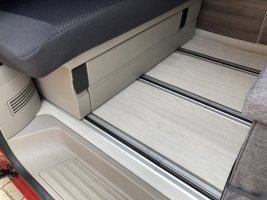
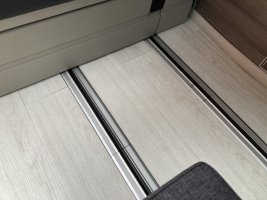
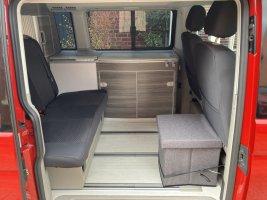
No more grey floor !

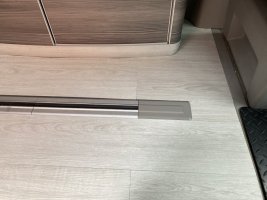
Lifted the plastic clips that go at the end of each rail to hide the cut lines but found that two vinyl planks fit perfectly in between the rail gaps so with those I just butted up against. If that makes sense.

Yes this does make sense. Much appreciated.
 
Yes if you get a good tight fit and your measurements are accurate the vinyl planks sort of hold each other in place I’m confident that they have enough stick to hold themselves down.
We had this type of flooring in kitchen dining room and conservatory for many years and countless large dogs running over it but it was very practical. Only downside it faded in the conservatory
 
Really like the ability to slide the rear seats / bed along the floor on those slides. Would really help with getting the bikes in the back. Was that with a special rear seat or can it be fitted aftermarket and where from?
 
Love it whe want also something like that
Do you have more photo’s of instaling it
What do you take al out and loss to get it so nice
 
Good evening,

it looks very good. I tryied to do this as well, using dary grey cheap carpet, but covering the rails (to avoid dirt getting in there). But even though it was much easier than your handy work I struggled a lot to get it. I tried it at least 3x times to get it in the way I wanted it.

The disadvantage of my approach is obviously that I have to roll up the carpet each time I move the bench. But I can live with this. I hope that the replacement of the carpet will be easier, because I can use the old one as a templace.

Regards,
Eberhard
 
Lifted the plastic clips that go at the end of each rail to hide the cut lines but found that two vinyl planks fit perfectly in between the rail gaps so with those I just butted up against. If that makes sense.
I’d also love some more installation pics. I’m very keen on doing the same
 
Like the table vinyl- can you let us know how well it wears? I’d be interested to know how it lasts with hot stuff on it and the like.

I suppose you can just replace it even if it does get damaged but I would be interested to know how often!
 
Love it whe want also something like that
Do you have more photo’s of instaling it
What do you take al out and loss to get it so nice
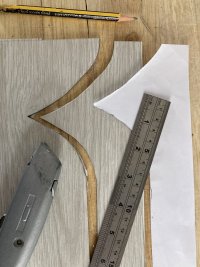
Apologies I don’t have anymore install pics. Just take your time and measure everything twice before cutting. I’m abit of a perfectionist so made sure it was a perfect fit with card templates. Good luck
 
I’d also love some more installation pics. I’m very keen on doing the same
Have a look at the link, like Iv said before it’s quite simple but take your time and use card/paper templates for the awkward corners and edges.
Good luck if you decide to go for it.
 
Like the table vinyl- can you let us know how well it wears? I’d be interested to know how it lasts with hot stuff on it and the like.

I suppose you can just replace it even if it does get damaged but I would be interested to know how often!
Yeah that’s the plan we can replace with another design if we fancy a change or it gets warn out. As for hot stuff we always put a heat matt down for pans anyway .
 
Yeah for sure. We have a scrubbed wood finish Amtico in our kitchen and dining room.
Fantastic product.
 
I bought an off cut of a ribbed carpet and after making a template it was an easy job to cut to make a pretty good fit. £15 plus a roll of double sided tape...
E0FF6B31-52A4-46BC-8433-E9DAA3722A6E.jpegC8462F52-2020-40F5-BD80-8010F1FDCAA2.jpeg
 
That looks great! Looks like a really tidy job. Thanks for sharing. How many packs of the vinyl planks did you use? Did you need to take the bench out, or did you slide it backwards and forwards depending on where you were fitting?
 
That looks great! Looks like a really tidy job. Thanks for sharing. How many packs of the vinyl planks did you use? Did you need to take the bench out, or did you slide it backwards and forwards depending on where you were fitting?

Three packs will be enough and yes just moved it fully to the rear completed the living area then fully forward to finish the rear.


Sent from my iPhone using Tapatalk
 
Three packs will be enough and yes just moved it fully to the rear completed the living area then fully forward to finish the rear.


Sent from my iPhone using Tapatalk
Thanks for the advice. I think i’ll give it a go! Hope it looks as tidy as yours when it’s done! :)
 
Thanks for the advice. I think i’ll give it a go! Hope it looks as tidy as yours when it’s done! :)

Best of luck, post up some pics as a comparison


Sent from my iPhone using Tapatalk
 
Resurrecting this thread as lockdown seems like a good time to attempt DIY such as this flooring!

@Oceandream A-T (or anyone else who has done the same) - I hoped to ask a couple of extra questions now you’ve had well over a year of usage:
- how are they bearing up? Quality and adhesion wise?
- is a sharp Stanley knife sufficient to cut the tiles?
- Where is the best place to ‘start’ - in a prior comment you mentioned that the tiles butt up tightly but precisely next to each other between the rails. Is starting middle and working ‘out’ advisable then?
- any other top tips or advice before I start buying/fitting?

Thank you!

Hello, the floorings holding up really well (not that we’ve been anywhere) as mentioned before we have a dog who I take to work and the flooring is still looking great. I did however when laying the flooring used a can of contact adhesive just to make sure everything stays where I should.
A metal ruler or right angle a good tape measure and a sharp Stanley is fine. The flooring is quite easy to work with. Just take your time. Most of the difficult cuts I had made a paper template just to get the angle spot on then transfer to the floor planks. I started in between the rails and worked to the corners obviously staggering the planks as you lay. Only tip I can give is plenty of tea and take your time.
Good luck.


Sent from my iPhone using Tapatalk
 
Cheers were really happy with the finish, the fiddly corners and tight gaps aren’t much fun but if you are patient and think about it it’s simple. Decided to go with b&q vinyl planks because they are easier to cut and position plus they come with adhesive backs. This made laying over the top of the standard grey floor easy plus it’s simple to change later on if we want. The table top is a printed vinyl wrap this was super easy
Don't the raised dimples in the standard flor make it difficult to attach to?
 
Owners thinking of following this route should be careful. At different point it implies
* the floor holds itself in place
* can be (easily?) removed to return the van to standard
Then only recently reveals a can of contact adhesive was used in the installation. I'm not sure all those statements are exactly compatible with each other.
 
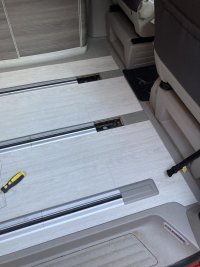
So - I have attempted a copy-cat of the flooring as completed by @Oceandream A-T
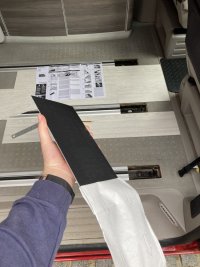
Like him I bought 3 packs of the vinyl self-adhesive floor tiles from B&Q with the only tools required being a sharp Stanley knife, metal edge ruler or set square, pencil and paper (for shaping the edges).
It was actually pretty enjoyable to do - I split the job over a couple of intervals so not sure how long in total it takes; about 3 hours total if I had to guess - usual measure twice cut-once rule applies!
I’ve installed with a 30cm offset as advised in the instructions, using whole pieces between the rails for simplicity so shaping only required at ends and edges. I have not used any contact adhesive and have therefore relied upon the self adhesive backing against the original grey bobbled-plastic floor.
I chose a light colour to offset 2 recent purchases that made my interior darker - privacy glass and dark seat covers. I think it achieves the job quite well but I recognise camping debris will show easily.
The reason I did it was to brighten up the interior, to give a more ‘modern’ look to the floor and to make it easier to clean (I have Karndean in my home which is fantastic stuff that proves very resilient to family life and easy to clean).
As explained, I have not used contact adhesive because I wanted to get Mrs JunglieD’s approval before making it more permanent. Right now the pieces can be lifted up and removed without leaving any residue whatsoever on the original flooring. However, the smaller pieces (infront of the runners) and thin pieces cut to shape the doorstep are too loose. They won’t ‘fall out’ because they’re held in place by surrounding pieces but they will rise up/down as occupants move around the cabin so not what you want in daily use. I’m therefore seeking any advice on a possible adhesive that has a known method for reliably removing it (incase I or a future owner choose to revert back to original).
Overall pretty happy - it’s a mega cheap mod (<£35) so I see it as something I can try for ‘the season’ and switch up easily if we decide to revert or change colour (I’ll have templates if a colour change is called for - which will reduce installation time to an hour I reckon!). Anyway - enough intro, here’s what you really want:
978A0B92-66B1-4D1F-825A-054D1FCCD072.jpeg
A167148B-D9F0-48C5-A063-323134229A81.jpeg
7EF1EECE-FF0E-445F-A96D-C243AADB1448.jpeg190BB3A8-FCAC-4E2E-B518-7450DC6B29A6.jpeg7EF1EECE-FF0E-445F-A96D-C243AADB1448.jpeg487B361C-2EE3-4074-8B6E-056241A74E1F.jpeg7862287D-3863-4A4D-871E-3A8C617A6233.jpeg5ECEA6F9-EE1A-4B9E-9E4E-6B4F874D7079.jpeg8FAF6178-F908-4F31-9817-2CFFD1C89A12.jpeg
 
So - I have attempted a copy-cat of the flooring as completed by @Oceandream A-T
Like him I bought 3 packs of the vinyl self-adhesive floor tiles from B&Q with the only tools required being a sharp Stanley knife, metal edge ruler or set square, pencil and paper (for shaping the edges).
It was actually pretty enjoyable to do - I split the job over a couple of intervals so not sure how long in total it takes; about 3 hours total if I had to guess - usual measure twice cut-once rule applies!
I’ve installed with a 30cm offset as advised in the instructions, using whole pieces between the rails for simplicity so shaping only required at ends and edges. I have not used any contact adhesive and have therefore relied upon the self adhesive backing against the original grey bobbled-plastic floor.
I chose a light colour to offset 2 recent purchases that made my interior darker - privacy glass and dark seat covers. I think it achieves the job quite well but I recognise camping debris will show easily.
The reason I did it was to brighten up the interior, to give a more ‘modern’ look to the floor and to make it easier to clean (I have Karndean in my home which is fantastic stuff that proves very resilient to family life and easy to clean).
As explained, I have not used contact adhesive because I wanted to get Mrs JunglieD’s approval before making it more permanent. Right now the pieces can be lifted up and removed without leaving any residue whatsoever on the original flooring. However, the smaller pieces (infront of the runners) and thin pieces cut to shape the doorstep are too loose. They won’t ‘fall out’ because they’re held in place by surrounding pieces but they will rise up/down as occupants move around the cabin so not what you want in daily use. I’m therefore seeking any advice on a possible adhesive that has a known method for reliably removing it (incase I or a future owner choose to revert back to original).
Overall pretty happy - it’s a mega cheap mod (View attachment 75802
View attachment 75803
View attachment 75804View attachment 75801View attachment 75804View attachment 75805View attachment 75806View attachment 75807View attachment 75808

Thanks for the reply. What a fantastic job you’ve done looks really smart. Hope your as chuffed with it as we are it’s still looking as good as the day we fitted it, Completely agree with your whole write up. Lovely job.


Iv just seen the comment above ref the three points. In hindsight I should have mentioned that the adhesive can was only used as and when required (If anything) I found the grip glue on the bottom of the planks was more than capable of holding the planks down it was only used on the smaller corner cuts and very sparingly at that. Believe me I had no intention to “pulling the wool over anyone’s eyes” which is how I took the tone last comment.


I hope you enjoyed the process and glad your had the courage to try something different.
All the best.


Sent from my iPhone using Tapatalk
Thanks for the clarification - the flooring passed muster on a nice day trip today so I’ll be keeping it!
Can I ask which brand/type of contact adhesive you used sparingly on the smaller loose/edge pieces?
 

VW California Club

Back
Top