Buy all your VW California Accessories at the Club Shop Visit Shop

Towbar fit with prep (ID7)

Califorian

Califorian

VIP Member
Messages
137
Location
Bangor NI
Vehicle
T5 SE 180 4Motion
Hi, I have been posting on the General Forum hoping to get some useful info on fitting towbar to a 2015 Cali 180 SE that has towbar prep ID7. I suspect I am either missing the obvious or have the wrong expectations!!!. I was hoping that once removing the lights and bumper etc it would be obvious that a harness was available to connect to. The Towbar fit (Provided very quickly by PF Jones) went smoothly and took about 1 hour. however the wiring has come to halt until I find out where the connections are . With towbar prep I don't expect to have to run cables under the vehicle to the passenger seat, dash and engine compartment. Indeed the harness provided by PF Jones (13 pin dedicated wiring kit 05/2012 Westfalia part no 321652300113) is quite short and only has two connectors. The instructions provided state the connectors are behind the passenger side internal rear wheel arch cover. Although I can get part access to this area it would probably require the removal of the wardrobe etc. This doesn't seen to tie up with other comments I have read where it is stated the wiring with tow bar prep is quick and only takes 45 mins.
Any help would be welcome, good news or bad news is acceptable. but there must be someone out there who has experienced the same issue .

thanks in advance of some words of wisdom and support:):)
 
This is just a guess, but have you looked into the space where the Leisure battery is installed under the rear wardrobe?
The battery is easily removed after removing the battery clamp. Use of a wide paint scraper to ease the battery over the lower lip of the access hatch makes it easier to get the battery out without disconnecting it.
On mine, looking at the rear of the vehicle, the cable passes to the N/S under the bumper to the edge of the plastic under shield then forward and above the N/S edge of the under shield and then upwards which would take it into the Leisure Battery compartment.:thumb
 
Thanks for coming back WelshGas, I have'nt looked in there, good idea. I will try your idea of sliding it forward, a torch and mirror might give me a good look around. Was yours a towbar prep version?
 
No,I had the removable towbar factory fitted.
I don't think you can remove just the wardrobe as the gas holder and water tank are integral and in fact in the factory the whole unit + hob etc: are fitted as one combined unit, but the mains wires run to the charger which is fitted above the leisure battery in the wardrobe base and I think most of the vehicle wiring loom to the rear runs through that space as well.
Let us know how you get on.:thumb
 
Hi WelshGas, good link to the tips and tricks thread. Unfortunately I still haven't found the towbar leads. Your tip for getting the aux battery out was useful to get the battery over the lip. There are some cables in there but only really for the inverter and some water tank ones. I pulled them all gently to see if they were stowed away. At least I now know where a few more things are:thumb:thumb. Today I will revisit access through the plastic panel in the wardrobe and I will drill the rivets out (again) from the plastic housing for the mains trip. Torch and mirror again. I am sure the connectors are in there somewhere!!!:):) . Or else I have missed the really obvious when I had all the bumper and plastic housings off underneath.

However, as a newbie to the T5 (though did tour all around Europe and Ireland in our T3 in the 90s) We managed to have a great day out yesterday with BBQ lunch on an initial outing to the Mourne Mountains. :thumb


Hi, did you track down the wiring loom?
 
Hi, did you track down the wiring loom?

Hi

Well despite plenty of research and looking in holes and panels etc I never did find the easy solution I was after. I was under a time pressure to get the towbar wiring fitted for a bike rack and catch a ferry. Consequently I eventually swallowed my pride and went back to Northern Ireland Van Centre Donnelly Bros to have the wiring fitted. It turned out that I was on the correct track and that the 'tow bar ready wiring' terminates behind the rear left hand panel. I already had the wiring loom pulled into the correct place but they insisted on fitting their own for warranty purposes. They obviously employ a gynaecologist or trained hamster to do the wiring as they carried it out by removing the external panel for the mains site connection/water filling point. I expect their experience and being able to look at the wiring in a normal T5 van helps. Cost was something like ÂŁ200 to supply the cable and fit!!! I already had fitted the tow bar which was easy and took about 1 Hour.

Why VW can't run the cable down to the back of the vehicle for all to see is a mystery you me.

Good luck
 
thanks for that. I think I will leave the panel til I need to do it.i hope I can find this post then.
 
Last edited:
Hi

Well despite plenty of research and looking in holes and panels etc I never did find the easy solution I was after. I was under a time pressure to get the towbar wiring fitted for a bike rack and catch a ferry. Consequently I eventually swallowed my pride and went back to Northern Ireland Van Centre Donnelly Bros to have the wiring fitted. It turned out that I was on the correct track and that the 'tow bar ready wiring' terminates behind the rear left hand panel. I already had the wiring loom pulled into the correct place but they insisted on fitting their own for warranty purposes. They obviously employ a gynaecologist or trained hamster to do the wiring as they carried it out by removing the external panel for the mains site connection/water filling point. I expect their experience and being able to look at the wiring in a normal T5 van helps. Cost was something like ÂŁ200 to supply the cable and fit!!! I already had fitted the tow bar which was easy and took about 1 Hour.

Why VW can't run the cable down to the back of the vehicle for all to see is a mystery you me.

Good luck

Thanks, I'll have a poke around!
Alec
 
Please let us know what you find.

If I get a chance this weekend I'll take off the water/ mains panel stick my phone in the hole and try and take some pictures. How they get their fingers in to make the disconnections/ connections and fit new pins I'm not too sure because there is very little space and the connections are at least 6 inches away from the hole.

Ian
 
I've just had an internal look and I think I have found the connector. If it's the correct one it is sitting just to the rear of the fresh water inlet pipe ( a white corrugated tube). Access would be easier from outside through the mains socket aperture ( I don't think you'd need to remove the water pipe).

I have a Westfalia towbar, which was fitted as an accessory by the VW dealer, from new, to the factory tow bar prepared electrics. I have a dodgy right hand indicator at the socket pin, so have been checking for bad connections. But I have just checked and the towbar was fitted less than 2years ago, and the Cali is less than 3years old ...... So either way I should be covered by VW warranty.


Yep that sounds like it and as I said earlier it is fitted by removing the external mains and fresh water panel.

Definately sounds like a warranty job to me. It's very tight and fiddly once you try and get your 9 inch long fingers in there
 
If I get a chance this weekend I'll take off the water/ mains panel stick my phone in the hole and try and take some pictures. How they get their fingers in to make the disconnections/ connections and fit new pins I'm not too sure because there is very little space and the connections are at least 6 inches away from the hole.

Ian
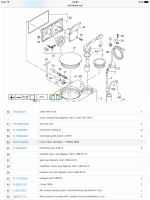
This might help.image.png
 
Why? That picture is about as useful as an ashtray on a motorbike when it comes to tow bar wiring on a Cali:):):):):)
If you read the previous posts the terminal connection for the Towbar Prep wiring is behind the External Water and Mains Flap . This Diagram shows what is behind the Unit, the pipes and wiring to the water Tank etc. as the previous poster was going to remove the unit to get at the connection so at least he would be able to see what was what.
Obviously it is of no use to you with your superior knowledge, but if the poster had to disconnect the water filling hose etc: he would have an idea.
Just trying to be helpful. And your post is???????????

WelshGas, If I were to dig deeper and attempt to access the wiring loom this diagram would have been a great help. It's always good to know what's holding what together before everything disappears into an inaccessible void!
Out of interest, where did you get this diagram from?
Thanks Alec
 
Yep that sounds like it and as I said earlier it is fitted by removing the external mains and fresh water panel.

Definately sounds like a warranty job to me. It's very tight and fiddly once you try and get your 9 inch long fingers in there

If you do it yourself, be careful removing the whole panel. It is fixed by the 4 self lapping Torx screws that are on the corners of the mains socket. These are easy to see and undo from the outside, but the front is held in place by two plastic studs with self tapping nut on the inside of the body. As the studs are plastic they are very easy to break, and the nuts are equally easy to lose into the bowels of your van.

The water pipe has a jubilee clip fixing the short plastic corrugated pipe to the black external panel.

The easiest way to remove this facilities panel and access the nuts and the jubilee clip is to remove the lower back panel inside the wardrobe below the sliding window cover. The back of the facillites panel can then be see and got at more easily than trying to access via the electric breaker panel at the back of the rear cupboard.

There is a two way cable socket behind the power socket to disconnect it from the van electrics, but the earth cable is bolted directly to the body of the van with a short length of green and yellow cable. In your case the power socket can be left hanging down outside the van on this cable. No damage will occur.

Don't over tighten the self tapping nuts. The plastic studs can break and then the black facilities panel will stick out at the front due to the curvature of the body.

This sound more difficult than it is. You will scuff a knuckle or two, but is an easy job for a competent DIYer.
If your van is still under warranty, then let you dealer do it.

Alan
I'm letting the dealer sort it but I like to gather some background data before making contact with them. Bit like researching ailments before visiting the GP!
 
If you read the previous posts the terminal connection for the Towbar Prep wiring is behind the External Water and Mains Flap . This Diagram shows what is behind the Unit, the pipes and wiring to the water Tank etc. as the previous poster was going to remove the unit to get at the connection so at least he would be able to see what was what.
Obviously it is of no use to you with your superior knowledge, but if the poster had to disconnect the water filling hose etc: he would have an idea.
Just trying to be helpful. And your post is???????????


Hi Welsh Gas, I think you have clearly missed the humour of my post. My references, as you will see from my previous posts, are related to VWs ability to hide the wiring connections for the 'tow bar ready' vehicles in the most difficult to access position, instead of being openly accessible or extended to a location adjacent to the tow bar.

It would be great if there was a simple guide available to carry out the wiring to vehicles with so called 'tow bar prep'. When I was trying to find out how to do jt, there were plenty of people speculating on where the connection was or providing well intentioned but wrong information. My reply to ArunAlec's question of 'did I ever resolve the problem' was to provide some clear facts about where the connection actually is and how the VW VanCentre had carried out the wiring, e.g. by removing the outside panel for the mains supply etc. If I get a chance this week I will take the panel off again and take some pictures of the wiring connections.
 
Back
Top