Buy all your VW California Accessories at the Club Shop Visit Shop

Something seems wrong with the batteries

ThomasHJ

ThomasHJ

Top Poster
VIP Member
Lifetime VIP Member
Messages
1,301
Location
Netherlands
Vehicle
T5 SE 140
Would really appreciate some help with the following.

Our Cali is T5 2011 SE. During our recent holidays we camped without being on EHU for the first time. I noticed the batteries voltage (as shown on the central control panel) dropped quite quickly. I know the % is inaccurate and sometimes even goes back up again. But they didn’t even last 48 hours. It was hot outside, but we used nothing that draws from the batteries, other than the fridge. This surprised me as I have read here on the forums that fellow Cali owners can easily do 3 days without EHU and sometimes even 4 or 5 days. So something seems to be wrong.

Another sign that something is wrong is that the amperes that are being drawn from the batteries (as shown on the central control panel) are always at 0.0 even with the fridge and lights on. I just hadn’t noticed this before.

It’s strange, because when we bought our Cali second hand (less than a year ago) we had the VW Camper Centrum do a full check of everything. They replaced all 3 batteries (the car battery and both leisure batteries), so the batteries are all brand new.

To gather some information that might help in diagnosing the issue, I did a 'test' the last 2 days. I parked the Cali, turned on the fridge at ‘max’ (even added a normal amount of food) and checked the voltage-reading on the central control panel every few hours or so when I had the chance and wrote down the voltage reading. I kept all other things that could draw from the leisure batteries turned off (heater, lights, etc).


These are the readings:

Time​
Voltage​
%​
Wednesday
14:42​
12.9​
100​
14:45​
12.5​
70​
14:47​
12.5​
70​
19:53​
12.5​
70​
Thursday
8:18​
12.3​
50​
10:59​
12.2​
40​
15:07​
12.1​
30​
18:11​
12​
20​


So, within 24 hours the reading says 12.1V / 30% and after another 3 hours, so a total of 27 hours the batteries were at 12V / 20%.

At this point I figured the readings show there’s something wrong so I stopped the test. I did try one more thing and that is that I fired up the auxillary heater and the amperage draw stayed at 0.0. Which seems wrong as well.

I’m not very experienced with electrics, but spend a few nights reading through the forums. I read in this thread that there’s a possibility that the 50/75A fuse of the rear battery is blown and were just using 1 leisure battery now. It’s dark out now and I put the Cali on EHU to charge the batteries back up again. Will try to test the fuse tomorrow. Will read up on how to do that tonight, because I have only used a multimeter once before in my life.

I hope it’s something simple like that fuse, so that it can be fixed by myself. If not, I will have to bring the van in to the VW Camper centrum. But prefer to try DIY wherever possible. Also because I like to learn. I do fear that if we are on 1 battery only, this might have been the case since we bought the van. Which means one of the brand new batteries hasn’t been charged since then. Which, well, isn’t good

Any help is very much appreciated.
 
As always with issues like these , fuses fuses fuses ...always check them first , there’s no other way arround when solving a problem knowing if all fuses are ok .
Check them first thing in the morning .
 
Last edited:
@hotel california will do! Will report back in the morning
Check the Control Panel for Diagnostic codes.

For those of you who don't know, if you ever get any problems with roof stuck or any other error say with the heater or fridge, you are able to access the hidden menu in your control panel as used by the VW Engineers.

Access as follows:


1. Hold down the centre of the rotary button together with the menu button (button below with the squares on it)

2. You will get the hidden menu.

3. Rotate the rotary button to get to "VW diagnose" and select this by pressing on the centre of the rotary button.

4. If no errors are present it will display "no errors"

5. If Errors are present then a list of errors will appear

6. Press the centre of the rotary button again to delete all the errors

7. Repeat process above just to check that errors have dissapeared!

8. Re-configure the time and date if neccesary.


Any problems should be resolved assuming these are Electronic and not Mechanical.


Error Codes from Control Panel.


1 = 1 = Pop-up roof

2 = 2 = Plumbing Heating

3 = 3 = Cool box Cooler

4 = 4 = Sewage wastewater

5 = 5 = Fresh water

6 = 6 = Outside temperature

7 = 7 = Battery

Error Code Defect Fault

1010 1010 Short-circuit to (earth) roof

1001 1001 Fuse / short circuit to (plus+) roof

1100 1100 Short-circuit output Roof "on"

1101 1101 Fuse roof "to"

1110 1110 Short-circuit output Roof "to"

1111 1111 Fuse starting Roof "to"

2100 2100 Short-circuit output heating on / off

2101 2101 Fuse output heating on / off

2001 2001 Interrupt input heating 30

3100 3100 Short-circuit output coolbox

3101 3101 Fuse interrupt output coolbox

3001 3001-J698-cooler input error "Active"

3010 3010 Short-circuit input icebox "actual temperature"

3011 3011 Interrupt or fuse input icebox "actual temperature"

4000 4000 Short-circuit to ground water level sensor

4001 4001 Fuse circuit to plus water level sensor failure

5000 5000 Short-circuit to ground water level sensor

5001 5001 Short circuit to plus water level sensor failure

6000 6000 Short-circuit to ground temperature sensor or for outdoor temperature

6001 6001 Fuse / short circuit to plus two temperature sensors for outside temperature

7001 7001 interrupt input interrupt input D +
 
Checked for errors. No errors present.

Will try and measure the fuse on the rear battery with a multimeter tomorrow. However, I have little experience with electricity.

Am I correct to set the multimeter to DC at 20? I assume to measure the battery itself I would normally put the red probe of the multimeter on the positive pole (+) and the black probe on the negative (-) pole of the battery?But now I need to measure the fuse. How do I go about doing that?

Or do I need to disconnect and remove the battery first and remove the fuse to measure it? If so, I'm sure there's a chronological order I should stick to when removing?

Sorry for my ignorance on the subject of electricity. ;-)
 
So I did some more reading and I am now assuming that yes I need to take the battery out and remove the fuse. Then set the multimeter to OHMS and 20K and then measure the fuse. I am then expecting to see a number close to 0 if the fuse is working.

Can anyone confirm this is correct and what things I need to keep in mind to safely remove the battery and fuse without messing things up?
 
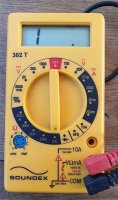
I'm using this old multimeter btw. It has no fancy sound or options but I assume it will suffice for this task.75.jpg
 
Testing the voltage won't help as the fuse could be getting power from either side as there are two batteries.
You are right - Set the multimeter to resistance (ohms) and test across the fuse (take it out if you can) of you get a reading that is 0, the fuse is good. If it is a really high reading, it has blown.
I don't see the need to remove the battery at this stage. The resistance test would work with just the fuse.
Edit - just seen you photo. Settings look right. Touch the probes together before testing anything to check you get a 0 reading.
 
Hi Thomas, I had something similar a few years ago on a boat with x2 leisure batteries, split charger and starter battery. It turned out to be one of the leisure batteries slowly failing. It was band new and only lasted 13 months and just out of guarantee!!

It would display it had accepted a full charge but quickly loose it's mojo. I seemed to be held up by the second leisure battery witch confused things for a while. I had to remove them and have them tested separately at the battery shop, one proved to be failing but looked OK.

It was a pain to diagnose and took me weeks. I suggest if you can't find anything immediately obvious, have the batteries checked at a battery shop they will do it for free (in the hope of selling you a new battery) and work from there, it will save you so much time if you know they are definitely 100% good. Also put on the best you can afford, as cheaper ones don't seem to last that long. The second one lasted 18 months. But knew what the problem was the second time!!. I then put a more expensive one on and its 2 years now its still fine... I'm not that technical either sorry, I hope this helps in some way. Good luck!
Cheers Mike
 
@Stoneybroke thanks for the feedback.

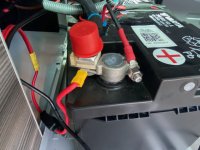
Ideally I would test the fuse without removing it. But I'm not sure that's possible, because I think I need to measure the top of the fuse (where teh red arrow in my foto points to) and there's a cable connected to it so I doubt I can reach the metal top part of the fuse with the probe without touching the metal part of the cable.

Also, I'm afraid I will mess things up when I remove stuff. Because there's of course the other battery that's still connected.

What would be the right way of going about measuring the fuse without messing up? What do I remove if anything and where do I put the probes of the multimeter?battery.jpg

@Duetveil thanks for the reply. They are brand new, quality batteries placed by a special VW camper Centre here in NL. But youre right, its a possibility. If the fuse wont be the solution then I'll bring the van in to the dealer and keep your comment in mind!
 
@Stoneybroke thanks for the feedback.

Ideally I would test the fuse without removing it. But I'm not sure that's possible, because I think I need to measure the top of the fuse (where teh red arrow in my foto points to) and there's a cable connected to it so I doubt I can reach the metal top part of the fuse with the probe without touching the metal part of the cable.

Also, I'm afraid I will mess things up when I remove stuff. Because there's of course the other battery that's still connected.

What would be the right way of going about measuring the fuse without messing up? What do I remove if anything and where do I put the probes of the multimeter?View attachment 66376

@Duetveil thanks for the reply. They are brand new, quality batteries placed by a special VW camper Centre here in NL. But youre right, its a possibility. If the fuse wont be the solution then I'll bring the van in to the dealer and keep your comment in mind!
It's easier to pull the battery out. The leads are long enough to do that without disconnecting. Once out, undo the nut on the red cable and lift the red cable off. Do Not touch any metalwork and wrap the end in a cloth, or put a glove over it. Lift off the fuse and check it.
 
thanks so much @WelshGas that sounds doable. Will try and report back.
Once the bolt holding the battery clamp is removed use a paint scraper or dinner knife to lift the front of the battery up to clear the lip of the compartment. Pass some rope or a strap around the battery to pull it towards you sliding it up the paint scraper/knife and onto the boot floor.
 
appreciate if someone can sanity check this idea - I think you can check it indirectly without taking it apart

you should also be able to measure the voltage (set the meter to 20 volts DC, top left) then measure between

the negative terminal on the battery and the top of the fuse cube
then
the negative terminal on the battery and the bottom of the fuse cube (i.e. the positive terminal of the battery)

if the fuse is good then both will read the same
if the fuse if blown then likely you will get a different reading
 
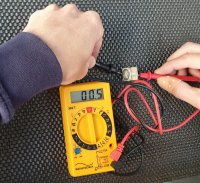
Ok so, I removed the battery. @WelshGas thanks for the tip on how to do it more easily. I then disconnected the red cable, put a oven mitt over it to make sure it wouldnt touch metal. I removed the cube fuse and measured it by placing the red and black probes of the multimeter on either sides (top and bottom) on the metal parts of the cube fuse.

See attached foto for the result. I believe this means that the fuse is not faulty? And there's more...
001.jpg

When putting the battery back in place, I seem to have messed up :Nailbiting:headbang.
I noticed a loose hose. Which seems to have been connected before I put the battery back in the cabinet.
It's a thin hose that is connected to the right side of the battery and I'm not sure but it seems I broke it off?
Find below a picture of the way it was before I messed up (1) and a picture of the lose hose (2) and the place where the hose was connected to tehe battery (3). I guess its broken off but I'm not sure. It doesn't seem to go back on.

002.jpg

Much thanks for the help so far. Now, is the cube fuse indeed working as it should? And what to do about the hose? Damn, I hate that I messed up. Seemed to be going so smoothly :).
 
Ok so, I removed the battery. @WelshGas thanks for the tip on how to do it more easily. I then disconnected the red cable, put a oven mitt over it to make sure it wouldnt touch metal. I removed the cube fuse and measured it by placing the red and black probes of the multimeter on either sides (top and bottom) on the metal parts of the cube fuse.

See attached foto for the result. I believe this means that the fuse is not faulty? And there's more...
View attachment 66378

When putting the battery back in place, I seem to have messed up :Nailbiting:headbang.
I noticed a loose hose. Which seems to have been connected before I put the battery back in the cabinet.
It's a thin hose that is connected to the right side of the battery and I'm not sure but it seems I broke it off?
Find below a picture of the way it was before I messed up (1) and a picture of the lose hose (2) and the place where the hose was connected to tehe battery (3). I guess its broken off but I'm not sure. It doesn't seem to go back on.

View attachment 66379

Much thanks for the help so far. Now, is the cube fuse indeed working as it should? And what to do about the hose? Damn, I hate that I messed up. Seemed to be going so smoothly :).
That's the vent hose. Normally has a hard plastic nozzle on the end of the corrugated tube that plugs into a hole on the side of the battery. Pull out the nozzle on the battery and reattach to the corrugated section.
 
So I glued the nozzle back to the corrugated tube. Seems to hold. The measurement of the cube fuse with the multimeter shows that the fuse is fine, if I am not mistaken. So now what? Any other stuff I could try?
 
It is worth checking that both leisure batteries are the same type and rating while that one is out. Does feel instinctively though like you are only running on one battery but a bit puzzled by the lack of a current draw on the display. Also the old chestnut of making sure nothing (adaptor etc) is plugged into the 240v inverter socket on the B pillar by the kitchen.

what voltage is the rear battery showing on the multimeter?

Anyone know where the control panel current/voltage actually takes the reading, does It only take the read out from the under seat leisure battery with the reading taken as proxy for both as they are in series?

Why doesn’t it show a current draw when the heater/fridge is drawing current? Can you get a current change on the panel by just turning on the kitchen lights?

Also, is it just me or is there quite a bit of corrosion on the terminals for an internal battery connection? Could there be water getting in affecting the wiring up to the other battery? Short? Earthing problem?
Hopefully just a different fuse....

sorry for a list of what if’s.
 
Thanks for the input. It wouldn't surprise me if it's running on just one battery. There is nothing plugged into any of the sockets.

@Drpps I just did a voltage reading of the battery. The multimeter shows 13V.

As far as the corrosion, I dunno. I saw it to and wondered what it was. Is it corrosion?
 
Thanks for the input. It wouldn't surprise me if it's running on just one battery. There is nothing plugged into any of the sockets.

@Drpps I just did a voltage reading of the battery. The multimeter shows 13V.
1600437855477.jpeg
As far as the corrosion, I dunno. I saw it to and wondered what it was. Is it corrosion?
Looks like it. It’s not disasterous but compared to this on @Loz van (2016 not 2011) 1600437855477.jpeg

has the battery been resting or is it on charge at present? 13v is healthy if it has been resting for a good few hours.
Can you get to the terminals under the front seat to check the voltage on that battery.
 
Thanks for the input. It wouldn't surprise me if it's running on just one battery. There is nothing plugged into any of the sockets.

@Drpps I just did a voltage reading of the battery. The multimeter shows 13V.

As far as the corrosion, I dunno. I saw it to and wondered what it was. Is it corrosion?
Do you have a Solar Panel? If not, what is the Blue wire on the +tve Red connection?
 
@Drpps it is not on EHU. 13V seems healthy yes. Which seems logical because its not even a year old. I will see what I can reach under the front seat. thanks
 
Do you have a Solar Panel? If not, what is the Blue wire on the +tve Red connection?
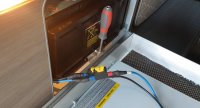
No solar panels. The blue wire leads to a socket that a previous owner build into the latch that closes the battery cabinet. For some reason unknown to me he felt he needed a socket back there. Probably for a fridge or portable solar panel or something I guess. I just never use that socket. He connected the wires to the battery, added 2x20V fuses on the wire. I'll add a picture of it.

fuses.jpg
 
No solar panels. The blue wire leads to a socket that a previous owner build into the latch that closes the battery cabinet. For some reason unknown to me he felt he needed a socket back there. Probably for a fridge or portable solar panel or something I guess. I just never use that socket. He connected the wires to the battery, added 2x20V fuses on the wire. I'll add a picture of it.

View attachment 66389
That’s OK. That wouldn’t be responsible for your problem.

Does the Control Panel show a current drain in amps?
 
No. it never shows any drain in amps. It's always at 0.0. I believe it used to show 0.2 quite often. I believe the control panel screen itself uses 0.2A.
 
Back
Top