2023 Ocean leaking roof fabric

Status
Not open for further replies.
Sorry to read you are having issues with your new van.

We also have the new bellows fabric and discovered it leaks in the same place as yours. This was the first time it had got wet and the leaks started within an hour of the rain starting. The rain wasn’t heavy, certainly not driving rain, and there was barely any wind.

I was hopeful the advice about a few wet / dry cycles will fix the issues, but after reading some of the later comments in this thread about the fabric type, I’m not so sure now.

View attachment 108387

View attachment 108388
I was convinced by a mate of mine to try the wetting and drying route as a solution to the seam leak. So far it does seem to be working to some extent. The seam that was originally leaking now seems to be dry... had a couple of other minor leaks from other seams, which I will test again in a few days. Hopefully they'll be dry then too. Fingers crossed.
 
also got the same issue on our bellows, booked into VW in June. Brand new van, delivered March 2023. I assume MY23 given the lighter cream colour.
Yes is MY23.
I've tried soaking the seams and then letting them dry a few times and it seems to be working. Certainly the seam that was leaking initially is now dry!
I've got a few other minor leaks from other seams, but I'm hoping they fix themselves after a few more spacings.
Might be worth giving it a try
 
I was convinced by a mate of mine to try the wetting and drying route as a solution to the seam leak. So far it does seem to be working to some extent. The seam that was originally leaking now seems to be dry... had a couple of other minor leaks from other seams, which I will test again in a few days. Hopefully they'll be dry then too. Fingers crossed.
This is great news - fingers crossed it sorts the issue.
 
Hello, ours has the new bellows and has been leaking too...on all sides but through the seams (including verticle ones). After the first time (when it was pouring through the front seams and side) we let them dry and then tested it with a hose pipe at home and no leaks. We then put the pop top up in light rain and no wind and it leaked again...we have it booked in at the van centre for beginning of June and will give them a ring about the recent leaks :( good luck with resolving yours x
 
Wow, a lot of new type fabric leaking.
Hope VW gets this sorted for you all asap!
 
If the dealer wants £320 to investigate, I would proceed Under protest, purely to get the warranty inspection carried out, but I would also state in an email to the dealer that you proceed on the understanding that the agreement to a charge is an imposed requirement by the dealer to facilitate the inspection of a clear fault that is covered under factory warranty. On a new vehicle.

The van is designed & fitted with a canvas, fitted at the factory, which has been specifically designed to provide a weather proof / water tight sleeping environment on a vehicle that is specifically sold as a camper van for use in all weather conditions for many many years of use.
Therefore the camper / canvas is clearly defective by the very definition & not fit for the purpose it was designed & you specifically bought the van to fulfill the requirement (I.e, camping)

Further, should they (VW / garage ) decide otherwise & decide to charge you, you will seek legal advice To recover the cost of the inspection of a clearly faulty part, as is demonstrated by your photos!

Example: if you bought a £30 tent, that was meant to provided weather protection (implied of otherwise) & the tent was found to leak after the first use or within a reasonable time thereafter, you would be entitled to a full refund under your consumer rights as the tent was not fit for purpose.

should VW not agree to fix the the issue fully, further damage will be caused as a direct result of the faulty canvas, any resulting damage caused ax a result of the obvious fault will be claimed by yourselves

Note: you can easily check the canvas at home, with a hose, by spraying water directly at it (the method the garage will use) !

if the canvas is found to be faulty (it must be) I would be asking VW / the dealer, to provide a large dollop of good will (in response to their request for a fee to investigate a clear fault of a part covered under the factory warranty).
Canvas water check is part of the factory QC check , clear not on this one.

I wish you the best of luck, report back to help others
Excellent answer! Never let any fault pass on a new (especially) expensive vehicle. T5’s and 6’s have a very bad assembly reputation in addition to some specific« lemon » engines and turbos. I am in a fight with my 2015, 115,000km and I am being ignored; there cannot be negotiations when a manufacture is at fault even though they are overwhelmed with recalls.

DC13E358-1870-4CF7-97D5-44A502955760.jpeg

0CCE5E16-8D2A-403C-AA31-6A212649A3F6.jpeg
 
After reading these posts of members that the canvas on their roofs leaking I was a little concerned as I had my canvas replaced last October and haven’t used it much since.
Now the weather has improved and it’s nice and sunny I thought I would give it a good spraying with the hose.
Absolutely no water coming in at all even after 5 minutes of constant heavy spraying, nothing at all.
On the outside you can see the water beading and running straight off. Cheeked all the seams and vulnerable areas again nothing.

Maybe if it’s raining all day and night and lashing into the sides of the canvas it might be different but from what I’ve seen today I’m happy with the outcome.
I did the same today with my MY2023 which is one of the last with the old single colour both sides 'canvas'. This was the first time it was ever wetted, 5 minutes serious spray hose soaking, and not a drip inside.

@Ozzy Pete, I imagine your T5 roof fabric replacement in October 2023 has to be an older mono-colour 'canvas' and not the or the two-colour new fabric?

I hope that the newer MY2023 with the two-colour fabric get this issue sorted; not my business, but perhaps they might try/argue for warranty replacement with the mono-colour fabric this apparently a good track record (I know it has changed a two or three times in the last 20 years) as this could be the least troublesome solution. I rather like the darker interior (though I have only seem photos of the new fabric).
I think you will find most bellows canvases will pass the hose test. That is equivalent to raining on a still/windless day. A more realistic test would be directing a high pressure stream of water along the seems to replicate " Wind Driven Rain " which has a higher penetrating force than normal rain. Rain in a stiff wind tends to be lateral in direction and will hit the canvas with a significant pressure increase, in severe wind conditions 2 to 3 x Atmospheric pressure ( 30-45 lbs/sq inch ) that is a lot of force.
 

Attachments

  • 15_Hens.pdf
    2.2 MB · Views: 43
Excellent answer! Never let any fault pass on a new (especially) expensive vehicle. T5’s and 6’s have a very bad assembly reputation in addition to some specific« lemon » engines and turbos. I am in a fight with my 2015, 115,000km and I am being ignored; there cannot be negotiations when a manufacture is at fault even though they are overwhelmed with recalls.

View attachment 108508

View attachment 108509
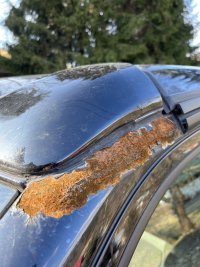
OMG, has this been done with photoshop, or is this real ?
 
OMG, has this been done with photoshop, or is this real ?
Looks real to me. Absolutely disgusting from VW to ignore this. I’m guessing the rain has got behind the paint and the stuck on awning channel has been gentle rocking away the paint from the body over 7 years.
 
I think you will find most bellows canvases will pass the hose test. That is equivalent to raining on a still/windless day. A more realistic test would be directing a high pressure stream of water along the seems to replicate " Wind Driven Rain " which has a higher penetrating force than normal rain. Rain in a stiff wind tends to be lateral in direction and will hit the canvas with a significant pressure increase, in severe wind conditions 2 to 3 x Atmospheric pressure ( 30-45 lbs/sq inch ) that is a lot of force.
I can well believe that storm driven rain for several hours is a worse challenge, but I did directly target the fabric with a horizontal jet of water for some time without any penetration.
 
I did the same today with my MY2023 which is one of the last with the old single colour both sides 'canvas'. This was the first time it was ever wetted, 5 minutes serious spray hose soaking, and not a drip inside.

@Ozzy Pete, I imagine your T5 roof fabric replacement in October 2023 has to be an older mono-colour 'canvas' and not the or the two-colour new fabric?

I hope that the newer MY2023 with the two-colour fabric get this issue sorted; not my business, but perhaps they might try/argue for warranty replacement with the mono-colour fabric this apparently a good track record (I know it has changed a two or three times in the last 20 years) as this could be the least troublesome solution. I rather like the darker interior (though I have only seem photos of the new fabric).
Yes the canvas is the light grey with the Panoramic front.
I was a little concerned about how light it was inside at first but I’ve now got used to it and like it.
I can imagine waking up in Spain on a nice campsite with the sun on the new canvas nice and light. Some of the new canvases are so so dark and really not sure I would like it that dark.
Just to be clear, @Ozzy Pete, your new October 2022 replacement canvas on your T5 California, is the two colour fabric (light inside darker outside) or it is the same colour inside and out?

I am interested as to whether the new two colour (two layer) fabric is now being used universally by VW.
 
Currently in France in my MY23 Coast with the new double skinned fabric touring Brittany. After rain a week ago with the pano opening facing the direction of the rain I did not see any water infiltration at the seams or through the fabric.
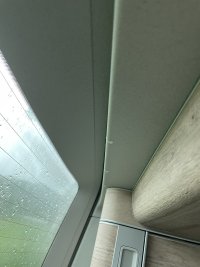
I was a little more preoccupied with the water coming through the main rear door opening. Clearly the rubber seal is not doing its job. I also have some pooling of water in the channel of the sliding window. When I open the window water drips inside the trim and behind the sink fixture. When tested the small drain is clear. I also have fogging in one led front light housing due to a failed seal.
Does VW even water test these pricey vehicles before shipping to the dealers. I guess not.
Regarding the fabric whetting to achieve waterproofing. It’s possible the thread is cotton and that might explain why some are seeing a lessening of the infiltration after a good soaking.

IMG_5517.jpeg
 
Just to be clear, @Ozzy Pete, your new October 2022 replacement canvas on your T5 California, is the two colour fabric (light inside darker outside) or it is the same colour inside and out?

I am interested as to whether the new two colour (two layer) fabric is now being used universally by VW.
It’s the same colour inside and out. Single skin. I do find that with the panoramic roof it’s much harder to close the sliding hatch. The material needs to be gathered at the front much more carefully than the old canvas. It could well be this fabric is thicker with lots more seams and zips or maybe it needs to be used a bit more to soften it up.
I’m going to try a squirt of silicone spray in the runners to see if it makes it easier to close.
 
Currently in France in my MY23 Coast with the new double skinned fabric touring Brittany. After rain a week ago with the pano opening facing the direction of the rain I did not see any water infiltration at the seams or through the fabric.
I was a little more preoccupied with the water coming through the main rear door opening. Clearly the rubber seal is not doing its job. I also have some pooling of water in the channel of the sliding window. When I open the window water drips inside the trim and behind the sink fixture. When tested the small drain is clear. I also have fogging in one led front light housing due to a failed seal.
Does VW even water test these pricey vehicles before shipping to the dealers. I guess not.
Regarding the fabric whetting to achieve waterproofing. It’s possible the thread is cotton and that might explain why some are seeing a lessening of the infiltration after a good soaking.

View attachment 108610
With regards the tailgate seal, make sure there are no debris behind the seal , between seal and bodywork. Also ease the seal upwards along the whole upper section ao that it definitely touches the tailgate when closed.
 
With regards the tailgate seal, make sure there are no debris behind the seal , between seal and bodywork. Also ease the seal upwards along the whole upper section ao that it definitely touches the tailgate when closed.
No debris. The Cali is new. I did check to make sure after the first downpour. The drips are appearing along the entire upper edge of the seal so it’s not localized. Had the same prob with a second rain event.
 
No debris. The Cali is new. I did check to make sure after the first downpour. The drips are appearing along the entire upper edge of the seal so it’s not localized. Had the same prob with a second rain event.
Sounds as if the seal has been compressed too much.
 
No debris. The Cali is new. I did check to make sure after the first downpour. The drips are appearing along the entire upper edge of the seal so it’s not localized. Had the same prob with a second rain event.
Open the tailgate looking carefully at how the rubber seal seats. and
Gently pull the seal off / away from the metal body seams (along the top section only, you should see some white sealant on the metal along the top edge where the body panels meet (roof and tailgate frame) ?
Slightly pinch the reinforced (gripping) part of the seal evenly along the top edge To create a slightly smaller aperture, push the seal back on nearly all the way, but don’t push it all the way home, check the seal overlaps the internal roof trim spanning the tailgate aperture, if all Ok close the tailgate carefully.
whilst the tailgate is closed, push the tailgate panel inwards (towards the van) just above the rear light clusters, the panel should feel solid with no movement or squeaks?
re open the tailgate check the seal And Check the internal high level trim panel is sitting correctly, nice and tight to the exterior frame of the bid panel (roof / tailgate perimeter) the trim panel locates into a recess in the rubber seal, the seal should sit perfect flat onto the rear roof trim panel for its entire length.
Get a piece of plain paper, put onto the seal so it protrudes inside & outside the van, place it at one edge close to one hinge, Carefully close the tailgate ensuring it latches correctly & check all is normal (I.e. it close without issue Or undue resistance).
now try gently pulling the paper, you should feel light resistance (when you try and pull the paper ) slide the paper over by half it’s width, repeat the process paying attention to the resistance against the paper being pulled is even across its width and the same as the first instance, if the seal is correct the resistance will be felt and will be even along the entire length of the seal, (if it is not you’ve found your leak point) repeat The above until you are happy that the seal is holding the same pressure across its entire length.

Possible Adjustment of the tailgate is very limited, have a look in the download section, I’ve posted a how to guide. Basically you have two pump stops either side of the tailgate panel, these control how much the tailgate is pulled in towards the van, get it correct and there will be no squeaks & the seal will seal correctly, get it wrong and the tailgate squeaks (I.e. it move on the seal) and may not seal correctly. Too much / not enough compression on the seal may make it leak, particularly if it’s localised Issue such as the seal is push too far back to make consistent contact with the tailgate panel.
the tailgate latch can affect the amount of pressure applied to the tailgate panel.

it’s listed as rear door adjustment in the technical downloads : link


please report back to help others.

edit:

web link : to same resource;


for completeness
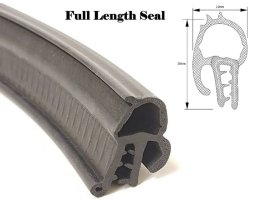
here’s a cross section of the door seal. you can see it works on friction to keep it in the correct position. the bead at the top of the seal (left hand side of the photo) acts to prevent water breaching the seal this should be tight to the body work along the length of the opening frame, the tang (on the right side) locates over the internal trim panel, the knife edge middle of photo sits against the vertical part of the tailgate when the tailgate is closed, it is this that creates the friction mentioned above and should grip a piece of paper

180659FE-1651-4FE7-9876-5ED43EA64337.jpeg
 
Last edited:
Currently in France in my MY23 Coast with the new double skinned fabric touring Brittany. After rain a week ago with the pano opening facing the direction of the rain I did not see any water infiltration at the seams or through the fabric.
I was a little more preoccupied with the water coming through the main rear door opening. Clearly the rubber seal is not doing its job. I also have some pooling of water in the channel of the sliding window. When I open the window water drips inside the trim and behind the sink fixture. When tested the small drain is clear. I also have fogging in one led front light housing due to a failed seal.
Does VW even water test these pricey vehicles before shipping to the dealers. I guess not.
Regarding the fabric whetting to achieve waterproofing. It’s possible the thread is cotton and that might explain why some are seeing a lessening of the infiltration after a good soaking.

View attachment 108610
LED headlight fogging is “normal” as they’re not sealed units.
 
Open the tailgate looking carefully at how the rubber seal seats. and
Gently pull the seal off / away from the metal body seams (along the top section only, you should see some white sealant on the metal along the top edge where the body panels meet (roof and tailgate frame) ?
Slightly pinch the reinforced (gripping) part of the seal evenly along the top edge To create a slightly smaller aperture, push the seal back on nearly all the way, but don’t push it all the way home, check the seal overlaps the internal roof trim spanning the tailgate aperture, if all Ok close the tailgate carefully.
whilst the tailgate is closed, push the tailgate panel inwards (towards the van) just above the rear light clusters, the panel should feel solid with no movement or squeaks?
re open the tailgate check the seal And Check the internal high level trim panel is sitting correctly, nice and tight to the exterior frame of the bid panel (roof / tailgate perimeter) the trim panel locates into a recess in the rubber seal, the seal should sit perfect flat onto the rear roof trim panel for its entire length.
Get a piece of plain paper, put onto the seal so it protrudes inside & outside the van, place it at one edge close to one hinge, Carefully close the tailgate ensuring it latches correctly & check all is normal (I.e. it close without issue Or undue resistance).
now try gently pulling the paper, you should feel light resistance (when you try and pull the paper ) slide the paper over by half it’s width, repeat the process paying attention to the resistance against the paper being pulled is even across its width and the same as the first instance, if the seal is correct the resistance will be felt and will be even along the entire length of the seal, (if it is not you’ve found your leak point) repeat The above until you are happy that the seal is holding the same pressure across its entire length.

Possible Adjustment of the tailgate is very limited, have a look in the download section, I’ve posted a how to guide. Basically you have two pump stops either side of the tailgate panel, these control how much the tailgate is pulled in towards the van, get it correct and there will be no squeaks & the seal will seal correctly, get it wrong and the tailgate squeaks (I.e. it move on the seal) and may not seal correctly. Too much / not enough compression on the seal may make it leak, particularly if it’s localised Issue such as the seal is push too far back to make consistent contact with the tailgate panel.
the tailgate latch can affect the amount of pressure applied to the tailgate panel.

it’s listed as rear door adjustment in the technical downloads : link


please report back to help others.

edit:

web link : to same resource;


for completeness
here’s a cross section of the door seal. you can see it works on friction to keep it in the correct position. the bead at the top of the seal (left hand side of the photo) acts to prevent water breaching the seal this should be tight to the body work along the length of the opening frame, the tang (on the right side) locates over the internal trim panel, the knife edge middle of photo sits against the vertical part of the tailgate when the tailgate is closed, it is this that creates the friction mentioned above and should grip a piece of paper

View attachment 108629
Thanks for that detailed info. I will have a proper look next week when I get home and of course report back. In the meantime I’m just enjoying the scenery.

IMG_5638.jpeg
 
Was there by any chance a strong wind blowing when your canvas leaked? We once camped in a new frame tent in heavy rain and a strong wind blew rain through the canvas like an aerosol spray. With time, the tent became waterproof, as others have suggested. Maybe worth soaking it a time or two?
 
The canvas shouldn't leak even without it being wetted. I wouldn't expect a modern material to let in water, they must have a coating etc on, they won't be plain cotton canvas of old.

Manufacturers don't wet Convertible cars before handing them over.
 
Currently in France in my MY23 Coast with the new double skinned fabric touring Brittany. After rain a week ago with the pano opening facing the direction of the rain I did not see any water infiltration at the seams or through the fabric.
I was a little more preoccupied with the water coming through the main rear door opening. Clearly the rubber seal is not doing its job. I also have some pooling of water in the channel of the sliding window. When I open the window water drips inside the trim and behind the sink fixture. When tested the small drain is clear. I also have fogging in one led front light housing due to a failed seal.
Does VW even water test these pricey vehicles before shipping to the dealers. I guess not.
Regarding the fabric whetting to achieve waterproofing. It’s possible the thread is cotton and that might explain why some are seeing a lessening of the infiltration after a good soaking.

View attachment 108610
Have exactly same issue with water leaking from seal between tailgate and roof on our MY22 Ocean during heavy rain. Trip 1 to dealer high level brake light replaced (well known source of leaks judging by previous posts). Leak continued. Trip 2 to dealer rear rubber seal adjusted. Leak continued. Trip 3 rear screen and surrounding panels removed, refitted and rear screen resealed. @Perfectos post (and previous posts) really helpful but I’m of view leave it to dealer to sort under warranty. Will await the next rainfall to see if this has fixed the issue.
 
Status
Not open for further replies.

VW California Club

Back
Top