Changing the Speed Display on VW T5.GP California Dash Insert - 7E0 920 970 E
Preamble
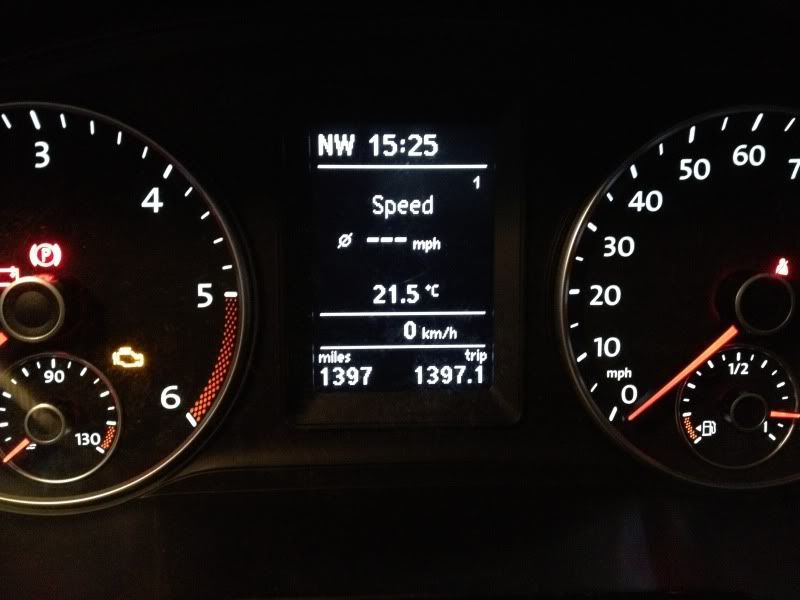
The factory setting of the dash insert in the T5.GP is such that it will display KMH in the lower section of the Driver Information Display (DIS) which when in the UK is mostly useless. There is away to alter the behaviour of the DIS to show a large and much more useful MPH display instead of the normal KMH one and with the ability to switch the KMH display on for Euro Touring.
Tools Required
• VCDS Diagnostic Tool
Steps Required
1. Plug in the VCDS cable to the ODB port on the van, which can be found on the drivers side just above the accelerator pedal.
2. Switch on the ignition and load up VCDS on your computer. Always ensure you have the current release of the software available from
http://www.Ross-Tech.com.
3. Assuming you have not already done so, proceed to make a backup copy of your vehicle’s factory configuration. See my guide “making a backup copy of your vehicle factory configuration” for further details.
4. Ensure your vehicle is clear of any fault codes before starting, if there are any fault codes keep a copy of the scan and then reset the fault code.
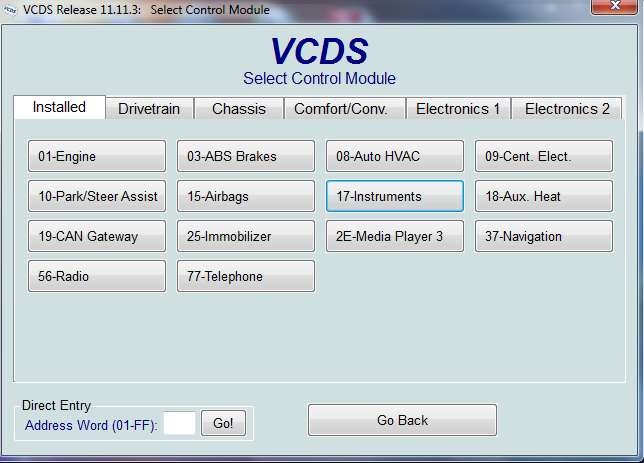
5. Select the Control Module by clicking ‘Select’ in the VCDS main screen and then choose 17-Instruments.
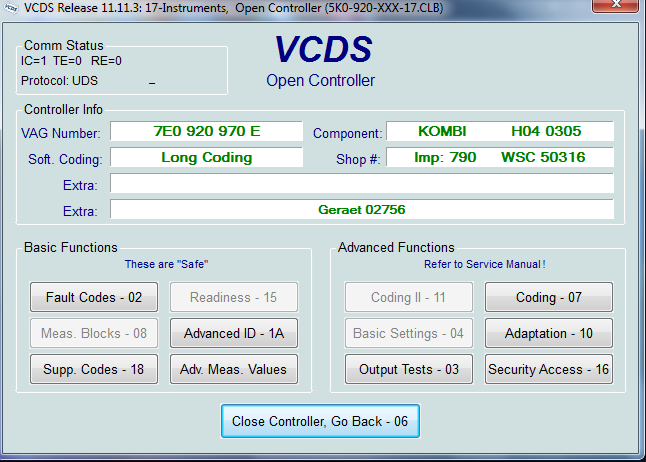
6. The software will login to the controller, interrogate it for fault codes and display relevant information about the controller. You can see from this screen that VCDS is using the 5K0-920-xxx-17 Label File which means our California Dash Insert shares some likeness to the 2009 onwards MK6 Golf (5K Chassis) which would also use the same label file.
At this point it is important to note that although this procedure works on many Dash Inserts in terms of California I have currently only tested it on my 7E0 920 970 E unit.
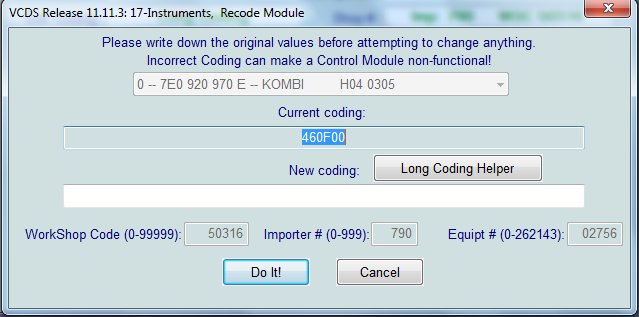
7. From this screen choose ‘Coding – 07’ which will open the Recode Module screen and display the current coding.
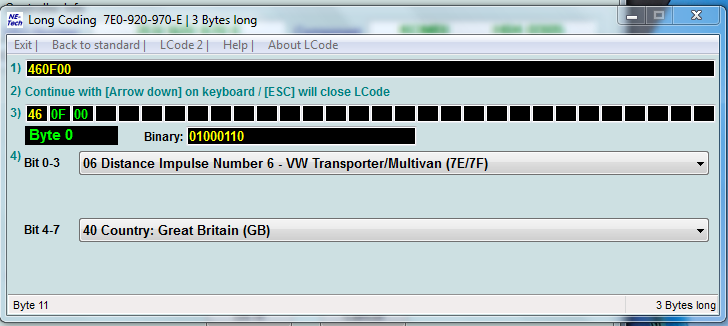
8. Click ‘Long Coding Helper’ which will take you to the Binary / Hex coding editor built into VCDS.
You can see that this is a 3 Byte Controller, Bytes 0, 1 & 2 shown at item 3. In this case we want to edit Byte 0 which is the first displayed Byte so no searching around required for this one. Byte 0, Bits 4-7 handle the Country Code, in our case GB.
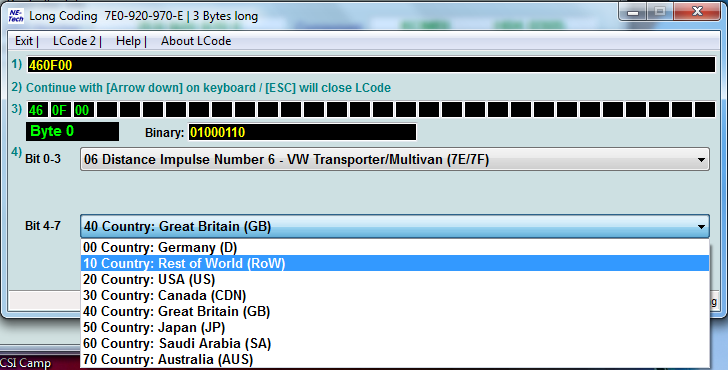
9. This part of Long Coding Helper contains a dropdown menu choice where we will make our changes.
10. For this tweak we need to select Australia (AUS).
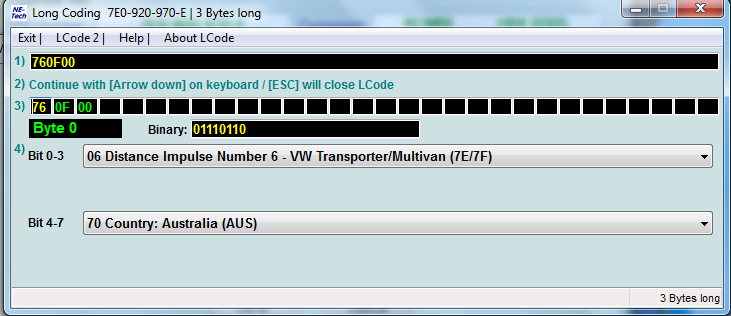
11. Once you’ve selected Australia choose ‘Exit’ which will return you back to the slightly different looking Recode Module screen. You will note that the new coding is now shown in the New Coding box. Press ‘Do It’ to save this coding to the Controller.
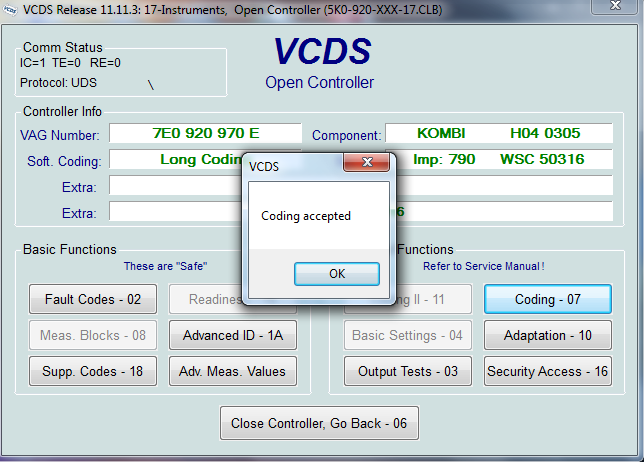
12. When the coding has been saved to the Controller you will be presented with a small confirmation box to acknowledge the new coding has been accepted by the Controller, choose ‘OK’.
13. Now that you have changed and stored the new code it’s time to close the Controller by choosing ‘Close Controller, Go Back – 06’ and if necessary you can close VCDS and unplug the OBD cable from the Van.
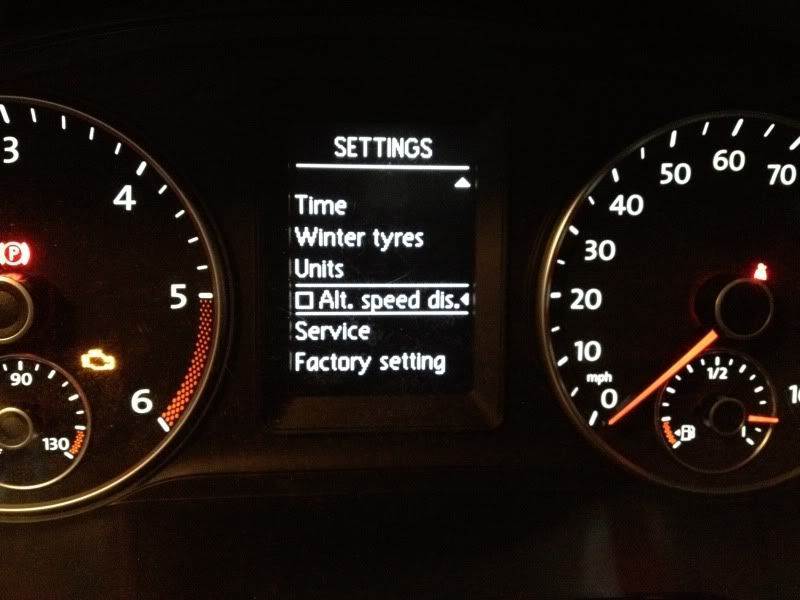
14. To finish off this neat little tweak we need to make some changes with the menu on the DIS. Select Settings and then look for ‘Alt. speed dis’ which should be ticked, remove this tick and choose ‘back’.
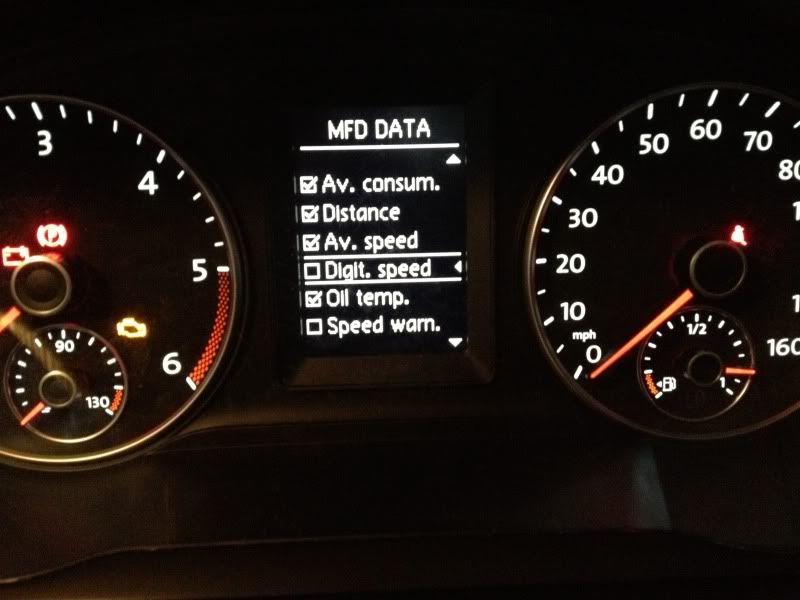
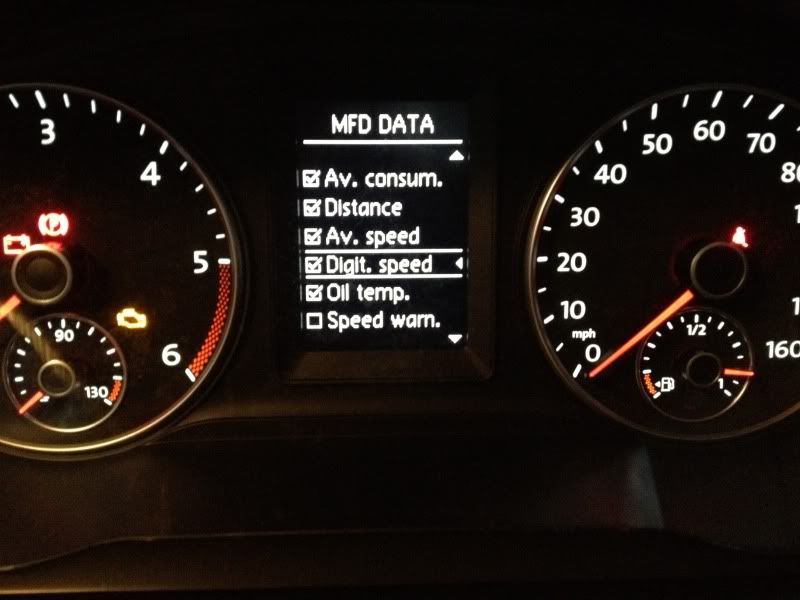
15. Next choose ‘MFD Data’ and scroll down where you will find ‘Digit. Speed’, place a tick in this box.
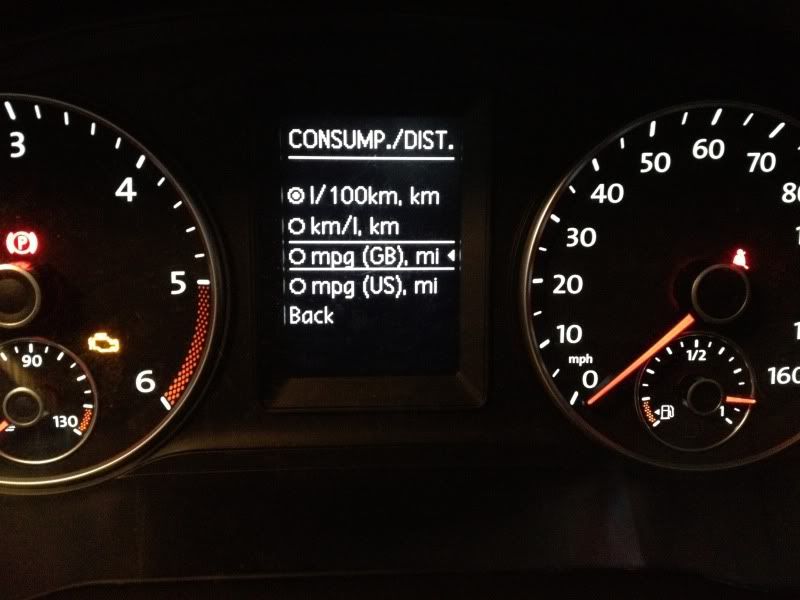
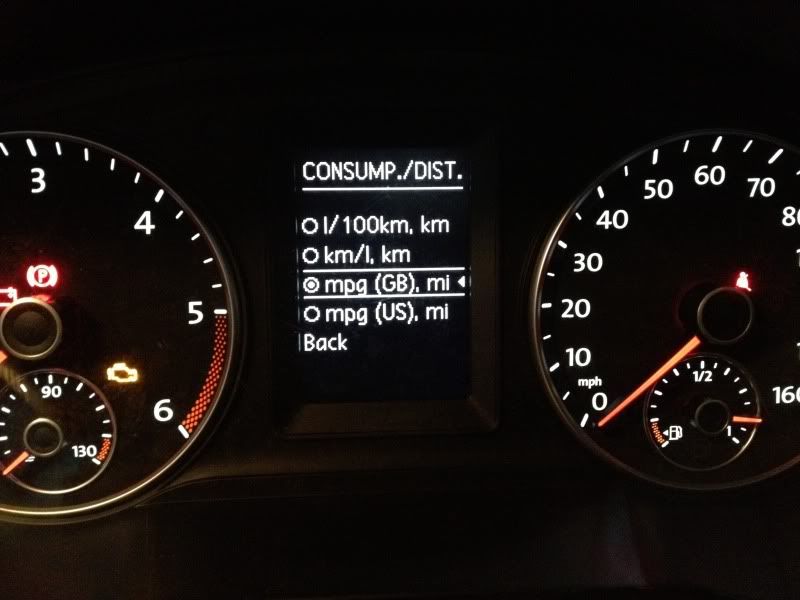
16. Finally we will need to set the units back to ‘MPG (GB) mi’. Choose ‘Units’ and you’ll find that the Dash Insert has defaulted to ‘l/100km km’. Select the ‘MPG (GB) mi’ setting
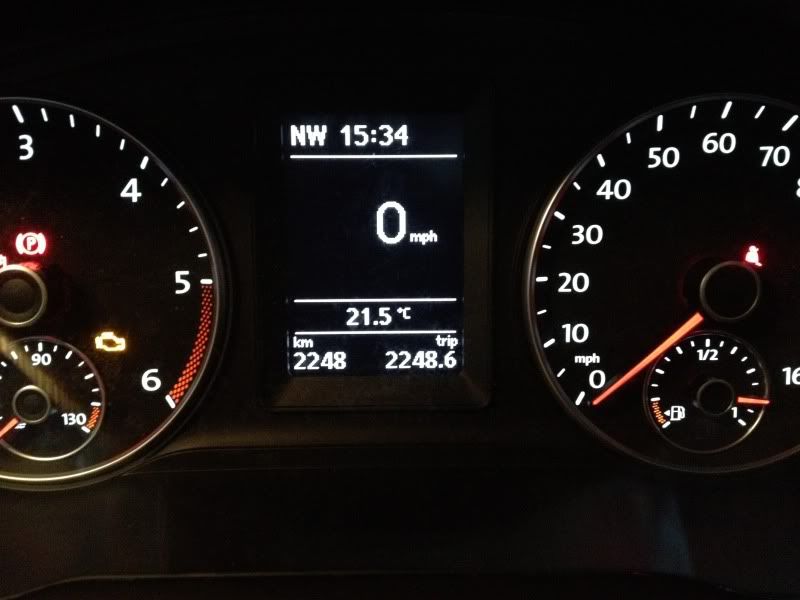
17. Exit out of the menu to your new large MPH display and give yourself a pat on the back whilst remarking about how clever you are.
To access the KM display when in the EU etc then simply dive back into the menu on your DIS and select 'Alt. speed dis'.