steve_b
Lifetime VIP Member
So something that has bugged us since we bought the Cali in January (and not been able to use it yet in anger...) was the rubber grommet that shrouded the cables between the drivers door and the A pillar had become detached.
There is a plastic clip inside that a lug had broken off - someone had in the past tried what looks like a hot glue gun but to no effect. The part number written on the grommet is 7h0 959 550 which looks like it has been replaced by 7H1-959-843-B . These are for two clips and the rubber shroud.
Now of course the problem with changing the clip is that you need to take the wiring loom out to feed the wires through the clip - which presumably means dismantling the door card and unclipping the speakers, window controls, mirror controls etc - probably not a five minute job.
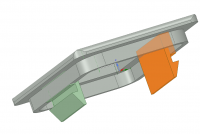
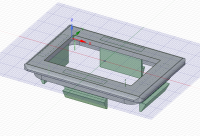
What I did manage to do was remove the broken clip by cutting through the plastic and bending it around the cables. I then taught myself 3d modelling using the free "designspark" software and printed on my budget 3d printer a replacement part.

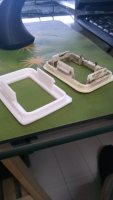
became this (note the snapped lug in the far side of the old part):

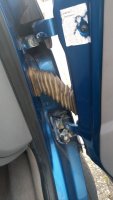
of course I still had the problem in putting it back without removing the cable loom so I cut across the centre of a lug with a hacksaw and bent it apart around the cables. Then the part clipped in with a satisfying "click" and some kind of normality has returned:

I might update the design with the top and bottom clips (they are on the original part but I didn't put them on my prototype as I didn't expect it to fit first time!) so my current replacement clip will slide up and down - if that becomes a problem I can re-print one. And I could also include a stepped break in the design to avoid me having to cut it with a hacksaw
If anyone wants the files then let me know
There is a plastic clip inside that a lug had broken off - someone had in the past tried what looks like a hot glue gun but to no effect. The part number written on the grommet is 7h0 959 550 which looks like it has been replaced by 7H1-959-843-B . These are for two clips and the rubber shroud.
Now of course the problem with changing the clip is that you need to take the wiring loom out to feed the wires through the clip - which presumably means dismantling the door card and unclipping the speakers, window controls, mirror controls etc - probably not a five minute job.
What I did manage to do was remove the broken clip by cutting through the plastic and bending it around the cables. I then taught myself 3d modelling using the free "designspark" software and printed on my budget 3d printer a replacement part.

became this (note the snapped lug in the far side of the old part):

of course I still had the problem in putting it back without removing the cable loom so I cut across the centre of a lug with a hacksaw and bent it apart around the cables. Then the part clipped in with a satisfying "click" and some kind of normality has returned:

I might update the design with the top and bottom clips (they are on the original part but I didn't put them on my prototype as I didn't expect it to fit first time!) so my current replacement clip will slide up and down - if that becomes a problem I can re-print one. And I could also include a stepped break in the design to avoid me having to cut it with a hacksaw
If anyone wants the files then let me know
Last edited:


