Buy all your VW California Accessories at the Club Shop Visit Shop

GC 680 Hacks.

B

Blue Grand Driver.

Messages
9
Location
New Zealand
Vehicle
Grand California 680
Hi from NZ. Have had our 680 for 4 months and got a lot of useful info off the forum so thought time for payback with a few tips that might help others.
1. First thing we did was remove the step. Too low for NZ camping spots. Replaced with a plastic folding job. It doesn’t fault any of the electronics when you unplug it.
2. Need a spare in NZ. An alloy won’t fit in the spare hanger. A 16” Crafter steel wheel fits the van and the hanger.
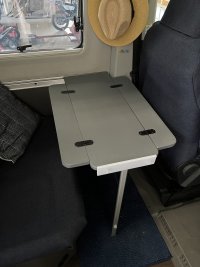
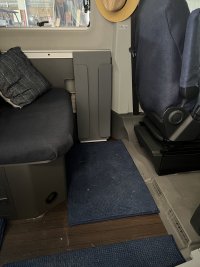
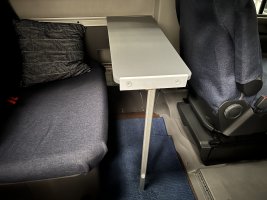
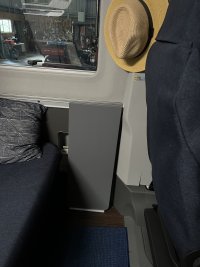
3. Many owners complain about the table. We made a smaller one as per the pics. Used a piece of shelving with a leg on one end and a hinge on the other. A piece of aluminium extrusion originally for a wardrobe rail (which you need for the wardrobes anyway) fits nicely into the existing extrusion and using the existing bolts. Use another piece of the extrusion for the leg. No holes in the van and an easily fold away table. Happy to provide further detail if anyone wants.
4. Take the rods out of the front curtain and just slide the curtain up behind the folded down sunshades. It sqeezes into the shade hinges and takes 10 seconds to fit and remove versus 10 minutes.
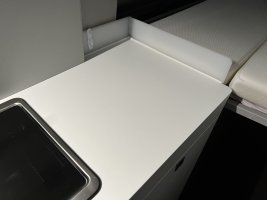
5. The rear of the kitchen bench needs a divider to protect the bed and the wall behind during food prep. We made one out of an HDPE cutting board and glued and screwed it in place. See pic.
6. Add a switch to the rear light under the external shower. It doesn’t otherwise go off with the doors open, during those long summer nights.
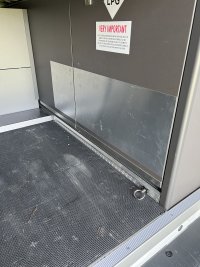
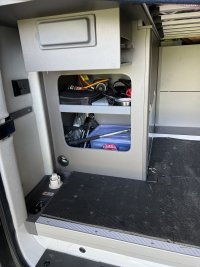
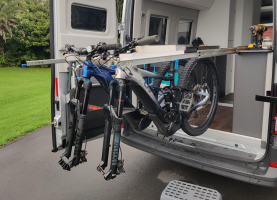
7. We carry 2 foldable e-bikes in the boot, so have protected the cupboard sides from scratches with glued on aluminium sheeting.
8. With the bikes in, there is no access to the back left cupboard, so probably going to put a rear facing extra door on it for easy access. Anyone done that already??
9. Also we fitted some decent 255 AT tyres on 16” black alloys as many others have done.
Cheers.
AD1600CA-4965-4DC5-B59C-0A1EE60E36C5.jpeg

2CE8A55A-6430-40D8-B332-C18E85011D65.jpeg

C08786D2-1FE7-4C87-919F-07C44A5B73F1.jpeg
 
Welcome @Blue Grand Driver.

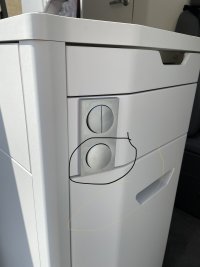
The boot light has a switch on the end of the kitchen unit. This turns the boot light off (but not back in again). To turn it back on you need to close the rear doors and then reopen. I don’t know why it works like this, but that switch is an off switch.

D3BCDD8D-E272-4334-ABCE-B6ACE4CD763B.jpeg
 
Hey there BGD, fellow kiwi and 680 owner here. Thanks for your input and ideas, I am somewhat envious of our European friends who have access to so many aftermarket parts for the GCs. We have to get the #8 wire out as always!

Agree regarding the factory step, its been of concern to me in terms of the reduced ground clearance, no issues yet but just may do the same once we get further afield, thats if the bloody rain ever stops!
 
Welcome @Blue Grand Driver.

The boot light has a switch on the end of the kitchen unit. This turns the boot light off (but not back in again). To turn it back on you need to close the rear doors and then reopen. I don’t know why it works like this, but that switch is an off switch.

View attachment 96292
The large switch switches ALL lighting off in the habitation area, didn’t know it did the boot light as well so good to know.
 
Hey there BGD, fellow kiwi and 680 owner here. Thanks for your input and ideas, I am somewhat envious of our European friends who have access to so many aftermarket parts for the GCs. We have to get the #8 wire out as always!

Agree regarding the factory step, its been of concern to me in terms of the reduced ground clearance, no issues yet but just may do the same once we get further afield, thats if the bloody rain ever stops!
Another kiwi. Don't mind the step although I have rebuilt mine twice after bottoming out. It's the grey water discharge mod for NZ regs that is much more a worry. I really don't want to knock that off.
 
Another kiwi. Don't mind the step although I have rebuilt mine twice after bottoming out. It's the grey water discharge mod for NZ regs that is much more a worry. I really don't want to knock that off.
Hi, when we picked up our GC brand new, the step had a dent in the bottom of it and the cam lock grey water connection was already broken off. Have also removed that and reverted to the original reach under the body design which works fine.
 
Some good ideas there. Have you got any photos of the aluminium sheets on the cupboard doors and the windscreen blind hack?
 
Some good ideas there. Have you got any photos of the aluminium sheets on the cupboard doors and the windscreen blind hack?
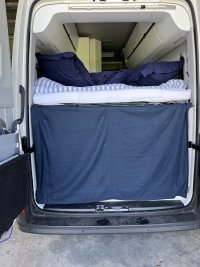
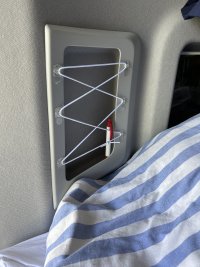
Hi, pics of the aluminium sheets below. Easily glued on with double sided tape. Also a couple of other ideas. We have added a simple curtain to the garage, velcroed on at the top and magnets at the bottom to stay in place. Keeps the garage private if you are relaxing with the doors open. Also a cut out into the storage bin to allow access when the garage is full with e-bikes. And elastic cord woven over the bed cubby holes to hold stuff in. And lastly added a couple of wings on the table that fold out when it is stood up. Sorry forgot to take a pic of the front blind but it is simply a case of tucking it into the sun shades at each end and pushing the shades forward so that it holds in place with out the rods and straps. So much easier. Also thanks to the Kiwi owner who posted the wooden insert idea for the gap in the bed. Just made one and works a treat.

E6C8C64A-5017-4C14-A4CC-B8CE624B0B88.jpeg

FD54ECF8-DD47-4A02-8017-8890DEBBBA72.jpeg

7450941B-D2DA-48C4-A8F4-2367F59F8A55.jpeg

FDE99125-EBA6-4C8F-9079-3C493B19A3E1.jpeg

97697D03-D262-4078-AF8A-96634623FD2B.jpeg

50D433AE-E72C-47EF-99DE-748538230127.jpeg
 
Hi, pics of the aluminium sheets below. Easily glued on with double sided tape. Also a couple of other ideas. We have added a simple curtain to the garage, velcroed on at the top and magnets at the bottom to stay in place. Keeps the garage private if you are relaxing with the doors open. Also a cut out into the storage bin to allow access when the garage is full with e-bikes. And elastic cord woven over the bed cubby holes to hold stuff in. And lastly added a couple of wings on the table that fold out when it is stood up. Sorry forgot to take a pic of the front blind but it is simply a case of tucking it into the sun shades at each end and pushing the shades forward so that it holds in place with out the rods and straps. So much easier. Also thanks to the Kiwi owner who posted the wooden insert idea for the gap in the bed. Just made one and works a treat.

View attachment 98640

View attachment 98641

View attachment 98642

View attachment 98643

View attachment 98644

View attachment 98645
Thanks for that. Really like the aluminium sheets idea and the rubber matting on the floor, that’ll be my next job. :)
 
Thanks @Blue Grand Driver. I'm also a fellow kiwi GC680 owner and really like your hacks.
Any chance you could share some more details about the wheels you bought and also what seat covers you are showing in the pictures?
 
Hi fellow Kiwi GC680 driver, we made the seat covers ourselves. Just bought a bit of upholstery material and went at it making paper shapes, etc. etc. They actually tuck into the plastic shrouds pretty easily. Plenty of advice on wheels and tyres on this forum. Need to make sure your choice is certified weight rated at least as much as the OEM’s. We went for Avanti Titan 16 inch rims. And then bigger tyres, 255/70/16, which are wider and larger diameter so can run quite a bit lower tyre pressures.
 
This is turning into the Kiwi Gathering area!

With the wheels and tyres - did you need to get a LT400 cert for the changes? I keep getting conflicting information on whether ones needed.
 
Nope. Our tyre guy said the wheels and tyres were at or higher rated than the OEM’s and it went through the COF no issues.
 
Hi from NZ. Have had our 680 for 4 months and got a lot of useful info off the forum so thought time for payback with a few tips that might help others.
1. First thing we did was remove the step. Too low for NZ camping spots. Replaced with a plastic folding job. It doesn’t fault any of the electronics when you unplug it.
2. Need a spare in NZ. An alloy won’t fit in the spare hanger. A 16” Crafter steel wheel fits the van and the hanger.
3. Many owners complain about the table. We made a smaller one as per the pics. Used a piece of shelving with a leg on one end and a hinge on the other. A piece of aluminium extrusion originally for a wardrobe rail (which you need for the wardrobes anyway) fits nicely into the existing extrusion and using the existing bolts. Use another piece of the extrusion for the leg. No holes in the van and an easily fold away table. Happy to provide further detail if anyone wants.
4. Take the rods out of the front curtain and just slide the curtain up behind the folded down sunshades. It sqeezes into the shade hinges and takes 10 seconds to fit and remove versus 10 minutes.
5. The rear of the kitchen bench needs a divider to protect the bed and the wall behind during food prep. We made one out of an HDPE cutting board and glued and screwed it in place. See pic.
6. Add a switch to the rear light under the external shower. It doesn’t otherwise go off with the doors open, during those long summer nights.
7. We carry 2 foldable e-bikes in the boot, so have protected the cupboard sides from scratches with glued on aluminium sheeting.
8. With the bikes in, there is no access to the back left cupboard, so probably going to put a rear facing extra door on it for easy access. Anyone done that already??
9. Also we fitted some decent 255 AT tyres on 16” black alloys as many others have done.
Cheers.
View attachment 96277

View attachment 96278

View attachment 96279
Hi, curious to know the brand and model of your foldable bikes. Thanks.
 
Hi, pics of the aluminium sheets below. Easily glued on with double sided tape. Also a couple of other ideas. We have added a simple curtain to the garage, velcroed on at the top and magnets at the bottom to stay in place. Keeps the garage private if you are relaxing with the doors open. Also a cut out into the storage bin to allow access when the garage is full with e-bikes. And elastic cord woven over the bed cubby holes to hold stuff in. And lastly added a couple of wings on the table that fold out when it is stood up. Sorry forgot to take a pic of the front blind but it is simply a case of tucking it into the sun shades at each end and pushing the shades forward so that it holds in place with out the rods and straps. So much easier. Also thanks to the Kiwi owner who posted the wooden insert idea for the gap in the bed. Just made one and works a treat.

View attachment 98640

View attachment 98641

View attachment 98642

View attachment 98643

View attachment 98644

View attachment 98645

Hi just question about the hinges on the table. No point asking where you got them as you are far away but what are they called so I can search in the UK. We have a table that needs repair which had similar ones. Thanks in advance and I do like the table which is giving me an idea for maybe something for my caravan.
 
Also keen to see a picture of the wheels + AT tyres!

We have just shortened down our table as well - so annoying we couldn't walk through.

Great idea on the alloy sheet - where'd you pick that up from?
My current job is to try to fit a slider in the back to put full-size E-MTB's in the back.
1674440280960.png
 
Also keen to see a picture of the wheels + AT tyres!

We have just shortened down our table as well - so annoying we couldn't walk through.

Great idea on the alloy sheet - where'd you pick that up from?
My current job is to try to fit a slider in the back to put full-size E-MTB's in the back.
View attachment 104341
This is a great idea, Have you finalised this project yet? How will you stow the bed etc? Any chance of some photos?
 
Sorry haven’t checked the forum for a while. Our tyres are Michelin latitude cross, and very happy with them. Good grip in slippery conditions and a soft rubber compound. No noticeable wear after first 10 k. Aluminium sheet available from hardware stores. Bunnings in NZ.
 
Also the hinges are called sewing machine table hinges and you can get them on Amazon or aliexpress or at an old school cabinetmakers.
 
Sorry haven’t checked the forum for a while. Our tyres are Michelin latitude cross, and very happy with them. Good grip in slippery conditions and a soft rubber compound. No noticeable wear after first 10 k. Aluminium sheet available from hardware stores. Bunnings in NZ.
Morning, interesting option.
Are they GC load rated and are you on 17” wheels.

sorry just read your earlier reply on load rating.
 
Another kiwi. Don't mind the step although I have rebuilt mine twice after bottoming out. It's the grey water discharge mod for NZ regs that is much more a worry. I really don't want to knock that off.
another kiwi here...we have sheared the grey water discharge bit twice already. The second time I went to a regular RV repair place and had the part replaced and repaired for much less than the quoted cost of vw part, which would take weeks to arrive. First time it broke when we hit a rock on a side road of the Forgotten Highway and second time was on gravel roads at Mavora Lakes in South Island. Hard to avoid it happening when exploring the more rugged parts of nz.
 
Another kiwi. Don't mind the step although I have rebuilt mine twice after bottoming out. It's the grey water discharge mod for NZ regs that is much more a worry. I really don't want to knock that off.
another kiwi here..we have broken the water outlet off twice! cheapest fix is at regular RV repairer using generic part vs waiting weeks for vw part that costs more for the part than it did for labour and part.
 
Back
Top