chockswahay
Top Poster
VIP Member
WARNING! You may not like this post, you may lose the will to live, or you might just learn something new…………. feel free to stop reading at any point!
I have been experimenting with different techniques for using a stove top Moka pot. After having spent far too long watching umpteen YouTube videos this is where I am at the moment. The pot used in these photos is the Bialetti ‘3 cup’ however my preferred choice is our ‘6 cup’. As anyone who has one of these knows the cup reference is only relevant to very small cups so don’t read too deeply into the numbers.
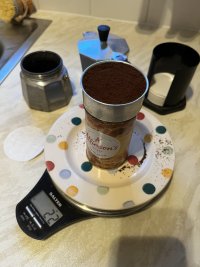
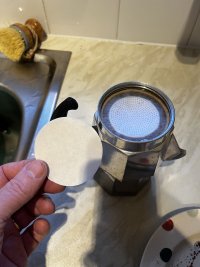
First I grind 20 grams of medium roast beans, finer than shop bought espresso grind but in reality not as fine as espresso setting on a good quality grinder. Then I drop the coffee into the coffee funnel and gently lift and drop onto the tube in the photo so that the grinds settle then once near the top I just level with a knife…. NO tamping. I put an ‘Aeropress filter’ on the underside of the top vessel (wet it to stay in place) then I pour boiling water in the the pressure chamber up to the relief valve. Screw the whole lot together (tea towel needed) and place on the stove on a VERY low heat. In my case I use an induction plate as the stove is induction and the Moka pot is aluminium.
It takes 9 or 10 minutes before the coffee starts to come through but when it does it is a nice, gentle, controlled flow. After about a minute I turn off the hob and the residual heat will last for another 2 minutes before the top vessel is full and the liquid turns clear and (possibly) starts to spurt. Note that it is very important to stop the brew the moment the spurting starts.
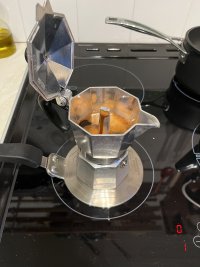
Once the brew is complete I remove it from the heat and rest it in cold water to stop the brewing process.
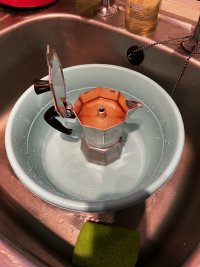
Then a quick stir to mix the coffee and oils evenly before pouring into 2 preheated cups. I add 50 grams of coffee to each cup then 125 grams of foamed milk (previously heated to 65 c) which has been frothed in a cafetière by pumping 4 or 5 times gently but ‘through’ the surface, then another 50 or so but briskly and without breaking the surface. This aerates and ‘stretches’ the milk.
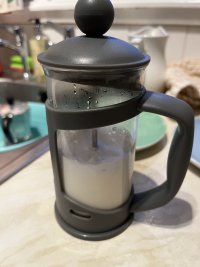
The final result is a ‘poor man’s Cappuccino’ (or flat white) without the expense of an espresso machine and an expensive grinder

I agree it’s not perfect, but the taste and texture are lovely and not a million miles away from something you would buy in a coffee shop or café.
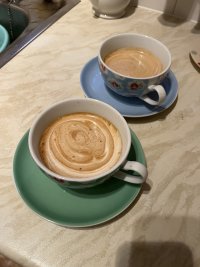
So, I did say this was full on nerdy but I thought it might just be of passing interest to those of you with a Moka Pot. The Lessons that I have learned during this excessive are:
1. Grind a bit finer than shop bought espresso grind.
2. Fill the funnel to the top, level with a knife but do NOT tamp down.
3. The use of a paper filter helps refine the taste (and if you don’t believe that I can tell you it makes the Moka pot much easier to clean afterwards!)
4. Filling the pressure vessel with boiling water does reduce the overall time and avoids ‘scorching’ the coffee.
5. A 3 minute extraction allows for the grinds to be fully wetted and draw out the full taste, helping to avoid sour (under extraction) or bitter (over extraction)
6. Depending on your personal taste the coffee to milk ratio should be around 1 to 2.5
7. Do not heat the milk beyond 65c or it will break down in structure and be less able to hold the air bubbles when frothing.
8. I clearly have TOO MUCH time on my hands and need to get out more . But at least I can have a nice cup of coffee in the meantime
9. Don’t judge me! I did warn you at the beginning…….
I have been experimenting with different techniques for using a stove top Moka pot. After having spent far too long watching umpteen YouTube videos this is where I am at the moment. The pot used in these photos is the Bialetti ‘3 cup’ however my preferred choice is our ‘6 cup’. As anyone who has one of these knows the cup reference is only relevant to very small cups so don’t read too deeply into the numbers.
First I grind 20 grams of medium roast beans, finer than shop bought espresso grind but in reality not as fine as espresso setting on a good quality grinder. Then I drop the coffee into the coffee funnel and gently lift and drop onto the tube in the photo so that the grinds settle then once near the top I just level with a knife…. NO tamping. I put an ‘Aeropress filter’ on the underside of the top vessel (wet it to stay in place) then I pour boiling water in the the pressure chamber up to the relief valve. Screw the whole lot together (tea towel needed) and place on the stove on a VERY low heat. In my case I use an induction plate as the stove is induction and the Moka pot is aluminium.


It takes 9 or 10 minutes before the coffee starts to come through but when it does it is a nice, gentle, controlled flow. After about a minute I turn off the hob and the residual heat will last for another 2 minutes before the top vessel is full and the liquid turns clear and (possibly) starts to spurt. Note that it is very important to stop the brew the moment the spurting starts.

Once the brew is complete I remove it from the heat and rest it in cold water to stop the brewing process.

Then a quick stir to mix the coffee and oils evenly before pouring into 2 preheated cups. I add 50 grams of coffee to each cup then 125 grams of foamed milk (previously heated to 65 c) which has been frothed in a cafetière by pumping 4 or 5 times gently but ‘through’ the surface, then another 50 or so but briskly and without breaking the surface. This aerates and ‘stretches’ the milk.

The final result is a ‘poor man’s Cappuccino’ (or flat white) without the expense of an espresso machine and an expensive grinder

I agree it’s not perfect, but the taste and texture are lovely and not a million miles away from something you would buy in a coffee shop or café.

So, I did say this was full on nerdy but I thought it might just be of passing interest to those of you with a Moka Pot. The Lessons that I have learned during this excessive are:
1. Grind a bit finer than shop bought espresso grind.
2. Fill the funnel to the top, level with a knife but do NOT tamp down.
3. The use of a paper filter helps refine the taste (and if you don’t believe that I can tell you it makes the Moka pot much easier to clean afterwards!)
4. Filling the pressure vessel with boiling water does reduce the overall time and avoids ‘scorching’ the coffee.
5. A 3 minute extraction allows for the grinds to be fully wetted and draw out the full taste, helping to avoid sour (under extraction) or bitter (over extraction)
6. Depending on your personal taste the coffee to milk ratio should be around 1 to 2.5
7. Do not heat the milk beyond 65c or it will break down in structure and be less able to hold the air bubbles when frothing.
8. I clearly have TOO MUCH time on my hands and need to get out more
9. Don’t judge me! I did warn you at the beginning…….
Last edited:


