Pushing the envelope - stretching Cali's room to te limit

Hi,

As I was reorganizing our Cali today for the 8th time in eight years, I realized how many small adjustments the bus has gathered in time - call it minor repairs. Improvements in creating extra room in our little fourwheeled hotel room are by definition always minor.

I thought, maybe it's useful to show some of them.

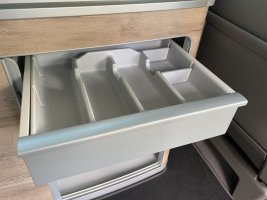
Here's a first one: our two stores deep kitchen drawer. To be honest, I nicked the idea from a Spanish Cali-owner, who build it with wood.
My construction is simple: two crossed aluminum bars, 1.5 mm thick, 1 cm high, both cut about 4 mm in the middle.

Don't forget what you through in there. First trip we used this, I angered mss marchugo by asking her where she had left the scissors. Of course I stored them in this drawer myself.

Regards from Amsterdam,

Marc.

View attachment 14203
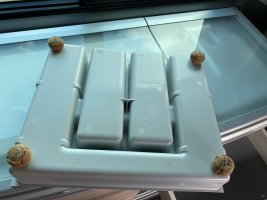
And I took the idea from you, thanks ;) This is how I did it: first you drink 4 bottles of cava, champagne, cider or any sparkling wine you like. Cut the 4 corks with a cutter to 2 cm and then attach them to the insert with double-sided tape. Finished!
55273A80-C184-418E-84B8-C62289BD3E72.jpeg
4BFA959B-BB77-4DB7-A4FB-B4C6B5562D2C.jpeg
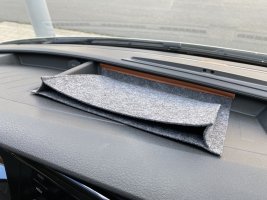
Also: the open compartment on top of the dashboard of the T6.1 is not very user-friendly because everything you put there shifts and reflects in the windscreen. That's why I attached this felt folder with the farthest flap with double-sided tape. Small things -like an access badge- find their place in it.
255637F6-D3F8-4D3D-8A49-341B10A04E12.jpeg
Greetings
Calibusje
 
Heater sensor finally listening to our body, in stead of to it's own airflow

View attachment 75161

As we were unsatisfied with the performance of the Cali parking heater (cycling from too cold to too warm), we had the temperature sensor moved from below in the heater duct, to the inside of the van, to the C-pillar, at the height of our heads when sitting in the cabin.

It's the small black plastic rectangle above the handle next to the sliding door. An extra cable runs unvisible through the pillar, to the controller of the heater under the van.

It improved a lot for us, now that the heater is adapting to our feelings, in stead of reacting to the air temperature in the suction channel below the floor.

Regards from Amsterdam,

Marc.
That’s where it was on the T4 Cali
 
T

Thanks.

The USB is from the head unit, can use it to charge phone if you want but I use it to plug in flash drive for movies, I fitted it with a HDMI point so I could connect it to my mini projector and monitor in the rear of drivers seat. For the kids honest. Sockets are wired for mains hook up, will be fitting an inverter soon and eberspacher water heater.
I use the usb skt at the side/under the rear bench. I plan to fit in paralell, a 240v skt next to the original 240v skt on the side of the kitchen. I have a short double extension + present.
 
Beam me up Scotty, it's a loo!

All the competitors can take their coat. Portapotti? Too big. Bog in a bag? Not stable (for men). I sat down on it. and it was stable, even for me. It rests against a front chair.

Brilliant idea, no patent yet.
They are working on bio degradable bags.

And the folks at TonkeView attachment 51318
did some research: according to them a Cali loo is on average only used 4 times a year.
I would like to open a questionaire here: do you you it more often (or less?).

Oh, the green thing is the (plastic) lid against smell... You can see the bag with the real thing underneath.

Relieved regards from Amsterdam,

Marc
I have a 335 porta pottie..but have not used it yet (l may do one day/night) As a solo traveller, l use a “medical/surgical” bottle for overnight!
 
Dog friendly magnets for the awning.

Magneten_luifel_klein.jpg

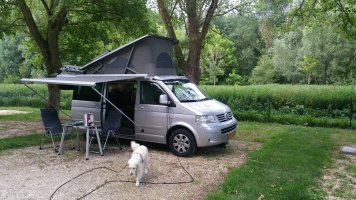
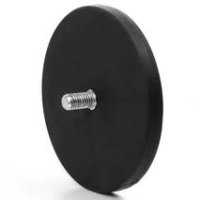
On our trip to the South of France, we have sticked two powerfull magnets on the Cali body. They have an M8 threaded stud, which can hold the legs of the awning, that have M8 holes at their feet. An M8 nut keeps them in place.

This prevents George, the two years old very lively lady retriever, from running rounds with her line around the legs of the awning.

The magnets were bought at
https://www.supermagnete.de/eng/mag...rubber-coated-with-threaded-stud-88mm_GTNG-88
and cost about 17 euro each. They can hold 50 KG, more than enough to prevent the legs from moving. In fact they are a bit too strong, when removing, you have to use quiet some force to overwin the magnetic power.

The pot magnets are rubber coated to prevent scratches on the car body. But as an extra measure, I sticked paint protection film under the magnets.

magneten_M8_88MM.jpg


On the downside, you have to put one on the front door, which obviously can't be opened now.

Another downside is, that the retriever still can go to war with the Cali table legs.

In the end, she is behaving so well, that it's better to leave her off the line. But at campsites, that is mostly forbidden.

Regards from Amsterdam,

Marc.
 
Are the sun awning legs fully extended when shade out to maximum, Marc?
 
@altvic
About 80 percent extended.
Mind your head...

Marc.

BTW In a heavy rain, the awning flushed the pouring water good, when putting one of the sides left or right firmly down.

Marc from Amterdam.
 
Two beers for the Majesty.

A two-cans antenna for the tiny telly

Xoro_tv_small.jpg


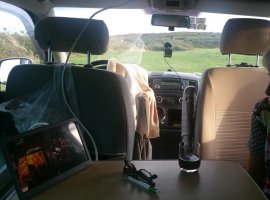
As we were traveling in Wales this fall, we were following the rituals around the Queens coffin on a small 12 Volt Freeview tv set, a Xoro, model PTL 1050, with a 10 inch screen. 120 Euros on Amazon.

Image quality is sharp and the viewing angle of the screen is broad enough for two, one in the front chair, the other on the back bench.

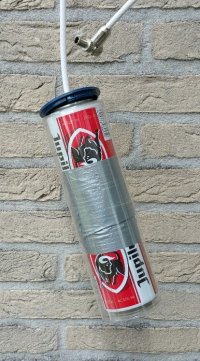
This DVB/T2 telly gets its signal over the air from a rather unstilish antenna, that I have constructed from two (empty) 33 CL beer cans. The cans are connected with a soldered coax cable. The male cable connector leads the signal to the coax input connector on the tv.

Blikjesantenne_resized.jpg


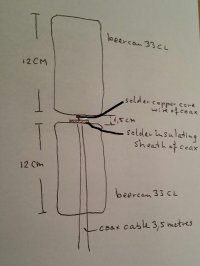
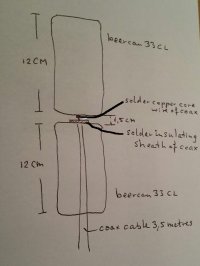
It's a bit of fumbling to solder the coax cables onto the opening sides of the tin cans. Don't use aluminum cola cans, as you can't solder on alu, only on tin. Both top ends of the cans (that look at each other) are to be sanded before soldering.

You need to distance the cans precisely 1,5 CM from each other. See drawing. I've put panzer-tape and a plastic tube around them, to prevent any movement and to protect the solderings from breaking. Holds more than five years now.

Scheme_Beer_Can_Antenna_Freeview.jpg


The Freeview signal can be weak in the hills in Wales, so you have to mount the beer cans high up into the pop top. I use 3.5 meters of 75 Ohm coax cable. Sometimes there was no reception at all, so the evening was for reading or rummikub.

Depending on the polarization of the Freeview transmitters, you'll have to experiment if the signal is best with the antenna standing or lying. We had good results in a horizontal position, not behind the metal hinges of the poptop. The beer cans beat the usual small inferior Freeview aerials by far in signal strenght.

It's amazing how many Freeview channels you can receive in the UK, about one hundred. In Holland we have access to only four free DVB-T2 channels, here called Digitenne.

Though the tiny telly can be stowed away easily in the overhead locker, the antenna of course is quit cloggy, but it too fits in the same locker.


Regards from Amsterdam,

Marc.

Beer_Can_Antenna_Freeview.jpg
 
Clothes hooks of bent aluminum

Dutch Clothes Hook.jpg
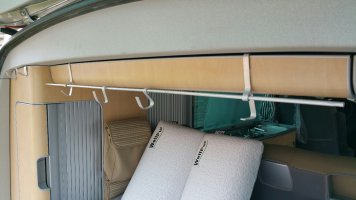
Made some hooks from bent aluminum, useful for hanging cloths, wet mountain shoes and other things. No need to glue anything, it just holds itself hanging from the the upper edge of the airplane locker.

The main tube is 6 MM diameter. In practice too thin, he bends a little. I should have used 8 MM.

I've put some sticking felt behind the hanging strips, to prevent moving and scratches.
Don't forget to sand the sharp edges to round off the ends of the strips.

BTW, the two small pillows from Wellpur we bought at Jysk. 24 x 42 CM, filled with memory foam. Sleeps very well. Who needs a big clunky pillow anway? When you turn in bed, just grab the pillow to follow your head.
Jysk are selling more or less matching pillow cases online, size 40x45 CM, color white, 2 euros each. The fabric is half bamboo, half polyester, not the least clammy.

Regards from Amsterdam,

Marc.
 
Compact grill Weber Go Anywhere Gas, that isn't too compact

1670856195705.png


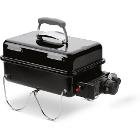
We've carried the Weber Go Anywhere Gas (GA Gas) Grill in the boot of the Cali for six years. It's called the "men's bag" on the BBQ forums because of its relatively compact size. He weighs 7 kilos and measures 37.0 cm * 31.0 cm * 53.0 cm.

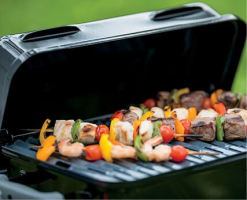
We like to use the grill for sea bream and trout, steaks, venison, meat skewers (see picture), roulades, in short all large and small pieces of meat.

We usually grill on feeling, i.e. without a meat thermometer. This works best with small meat. Our digital Ikea meat thermometer helps us a little with larger pieces of meat.

Here my experiences:

Positive is:
- The grill reaches a temperature of 200 degrees Celsius within half a minute.
- it has a closed lid so that the meat is well warmed all around and inside.
- Electric piezo ignition still works perfectly after six years.
- You can operate the GA Gas with relatively inexpensive gas cartridges with EN417 connection, for example from Cadac (500 grams) or Nomadiq (500 grams). The Weber gas cylinders themselves are far too expensive.
- In thr gsrden at home, the grill can be connected to a 11 kg propane-butane gas bottle with an extra hose and adapter.
- The GA Gas is enamelled and the baking tray is made of porcelain-enamelled steel, which makes it easy to clean under running warm water with washing-up liquid.
- If you put an alu tray at the bottom, most of the dripping fat is collected.
- The gas burner is protected from dripping by an aluminum "roof".
- The two fold-out legs do not get hot, so the grill can be placed on camping grass and also on the Cali table.
- Unlike the Weber GA charcoal grill, it is allowed on most campgrounds.
- The price is okay: if you keep an eye on the offers, you will find something for 80 - 90 euros. But sometimes you also see prices of 195 euros.

Negative is:
- Although it is relatively small, it still takes up three quarters of a euro box, even if you unscrew the handle. So, though the grill is compact, it certainly is not very compact.
- The grill does not deliver low temperatures: with the lid closed, it heats up to at least 100 to 120 degrees Celsius. This means that you can't cook meat "low and slow" up to a maximum of 80 degrees slowly and for a long time, so pulled pork doesn't work.
- The GA Gas is not suitable for the butane gas in the Cali.
- The grill has a pressure reducer of 30 mBar here in the Netherlands. In Germany it is supplied with a pressure reducer of 50 mbar. Both are not interchangeable.
- During our trip to Greece, the grill remained unused for five weeks, simply because the food in the restaurants there is so cheap and tasty that you don't bother to light the grill yourself.
- The two fold-out legs slide easily on smooth surfaces.

Greetings from Amsterdam,

Marc.

1670856242049.png
 
Compact grill Weber Go Anywhere Gas, that isn't too compact

View attachment 103053


We've carried the Weber Go Anywhere Gas (GA Gas) Grill in the boot of the Cali for six years. It's called the "men's bag" on the BBQ forums because of its relatively compact size. He weighs 7 kilos and measures 37.0 cm * 31.0 cm * 53.0 cm.

We like to use the grill for sea bream and trout, steaks, venison, meat skewers (see picture), roulades, in short all large and small pieces of meat.

We usually grill on feeling, i.e. without a meat thermometer. This works best with small meat. Our digital Ikea meat thermometer helps us a little with larger pieces of meat.

Here my experiences:

Positive is:
- The grill reaches a temperature of 200 degrees Celsius within half a minute.
- it has a closed lid so that the meat is well warmed all around and inside.
- Electric piezo ignition still works perfectly after six years.
- You can operate the GA Gas with relatively inexpensive gas cartridges with EN417 connection, for example from Cadac (500 grams) or Nomadiq (500 grams). The Weber gas cylinders themselves are far too expensive.
- In thr gsrden at home, the grill can be connected to a 11 kg propane-butane gas bottle with an extra hose and adapter.
- The GA Gas is enamelled and the baking tray is made of porcelain-enamelled steel, which makes it easy to clean under running warm water with washing-up liquid.
- If you put an alu tray at the bottom, most of the dripping fat is collected.
- The gas burner is protected from dripping by an aluminum "roof".
- The two fold-out legs do not get hot, so the grill can be placed on camping grass and also on the Cali table.
- Unlike the Weber GA charcoal grill, it is allowed on most campgrounds.
- The price is okay: if you keep an eye on the offers, you will find something for 80 - 90 euros. But sometimes you also see prices of 195 euros.

Negative is:
- Although it is relatively small, it still takes up three quarters of a euro box, even if you unscrew the handle. So, though the grill is compact, it certainly is not very compact.
- The grill does not deliver low temperatures: with the lid closed, it heats up to at least 100 to 120 degrees Celsius. This means that you can't cook meat "low and slow" up to a maximum of 80 degrees slowly and for a long time, so pulled pork doesn't work.
- The GA Gas is not suitable for the butane gas in the Cali.
- The grill has a pressure reducer of 30 mBar here in the Netherlands. In Germany it is supplied with a pressure reducer of 50 mbar. Both are not interchangeable.
- During our trip to Greece, the grill remained unused for five weeks, simply because the food in the restaurants there is so cheap and tasty that you don't bother to light the grill yourself.
- The two fold-out legs slide easily on smooth surfaces.

Greetings from Amsterdam,

Marc.

View attachment 103054
Thanks for the review, and you kinda said it yourself: for some of us, going on a trip also means going out to eat. A lot. We only have our so-called 'emergency food' with us: frankfurter sausages with long-life rolls, dried onions and mustard, ketchup and mayonnaise for on top. Also some cans of ravioli and cheese to grate. This is for when we drive too long and everything is closed or we are very remote.In the morning, after getting up and all 4 of us are ready: extensive breakfast in the bus. For the rest: good food, wherever we are. At restaurants or similar. We barbecue at a campsite (if we are already on one) on the communal equipment on the domain.
Each to his own, but there are 4 of us and this would be a heavy place taker. But: do you have space, do you use it and do you like it: I would say take it with you! :D Like you do, for 6 years already :thumb
 
Last edited:
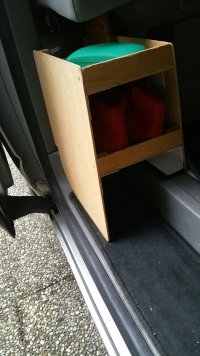
Unfinished test shoe rack works well

shoe_rack_1.jpg

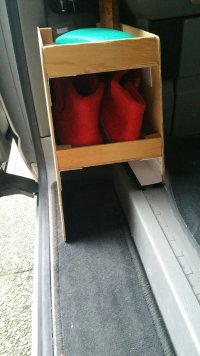
Some time ago I was inspired by a German Cali owner who had built a metal shoe rack between the sliding door and the backseat.

From 4 MM plywood that I found in the basement, I had glued a prototype, with a small screw here and there, to test during a trip to Scotland.

Mrs marchugo was satisfied with the result, but I was too lazy to build a posh version. So, until today we are traveling with the not-so-nice plywood prototype.

Its functionality is more than o.k. for stowing slippers, shoes, toilet rolls, handies and other small things (though never the keys of the Cali! Always keep them in your pocket).

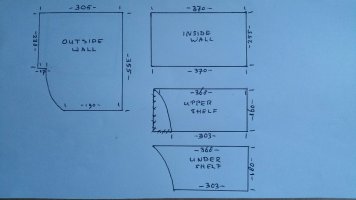
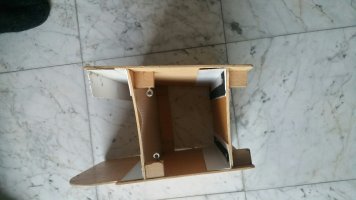
The outside wall of the rack is skewed by about 5 degrees, for easily lifting out the sliding door table. So the upper shelf is 2 CM less broad than the lower one.
shoe_rack_2.jpg

The bend in the outside wall has a radius of about 8 CM, to compensate for the form of the round plastic trim.
The radii for the shelves are about 28 CM.

Cali_Shoe_Rack_Drawing.jpg

You can draw the radius with an old-fashioned compass from school.
Or you use a string with a length of 8 or 28 cm and a pencil or nail tied to it.
Or you sand until the bend fits in the trim...

My rack has no USB connector, as there is a USB port right behind it under the backseat.

The rack is secured against flying, by velcro tapes at the bottom of the rack and on the floor of the Cali.

By chance I found a fitting square block of wood (about 11x11x1CM) that I clamp vertically between the upper shelf and the bottom of the back bench (no picture). Holds like a rock and can easily be removed when the bed is pulled out.

Cali_Shoe_Rack_3.jpg
Permanent provisional: edges secured with PVC profiles from the DIY market.

I call the whole rack a permanent provisional.


Racky regards from Amsterdam,

marchugo
 
New silent electronic ignition for Cali gas hob
Silent plug from Onlyfire.jpg
Silent plug from Onlyfire.

Encouraged by other members of the Cali forum, I've silenced the banging sound of the VW hob ignitor plug in our T5 Cali.

Thereby I've found some alternative hiding places for the new generator block which sends the ignition sparks to the burners on the stove.

See attached PDF file.


20230107_163138.jpg
Nice place to hide the generator block inconspicuously.

If I can complete this job in less than two hours, anyone with two left hands, like me, can do it.

Sparkling regards from Amsterdam,

Marc.
 

Attachments

  • Silent_Cali_Hob_Ingnition_Marc.pdf
    3.1 MB · Views: 66
New silent electronic ignition for Cali gas hob
View attachment 104131
Silent plug from Onlyfire.

Encouraged by other members of the Cali forum, I've silenced the banging sound of the VW hob ignitor plug in our T5 Cali.

Thereby I've found some alternative hiding places for the new generator block which sends the ignition sparks to the burners on the stove.

See attached PDF file.


View attachment 104132
Nice place to hide the generator block inconspicuously.

If I can complete this job in less than two hours, anyone with two left hands, like me, can do it.

Sparkling regards from Amsterdam,

Marc.
Love the hiding place :thumb and this is a great mod.
 
Securing bikes with fast release locking belts.

1684074705331.jpeg

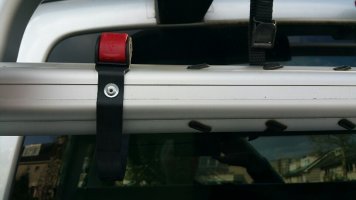
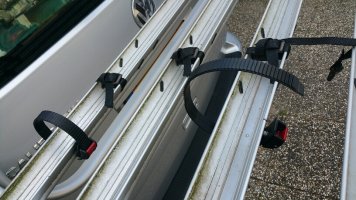
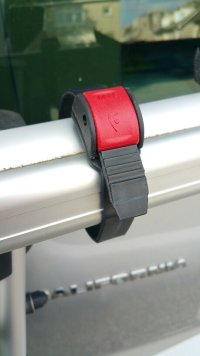
I was annoyed by the constant tying and untying of the old-style woven ribbons that hold the wheels on the T5 bike rack.

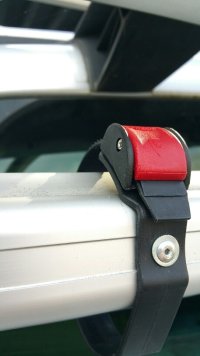
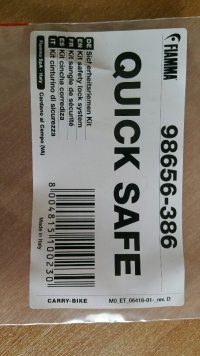
From Fiamma I bought four plastic sliding quick releases (Quick Safe 98656-386). About 12 euros each on Amazon.de.

1684075607371.jpeg

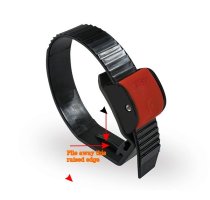
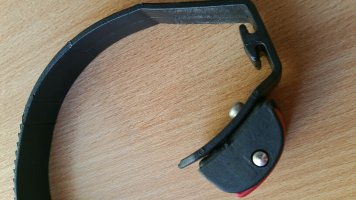
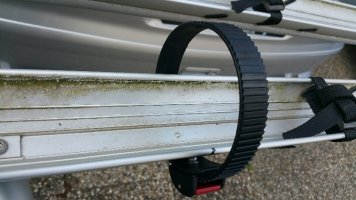
I first buffed off the plastic vertical raised edge on the inside with a coarse wood rasp, so that the belt grips nicely around the underside of the wheel carriers on the rack. Don't remove the "mushroom" type elevation:

1684074952758.jpeg


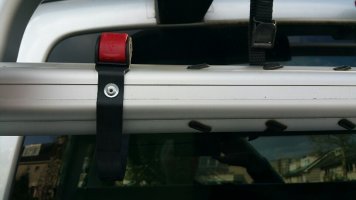
Then I made holes at the bottom of the wheel rails with a 4MM steel drill. Pre-drill with 2MM first. I measured and marked carefully where the deepest point of the wheel rests in the wheel rail. Positions may differ among bike types.

1684074802518.jpeg


I also made 4MM holes in each strap, at a position that allows the red clip to just peep above the edge of the rail. Make sure there's enough room to squeeze the clip open.

1684074895058.jpeg


Then clamp the belts onto the wheel rail with alu pop rivets, using simple rivet plyers from the DIY market. The pop rivets are 4MM thick X 15MM in length. I secured them underneath with 4MM alu distance rings, to prevent the rivets from coming loose.


1684074994996.jpeg


Result: my wife finds the classic ribbons just as useful. Of course I think my invention is great. No more fumbling with putting bows in the ribbons. With one click you loosen the straps. As a compromise, both types are still hanging on the bike rack.
Well, one ribbon has to stay anyway: the one that secures the bike rack when folded upwards.

Sliding regards from Amsterdam,

Marc.

1684075640561.jpeg

1684074840339.jpeg

1684075079634.jpeg
 
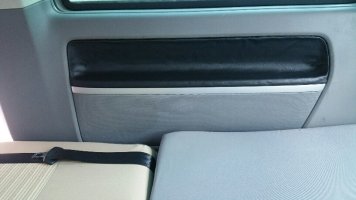
Repair of fabric coming loose in arm rest back seat T5

20230523_134447_resized.jpg
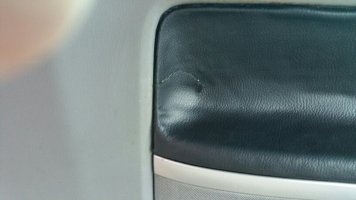
After the repair with skai leather.


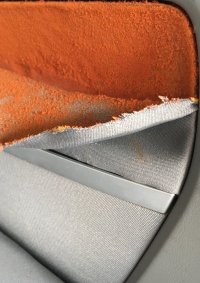
The fabric in the arm rest at the right of the backbench slowly disengaged itself from the wall. Our Cali T5 is from 2009, and reading the fora this problem is not unique.

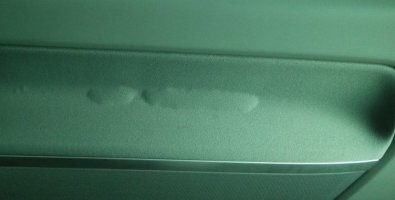
This is how it started about a year ago:
x_kleiner.jpg

And this is how it developed:
z.jpg

Fabric_coming_Loose.jpg

Before trying to repair this, I've been reading a lot about it on the German and UK California websites. One thing is clear: nobody seems to know the cause.

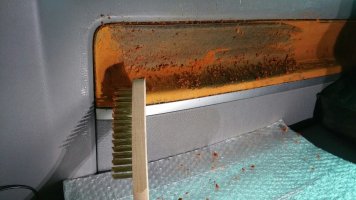
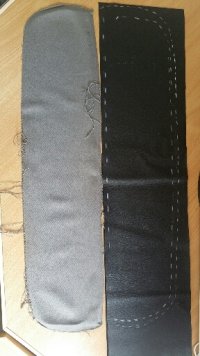
The orange-tinted glue on the back of the thin gray fabric dries out and eventually crumbles into sticky crumbs, which, if you're not careful, will leave nasty, irremovable stains on the upholstery of the chairs, your bedding, and your clothes.

It seems that the glue pulverizes due to aging and heating. The fabric just comes loose from the glue.

Also obvious: repair is not easy. Cali owners in various forums have made valiant efforts to glue the gray matter back on. Sometimes with spray glue, sometimes with brushed glue. Some even injected the adhesive through the fabric.

Mostly the results were not to be seen. The fabric showed unsightly ridges and bumps after the pasting operation. And it was not uncommon for the textile to come loose again after a few weeks or months.

I decided to remove the orange sticky mass first, with a copper brush:
Textielscheur_ragen_88-HZX-8.jpg

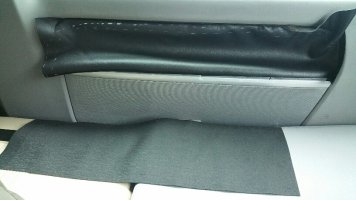
At our local clothing repair shop I scored a piece of skai, an imitation leather, with a smooth leather motif on top and fabric at the bottom. The black color seemed acceptable to me for the place. The vinyl is slightly stretchy, so that you can drape it in the round shapes of the armrest.
Reparatie_textiel.jpg


With chalk I drew the contours on the vinyl. I took a good centimeter extra, so that I could push the edges into the small gutter around the armrest cavity in which the gray textile from VW originally clamped. I used the handle of a fork to crumple the textile in the gutter. Don't be tempted to use the sharp end of a knive, as it will damage the skai.
No need to crumple the leather in to the lower side gutter. The aluminum decorative strip clamps the skai neatly. The strip can be removed easily, just give it a firm pull. Do not loose the five very small clamps that hold the strip.

First I tried a very expensive Pattex doublesided mounting tape to hold the skai. It promised to be able to hold up to 100 kilos per square meter. Pattex left the scene immediately, by simply letting go. The tape dropped to the floor within seconds. Apparently this super tape has no effect on the old glue residues from VW.

On the gamble I then squeezed a full tube of Bisonkit into the hollow of the armrest. The piece of skai also received thick stripes of sealant. Wait twenty minutes until the glue is almost dry. And then just press and push with all your fingers, like a piano player, until every curve of the cavity is firmly covered with skai.

Because the curves left and right are rather erratic, I cut horizontal incisions into the piece of skai, eight centimeters on both the left and right side, about in the middle. Then I could neatly cut off the resulting double flaps and stick them one over the other with sealant.

Long story short: I'm satisfied, it's neat. Not professional, but everything is better than the orange hole I started with.
20230523_134458_resized.jpg

The proof is not yet in the pudding, because we have to see whether the Bison kit will hold up in high temperatures. A Cali bodywork likes to warm up to above seventy degrees Celsius on a summer day...

Kunstleer-vervangstof-maten.jpg

Here are the sizes of the original VW grey textile clothing (left) that came loose:

Original cloth: Br. 72 cm, H. 17.5 incl covers
stretch horizontally: 6 CM by 72 CM (= almost 10 %)
stretch vertical: approx. 0 CM

New skai cloth: Br. 72 CM; stretch: about 2 %
cover left-center: 2 CM
cover right-center: 1.5 CM
cover top-middle: 1 CM
cover lower-middle: 1.0 CM


Regards from Amsterdam,

Marc.
 
Airtight food containers reduce condensed water in the fridge
Koelkast_Airtight_Food_Boxes_2.jpg
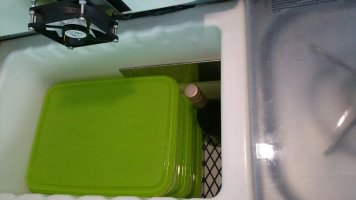
Stacked vertically.

The Cali fridge tends to assemble a lot of condensed water at the bottom. Every time you open the cool box, and toss around with your hands at the bottom looking for that one thing, a fresh cloud of moist air dives into the box. It condenses at the cold back wall and then drips off to the bottom.

Within a few days, the water level can rise to half a centimeter. Then nothing remains but clearing out the box and mopping.

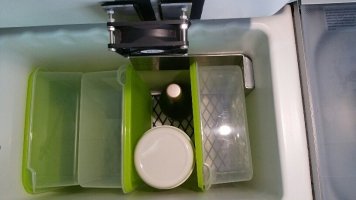
What helps is using airtight food storage containers. They significantly reduce the amount of moist air that enters the refrigerator. The contents of the boxes also stay better cooled when the lid of the fridge opens.

Many Cali users stack their food boxes horizontally. I thought that it is more efficient to place the boxes vertically. Then you can lift one box in one go, without having to toss and turn around in the fridge for a long time. After a week of use, the amount of water on the bottom is considerably less (you can't keep the condensation away completely anyway).

Three food-safe boxes of half a liter each are sufficient for us to sort our stocks. One for breakfast (cheese, ham, bacon, eggs), a second for dinner (carrots, tomatoes, chicory, radishes, salad). And a third for other snacks that you want to stay cool, such as mandarins, kiwis or Roquefort.

Three bottles (white wine, rosé, beer) also fit in the middle aisle. Or a small fourth container (here round, just had it lying around), for all kinds of bits and pieces.

Optionally, you can turn the two left boxes another quarter turn, so that one box is tight against the freezing cooling element in the back basket. You can store fresh meat or fish there.

I found these boxes from the Swiss brand Rotho on Amazon.de discounted for 9.98 euros each. They are BPA free. The box is made of PP plastic. The PE lid closes tightly enough not to rattle open while driving.
The dimensions are: 31.5 x 24 x 10 cm (L x W x H). At home, the boxes can be used in the freezer and in the microwave.

https://www.amazon.de/dp/B087XPSFX1/

Regards from Amsterdam,

Marc.

Koelkast_Airtight_Food_Boxes_1.jpg
Stacked horizontally.
 
Cooling the fridge with a fan
View attachment 59863

Last summer in the South of France the Danfoss fridge in our T5.1 decided to stop working, because the temperature outside was 42 Celsius. I decided to install a small ventilator beneath the refrigerator, to pull out the hot air from the space under the compressor.

The temperature in the compartment I measured that day at 72 degrees Celsius. The fridge stops working above 55 degrees Celsius, according to the Danfoss manual. In fact the fridge is causing its own stoppage by generating heat.

The compressor space of the old T5.1 also houses the Waeco battery loader, that adds considerable more heat to the area. This loader stops working above 59 degrees Celsius, as many Cali owners might have experienced while on hook in hot summers. Later VWN moved the loader to the battery compartment at the back.

I mounted a 12 Volt DC Arctic fan F9 (9 euros) and connected it to the electro block (model number 101N0220) of the Danfoss compressor.

In the early T5 models you can easily open the 2.5 MM Torx screws of the left wall in the left closet. In later T5 versions the wall is fixed, and has a small service hatch, that is probably too small for people with big hands...

After opening the wall, you'll see the Danfoss electro block at the left, with a series of connectors from top to bottom.

The big Minus (-) connector is a switched mass, indirectly connected to the Minus pole of the leisure battery. The minus wire switches the compressor on and off.
Power is only switched on when the temperature sensor in the cool box (connectors C and T) reaches the value you that you chose in the computer unit of the Cali.
The big Plus (+) is the 12 Volt plus connector direct from the battery plus. Together they feed the fridge compressor. (the yellow D is a data wire).

Just below the big + and - you can see two other connectors, + (small plus sign ) and F (Fan). Normally these connectors are empty. They too are switched 12 Volt connections. I have used them to automatically switch on the fan only at times when the compressor is working. The small plus connector wire goes to the plus of the fan, the F wire to the minus of the fan.

View attachment 59861


A view of my provisional setup, which, I fear, is also the final setup:
View attachment 59862

The fan is pulling hot air from the compressor department. To avoid a circular air movement back into that space, I closed the gap around the grey water valve with a piece of linoleum.

With a switch I can cut off the current to the fan, just in case its sound keeps us out of sleep. Which isn't the case, I can hardly hear the fan working, even with the closet door open.

Does it help? Yes it does. On warm days the fan sucks enough warmth from under the compressor to keep the fridge going. The compressor also does start less frequently to cool the box. Although I must add, that since our solar panels we hardly use the battery loader, so there's less heat under the fridge.

Regards from Amsterdam,

Marc.
Please can you tell me how you disconnected the plug / connector from the electro block. I'm trying to do the same as this and have built a fan module and connectors but can leverage the connector if the F D and + connection. Thanks
 
Hi OKCali,

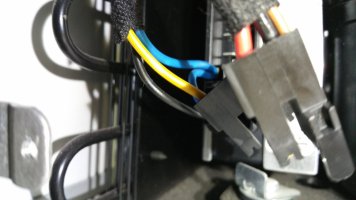
As I recall right (it is some time ago), I just pulled out the black plastic connector (the one with one yellow line and two empty holes) with some finger force.

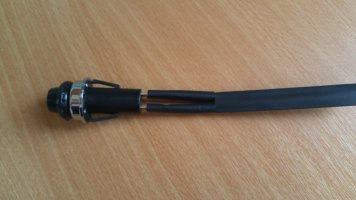
Once pulled out, the connectors look like this (see picture below).
It's the second one behind that you have to pull out.
Can't remember if you have to push the plastic clips somehow.

Regards from Amsterdam,

Marc.

20190813_171954.jpg
 
Hi OKCali,

As I recall right (it is some time ago), I just pulled out the black plastic connector (the one with one yellow line and two empty holes) with some finger force.

Once pulled out, the connectors look like this (see picture below).
It's the second one behind that you have to pull out.
Can't remember if you have to push the plastic clips somehow.

Regards from Amsterdam,

Marc.

View attachment 114538
Thanks so much for your help. When things don't pull apart easily I'm never sure whether to force it without a diagram/ instructions. All sorted now. Thanks again.
 
Repair temperature sensor in Cali fridge

This week the fridge in the Cali refused to start. The Control Unit showed error code 3001, which means 'input error from the Fridge Temperature Gauge Unit', which in plain English means: temp sensor died.

Yesterday a visit to the local Cali dealer. Indeed a new temperature sensor was needed. Price tag: 70 euros for the sensor, plus hundred euro labor cost.

To see these amounts into perspective, this is the sensor:

View attachment 76341


Next time I'll do the repair myself, I think. Because you don't have to pull out the fridge from the kitchen block, as is often told. Just pop out the white plastic cap on the right wall inside the cooler, where the sensor lives. It is only plugged in.

Then fish out the sensor, plus some extra centimeters lenght of its two tiny cables. Cut the little cables, solder the new sensor cables onto the old ones, and you're done.
(of course isolate the cables with some rubber shrink tube, but do not heat that, so that you can easily free the cables if needed next time).


View attachment 76342

At the right: the plastic cap of the temp sensor.


Regards from Amsterdam,

Marc.

How can you get the white cover off? Does it literally just pop off? I’m scared to break mine.

Thanks Marc
 
As I recall right, I didn’t even pull off the plastic cover. I think I just reached with my hand from the outside from the left cupboard.
Most plastic things in the Cali are clipped in by VW, so if you use a plastic knive, you could wiggle it out.

Regards from Amsterdam,

Marc.
 
Thanks for the thread Marco, I got a lot of ideas for my backlog. Especially that arm rest cloth reparation!

Greetings from Eindhoven.
 
Small gas valve saves us when the R907 bottle is empty

Connecting_valve_EN_417_1.jpg

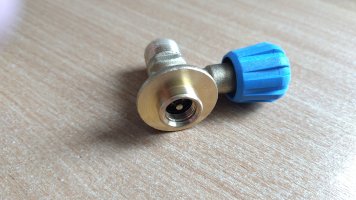
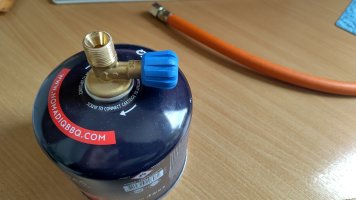
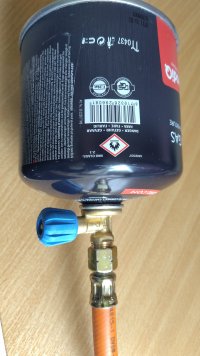
Today I added a small copper gas valve to the Cali repertoire. It fits in the 500 gram gas cans (propane/butane), that we always carry in the van for the gas grill.

Now we can use the cans as a backup for when the blue R907 butane bottle is exhausted sooner than we expected. It saves us the room and the 4 kilogram of the spare Campingaz bottle.

Connecting_valve_EN_417_2.jpg

The valve is suitable for containers with a EN 417 connection. The outgoing end of the valve has an outlet of 3/8 inch (left handed thread), and connects to the Cali gas pressure regulator (not on the picture here).

Connecting_valve_EN_417_3.jpg

https://www.amazon.nl/dp/B001HXM0XO/

Regards from Amsterdam,

Marc.
 

VW California Club

Back
Top