Buy all your VW California Accessories at the Club Shop Visit Shop

Some cosmetic mods - my own “Edition”

  • Thread starter vwcaliforniacornwall
  • Start date
vwcaliforniacornwall

vwcaliforniacornwall

Messages
38
Location
Cornwall UK
Vehicle
T6 Ocean 199
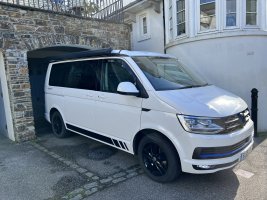
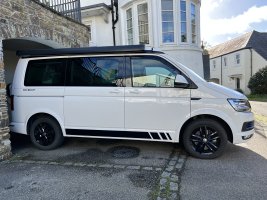
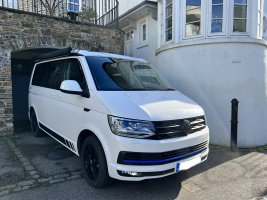
Having toyed with the idea of either having the lower half of my Candy White California sprayed or wrapped in a blue colour, I decided instead to go for the “edition” look.

The standard Davenport wheels were powder coated in gloss black. At £70 per wheel I thought that was a good value upgrade.
Had a Matte Black “R-Line look” grille from Van-X fitted for me - I’m glad I paid out for this job because although the grille is supposed to be a direct replacement, the fitter informed me that there was a fair bit of trimming required to get it to fit properly.
Changed both VW badges to gloss black - simple to do - I had to buy a front badge back plate and spray it matte black.
The lowest trim on the lower grille was replaced with blue trim insert from VanStyle. I’m not totally happy with this because there are gaps between the centre insert and the two side pieces. I may try to source a better fit product.
I replaced both front wing indicator repeaters with all black dynamic ones - very easy job to do as long as you have a trim removal kit.
B pillars blacked out with vinyl decal trim from CampervanBits - the fitter was not impressed by the quality of this vinyl - his opinion
“Stepped” sill decals from Beatnik Decals - the fitter thought these were much better quality
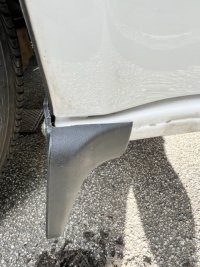
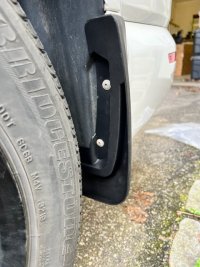
Finally, a set of stubby mud flaps which again were very easy to fit but I did trim the front ones a little so that they wont foul or damage the lower part of the doors.

I am very pleased with the outcome.
9470F284-E45E-4516-9A69-0E359E5912B9.jpeg
044C6DDB-F9A9-4CC3-9911-6DDA5542799F.jpeg
CCA8217D-B113-4CF0-8033-8868BC5D1F92.jpeg
6907B860-5577-420D-B3B0-2BE88AE8A418.jpegAD3090EA-6353-43E1-B037-2704DF027F70.jpeg
 
Last edited:
Having toyed with the idea of either having the lower half of my Candy White California sprayed or wrapped in a blue colour, I decided instead to go for the “edition” look.

The standard Davenport wheels were powder coated in gloss black. At £70 per wheel I thought that was a good value upgrade.
Had a Matte Black “R-Line look” grille from Van-X fitted for me - I’m glad I paid out for this job because although the grille is supposed to be a direct replacement, the fitter informed me that there was a fair bit of trimming required to get it to fit properly.
Changed both VW badges to gloss black - simple to do - I had to buy a front badge back plate and spray it matte black.
The lowest trim on the lower grille was replaced with blue trim insert from VanStyle. I’m not totally happy with this because there are gaps between the centre insert and the two side pieces. I may try to source a better fit product.
I replaced both front wing indicator repeaters with all black dynamic ones - very easy job to do as long as you have a trim removal kit.
B pillars blacked out with vinyl decal trim form Vee Dub Transporters - the fitter was not impressed by the quality of this vinyl - his opinion
“Stepped” sill decals from Beatnik Decals - the fitter thought these were much better quality
Finally, a set of stubby mud flaps which again were very easy to fit but I did trim the front ones a little so that they wont foul or damage the lower part of the doors.

I am very pleased with the outcome.
View attachment 104734
View attachment 104741
View attachment 104742
View attachment 104735View attachment 104736
Looks smart. You could also cover the door handles in black if you fancied it. We still need to do our boot.

766C41AF-61AF-482A-ACE8-FCEB55E5D5C4.jpeg

2B399BED-35A8-4E88-9F55-9CA0761FE41D.jpeg

21D05F22-0FCB-4DF4-B956-2A6FFB6EA4FB.jpeg
 
Thank you. I think the black door handles detail nicely. I rather like the side steps too.
 
Having toyed with the idea of either having the lower half of my Candy White California sprayed or wrapped in a blue colour, I decided instead to go for the “edition” look.

The standard Davenport wheels were powder coated in gloss black. At £70 per wheel I thought that was a good value upgrade.
Had a Matte Black “R-Line look” grille from Van-X fitted for me - I’m glad I paid out for this job because although the grille is supposed to be a direct replacement, the fitter informed me that there was a fair bit of trimming required to get it to fit properly.
Changed both VW badges to gloss black - simple to do - I had to buy a front badge back plate and spray it matte black.
The lowest trim on the lower grille was replaced with blue trim insert from VanStyle. I’m not totally happy with this because there are gaps between the centre insert and the two side pieces. I may try to source a better fit product.
I replaced both front wing indicator repeaters with all black dynamic ones - very easy job to do as long as you have a trim removal kit.
B pillars blacked out with vinyl decal trim form Vee Dub Transporters - the fitter was not impressed by the quality of this vinyl - his opinion
“Stepped” sill decals from Beatnik Decals - the fitter thought these were much better quality
Finally, a set of stubby mud flaps which again were very easy to fit but I did trim the front ones a little so that they wont foul or damage the lower part of the doors.

I am very pleased with the outcome.
View attachment 104734
View attachment 104741
View attachment 104742
View attachment 104735View attachment 104736
Looks great:thumb
 
Having toyed with the idea of either having the lower half of my Candy White California sprayed or wrapped in a blue colour, I decided instead to go for the “edition” look.

The standard Davenport wheels were powder coated in gloss black. At £70 per wheel I thought that was a good value upgrade.
Had a Matte Black “R-Line look” grille from Van-X fitted for me - I’m glad I paid out for this job because although the grille is supposed to be a direct replacement, the fitter informed me that there was a fair bit of trimming required to get it to fit properly.
Changed both VW badges to gloss black - simple to do - I had to buy a front badge back plate and spray it matte black.
The lowest trim on the lower grille was replaced with blue trim insert from VanStyle. I’m not totally happy with this because there are gaps between the centre insert and the two side pieces. I may try to source a better fit product.
I replaced both front wing indicator repeaters with all black dynamic ones - very easy job to do as long as you have a trim removal kit.
B pillars blacked out with vinyl decal trim form Vee Dub Transporters - the fitter was not impressed by the quality of this vinyl - his opinion
“Stepped” sill decals from Beatnik Decals - the fitter thought these were much better quality
Finally, a set of stubby mud flaps which again were very easy to fit but I did trim the front ones a little so that they wont foul or damage the lower part of the doors.

I am very pleased with the outcome.
View attachment 104734
View attachment 104741
View attachment 104742
View attachment 104735View attachment 104736
Looks great!
 
+1 for the stubby mud flats - I fitted same with a few images on a post. I would recommend to drill a couple of holes in them as there is a flaw in the design that can allow water to sit. Just fitted a bonnet protector as well which works great. About as much as I CBA with TBH.
 
Looks good. You need to do the mirrors. Oddly the mirrors on genuine Editions are pearlescent black (deep black paint code LC9X (not that you’d notice)) and are available painted as parts 7E1857527LC9X and 7E1857528LC9X. Don’t buy non genuine ones on eBay as they are rubbish.
 
The lowest trim on the lower grille was replaced with blue trim insert from VanStyle. I’m not totally happy with this because there are gaps between the centre insert and the two side pieces.
the trims allow both side pieces to slide slightly toward the middle section, reducing the gap to no more than the two pieces butting together.

hard to tell from your photo how big the gap is, but doesn’t look too significant so try the above to help with the OCD alarm ;)

edit: nice job with the upgrades so far, I suspect more are coming ?
 
Having toyed with the idea of either having the lower half of my Candy White California sprayed or wrapped in a blue colour, I decided instead to go for the “edition” look.

The standard Davenport wheels were powder coated in gloss black. At £70 per wheel I thought that was a good value upgrade.
Had a Matte Black “R-Line look” grille from Van-X fitted for me - I’m glad I paid out for this job because although the grille is supposed to be a direct replacement, the fitter informed me that there was a fair bit of trimming required to get it to fit properly.
Changed both VW badges to gloss black - simple to do - I had to buy a front badge back plate and spray it matte black.
The lowest trim on the lower grille was replaced with blue trim insert from VanStyle. I’m not totally happy with this because there are gaps between the centre insert and the two side pieces. I may try to source a better fit product.
I replaced both front wing indicator repeaters with all black dynamic ones - very easy job to do as long as you have a trim removal kit.
B pillars blacked out with vinyl decal trim from CampervanBits - the fitter was not impressed by the quality of this vinyl - his opinion
“Stepped” sill decals from Beatnik Decals - the fitter thought these were much better quality
Finally, a set of stubby mud flaps which again were very easy to fit but I did trim the front ones a little so that they wont foul or damage the lower part of the doors.

I am very pleased with the outcome.
View attachment 104734
View attachment 104741
View attachment 104742
View attachment 104735View attachment 104736
That looks really good. You should be happy with the result.
 
Both look really nice and smart. I like the black indicators, and never thought about turning the B-pillar into black. Makes a nice difference.
One question about the door handles. What you guys do is stick something on top that goes in just with pressure, or replace the entire door handle, or paint them? If with pressure, what stops anybody from removing them?
Black handles are just covers over the original handles. Ours have been on 3+ years without issue.
 
Back
Top