JunglieD
VIP Member
Do yourself a favour and check your interior table hinge!
You may be luckier than I - my 4y/o had certainly taken the table to the limits of fair wear and tear - but I was surprised to find, one day this summer, that my interior table leg had completely failed due to the plastic hinge snapping. Browsing this forum and international equivalents it became clear that this isn’t an uncommon problem. To avoid it you need to treat the table very gently - making sure you lift it UP so the leg is completely clear of the floor before making any lateral movement to avoid the strain this plastic hinge is seemingly not designed to withstand.
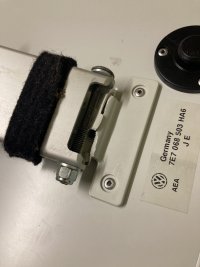
Faced with the damage you can see in the photo I initially thought to include the repair within my annual service at Breeze. I never got a formal quote from VW but £450+ was muted for the part and I’m not sure if that included VAT or labour. Ridiculously expensive imo and incredibly wasteful given the majority of the table components continue to be in fine fettle.
To this forum I turned and I stumbled across an old thread where @Johnboy had manufactured a solution which peaked my interest. It retained many of the original parts, seemed to offer more lateral hinge strength than the original and - importantly for me - didn’t require drilling through the surface of the table. I didn’t want to affect the already small surface area with screw heads or damage the integrity of the table veneer.
Quick DM, phone call, some emails and a few days later I had the part and a detailed set of instructions in hand. Below is the different steps I followed to achieve the fix:
Removed the table to get better access for working on the hinge. Removed the metal hinge pin and you can see the damage more clearly.
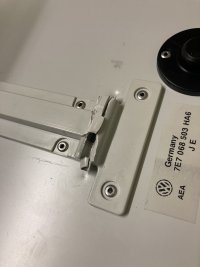
Drilled out the 4 pop rivets (gently). It’s John’s and my belief that these are used primarily to align the plastic bracket which is ultimately glued into place on the underside of the table.
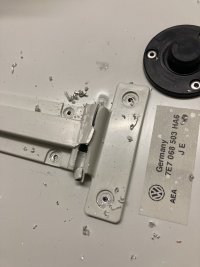
Using tape to protect much of the table underside, used a hacksaw blade to cut the designated part of the plastic hinge.
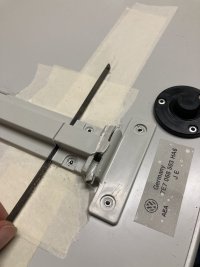
Used a Stanley knife and plastic levers / trim tools to remove glue at the edges of the damaged section and then prise it clear of the table underside. You can see some scratching I caused with the Stanley knife despite best efforts - but remember this is the underside of the table which is either facing the floor or the kitchen cupboards so never in sight.
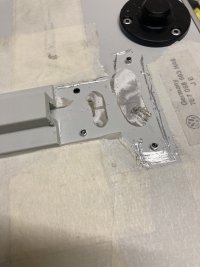
Used sand paper to remove adhesive and create a decent key for subsequent adhesive. Then used John’s provided bespoke drill guide (and bit) to create 2 new holes for rivets (the new part is narrower than the original at one end)
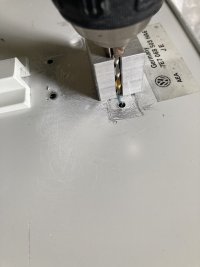
Confirmatory check that alignment is ok with new holes for rivets
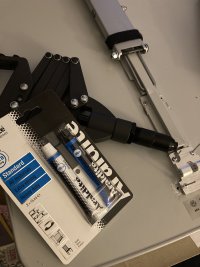
Used alcohol wipes to clean both surfaces. Gathered final equipment (rivet gun and standard Araldyte epoxy resin)
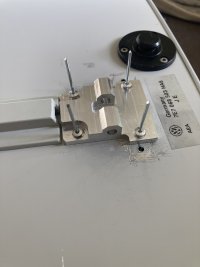
Mixed the Araldite, applied to both surfaces and used 4 pop rivets to neatly align the new hinge and apply extra pressure to bring the parts together. Spread the excess Araldyte around 3 sides of the hinge join to the table for extra adhesion.
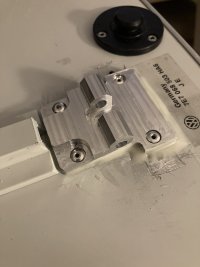
Dry for 24-hrs. Refit leg and hinge pin. Check operation. Refit the table to the van. Check operation. Job done!
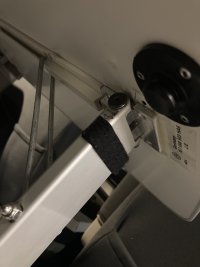
Clearly I’m going to be taking greater care of my table going forward. But the table leg operates exactly as it did before, has no ugly holes through the table top and certainly looks and feels like the metal hinge will stand up better to wear and tear in the future. I’ll keep you posted how the repair holds but I was delighted with the outcome - I dare say the DIY was even a little bit enjoyable. Must’ve saved over £400 here, done my bit for the environment and (imo) ended up with a stronger hinge than when it left the factory.
I love this forum - thank you to @Johnboy for taking the time to engineer a solution and helping me through the process. Top man!
You may be luckier than I - my 4y/o had certainly taken the table to the limits of fair wear and tear - but I was surprised to find, one day this summer, that my interior table leg had completely failed due to the plastic hinge snapping. Browsing this forum and international equivalents it became clear that this isn’t an uncommon problem. To avoid it you need to treat the table very gently - making sure you lift it UP so the leg is completely clear of the floor before making any lateral movement to avoid the strain this plastic hinge is seemingly not designed to withstand.

Faced with the damage you can see in the photo I initially thought to include the repair within my annual service at Breeze. I never got a formal quote from VW but £450+ was muted for the part and I’m not sure if that included VAT or labour. Ridiculously expensive imo and incredibly wasteful given the majority of the table components continue to be in fine fettle.
To this forum I turned and I stumbled across an old thread where @Johnboy had manufactured a solution which peaked my interest. It retained many of the original parts, seemed to offer more lateral hinge strength than the original and - importantly for me - didn’t require drilling through the surface of the table. I didn’t want to affect the already small surface area with screw heads or damage the integrity of the table veneer.
Quick DM, phone call, some emails and a few days later I had the part and a detailed set of instructions in hand. Below is the different steps I followed to achieve the fix:
Removed the table to get better access for working on the hinge. Removed the metal hinge pin and you can see the damage more clearly.

Drilled out the 4 pop rivets (gently). It’s John’s and my belief that these are used primarily to align the plastic bracket which is ultimately glued into place on the underside of the table.

Using tape to protect much of the table underside, used a hacksaw blade to cut the designated part of the plastic hinge.

Used a Stanley knife and plastic levers / trim tools to remove glue at the edges of the damaged section and then prise it clear of the table underside. You can see some scratching I caused with the Stanley knife despite best efforts - but remember this is the underside of the table which is either facing the floor or the kitchen cupboards so never in sight.

Used sand paper to remove adhesive and create a decent key for subsequent adhesive. Then used John’s provided bespoke drill guide (and bit) to create 2 new holes for rivets (the new part is narrower than the original at one end)

Confirmatory check that alignment is ok with new holes for rivets

Used alcohol wipes to clean both surfaces. Gathered final equipment (rivet gun and standard Araldyte epoxy resin)

Mixed the Araldite, applied to both surfaces and used 4 pop rivets to neatly align the new hinge and apply extra pressure to bring the parts together. Spread the excess Araldyte around 3 sides of the hinge join to the table for extra adhesion.

Dry for 24-hrs. Refit leg and hinge pin. Check operation. Refit the table to the van. Check operation. Job done!

Clearly I’m going to be taking greater care of my table going forward. But the table leg operates exactly as it did before, has no ugly holes through the table top and certainly looks and feels like the metal hinge will stand up better to wear and tear in the future. I’ll keep you posted how the repair holds but I was delighted with the outcome - I dare say the DIY was even a little bit enjoyable. Must’ve saved over £400 here, done my bit for the environment and (imo) ended up with a stronger hinge than when it left the factory.
I love this forum - thank you to @Johnboy for taking the time to engineer a solution and helping me through the process. Top man!
Last edited:


