- Home
- Forums
- VW California T5 T6 & T6.1 Specific Sections
- VW California T5,T6 & T6.1 Specific Sections
- Audio & Navigation
You are using an out of date browser. It may not display this or other websites correctly.
You should upgrade or use an alternative browser.
You should upgrade or use an alternative browser.
G
GrumpyGranddad
Guest User
Had a dialogue with Hamid last week regarding my dashcams. He is so helpful. Big thumbs up from me for SatNav Systems 
WillSS
2 seater beach
VIP Member
- Messages
- 133
- Vehicle
- T6 Beach 150
Just for future reference if anyone else has this failing touch screen issue on their discover media system there is a pretty straightforward DIY fix with a replacement screen digitiser off ebay for approx £30. (Certainly easier than swapping a phone screen as a comparison to what’s involved)
I had the same issue as above approx 6 months ago but managed to replace the digitiser and it’s been perfect since. Happy to post the ‘how to‘ / part details on here if someone else has the problem down the line (PM me) but maybe all the potential failures have shown up by now.
Cheers, Will
I had the same issue as above approx 6 months ago but managed to replace the digitiser and it’s been perfect since. Happy to post the ‘how to‘ / part details on here if someone else has the problem down the line (PM me) but maybe all the potential failures have shown up by now.
Cheers, Will
brettvee_dakdak
Hi Will,Just for future reference if anyone else has this failing touch screen issue on their discover media system there is a pretty straightforward DIY fix with a replacement screen digitiser off ebay for approx £30. (Certainly easier than swapping a phone screen as a comparison to what’s involved)
I had the same issue as above approx 6 months ago but managed to replace the digitiser and it’s been perfect since. Happy to post the ‘how to‘ / part details on here if someone else has the problem down the line (PM me) but maybe all the potential failures have shown up by now.
Cheers, Will
I am having the same issues with my 2017 T6, that mentioned. I am interesting in following the instructions you offered and buying the replacement screen digitiser from ebay to have a go at fixing it myself. Are to able to post the how to details you mentioned, thanks in advance, Brett
WillSS
2 seater beach
VIP Member
- Messages
- 133
- Vehicle
- T6 Beach 150
Ok Brett, i‘ve just dug out the the photos, it was actually nearly a year ago looking at them now! Memory a bit rusty but the photos pretty much show the order of things
First the part, here’s the ebay link to the digitiser… no surprises it’s gone up in price like the rest of world. This is supplied from the EU (Germany) but you could take a punt on the cheaper Chinese delivered one (does look a different supplier though). I bought the EU delivered version.
ebay item 115045718856
If this link doesn’t work down the line then just search for “VW digitiser TDO-WVGA0633F00039”
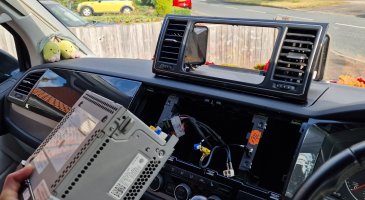
To fit you obviously need to remove the unit, clear the kitchen table and grab your screwdrivers, fairly sure the screws were all of the small torx variety. Then pull it apart to get to just the screen…
No great surprises here, pull off the front knobs, remove any sd cards and just look for the relevant screws…
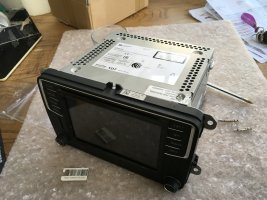
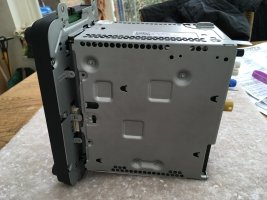
Once here you’ll spot a small plastic clip holding each of the two card slot gubbins (below now removed laying on their side, were vertical)
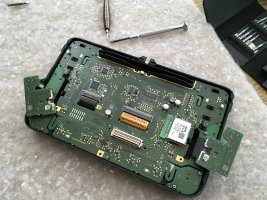
then gently ease up the 2 ribbon connectors and slide them out…
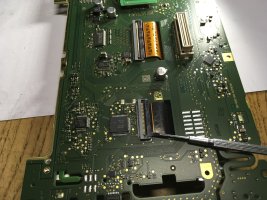
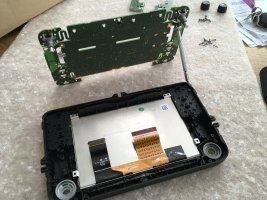
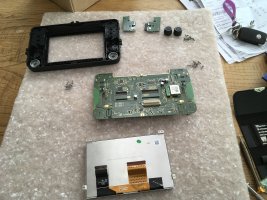
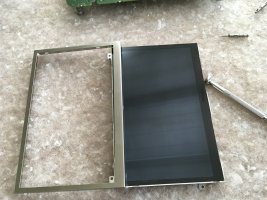
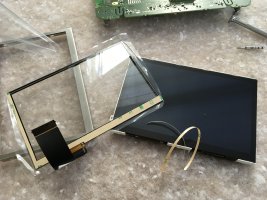
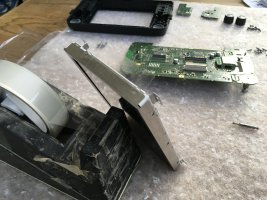
Basically keep striping it down until you get to the glass unit.
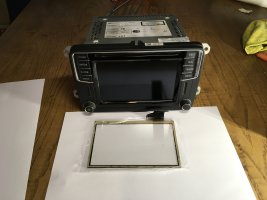
Now get your new screen and after cleaning stick it over the existing one with the supplied 3m edge tape. Yes on top of the exisitng!
You will not get the original one apart as it is bonded throughout to the LCD. It is only 1mm thick and will still fit fine. In the last photo it looks like i helped the ‘fit‘ with a bit of sellotape here! Then put it all back together in reverse order but obviously connect the correct ribbon in. I left the existing one tucked out the way hence this is all completely reversible back to your original condition should you need to go back for any reason!
The end result is it looks and performs as per the original ‘working’ screen.
As said been a year now and mine’s performed perfectply.
Good luck, Will
First the part, here’s the ebay link to the digitiser… no surprises it’s gone up in price like the rest of world. This is supplied from the EU (Germany) but you could take a punt on the cheaper Chinese delivered one (does look a different supplier though). I bought the EU delivered version.
ebay item 115045718856
If this link doesn’t work down the line then just search for “VW digitiser TDO-WVGA0633F00039”
To fit you obviously need to remove the unit, clear the kitchen table and grab your screwdrivers, fairly sure the screws were all of the small torx variety. Then pull it apart to get to just the screen…
No great surprises here, pull off the front knobs, remove any sd cards and just look for the relevant screws…


Once here you’ll spot a small plastic clip holding each of the two card slot gubbins (below now removed laying on their side, were vertical)

then gently ease up the 2 ribbon connectors and slide them out…


Basically keep striping it down until you get to the glass unit.
Now get your new screen and after cleaning stick it over the existing one with the supplied 3m edge tape. Yes on top of the exisitng!
You will not get the original one apart as it is bonded throughout to the LCD. It is only 1mm thick and will still fit fine. In the last photo it looks like i helped the ‘fit‘ with a bit of sellotape here! Then put it all back together in reverse order but obviously connect the correct ribbon in. I left the existing one tucked out the way hence this is all completely reversible back to your original condition should you need to go back for any reason!
The end result is it looks and performs as per the original ‘working’ screen.
As said been a year now and mine’s performed perfectply.
Good luck, Will
brettvee_dakdak
Hi Will, Thanks for sharing the information and digging up the old photos to demonstrate the process, it is good information. Before purchasing the digitiser and removing the unit from the vehicle, I am just wandering, was there any software adaption or computer syncing required upon reinstallation or is it just a straight forward plug and play with no information/settings lost whilst the unit is out of the vehicle? Thanks again Brett
WillSS
2 seater beach
VIP Member
- Messages
- 133
- Vehicle
- T6 Beach 150
No issues, battery disconnects or coding required. It will be fine as you are just replacing the screen .
brettvee_dakdak
My digitiser should arrive in one more weekNo issues, battery disconnects or coding required. It will be fine as you are just replacing the screen .
brettvee_dakdak
Thanks for your help, I installed the new digitiser yesterday. Looks and performs like new.My digitiser should arrive in one more week
S
Siren
VIP Member
- Messages
- 6
The touch screen on our 5 year old Cali went bad last week - just where it gets the most use where the three route choices/letter 'L' on input screen appear. I contacted Ingleby Electronics on the Saturday by email through their contact page (Incidentally I have absolutely no connection with them, so this is unbiased review) Natalie & Ian very friendly, quoted £270 to replace screen plus carriage. I paid £19 return carriage online on Sunday through their ebay page and was emailed a prepaid Parcel Force Label with job number on it. I took unit out and posted on Monday. Received acknowledgement they had received on Tuesday. On Wednesday they confirmed new screen fitted and all working. I paid that day by transfer to their account and received unit back next day on the Thursday!! Works perfectly, lovely new sensitive screen, you would never know changed. So turn round was amazing 4 days from posting to them. Cannot recommend this company more highly. Total cost of repair £289, excellent value for money.
Quick tip - google 'How to remove VW Infotainment System', there are a couple of good YouTube videos. I found working from bottom right of vent trim worked well.
Kevin - Ocean, 5 years old
Quick tip - google 'How to remove VW Infotainment System', there are a couple of good YouTube videos. I found working from bottom right of vent trim worked well.
Kevin - Ocean, 5 years old
Chunkymunky
VIP Member
Agree with above! I have no connection to Ingleby , and wasn’t then at the stage of wanting to do the job myself. I drove to them and Ian did the entire digitiser job while I waited. An absolute gentlemanThe touch screen on our 5 year old Cali went bad last week - just where it gets the most use where the three route choices/letter 'L' on input screen appear. I contacted Ingleby Electronics on the Saturday by email through their contact page (Incidentally I have absolutely no connection with them, so this is unbiased review) Natalie & Ian very friendly, quoted £270 to replace screen plus carriage. I paid £19 return carriage online on Sunday through their ebay page and was emailed a prepaid Parcel Force Label with job number on it. I took unit out and posted on Monday. Received acknowledgement they had received on Tuesday. On Wednesday they confirmed new screen fitted and all working. I paid that day by transfer to their account and received unit back next day on the Thursday!! Works perfectly, lovely new sensitive screen, you would never know changed. So turn round was amazing 4 days from posting to them. Cannot recommend this company more highly. Total cost of repair £289, excellent value for money.
Quick tip - google 'How to remove VW Infotainment System', there are a couple of good YouTube videos. I found working from bottom right of vent trim worked well.
Kevin - Ocean, 5 years old
SW gasman
VIP Member
Yep, ours has gone too (2017 T6 Cali - knackered touchscreen, started approx a year ago and now barely works). Will be in touch with Ingleby directly (unless anyone knows of a SatNav specialist in the South West who can fix it??)...
Ch1pbutty
Super Poster
VIP Member
Perhaps be better off replacing it with a modern non VW unit, rather than nursing old tech which will most likely fail again in future.Yep, ours has gone too (2017 T6 Cali - knackered touchscreen, started approx a year ago and now barely works). Will be in touch with Ingleby directly (unless anyone knows of a SatNav specialist in the South West who can fix it??)...
Can recommend Absolut5 for upgraded system.
Last edited:
WillSS
2 seater beach
VIP Member
- Messages
- 133
- Vehicle
- T6 Beach 150
see above, it’s really not that difficult to fix it yourself and save £100sYep, ours has gone too (2017 T6 Cali - knackered touchscreen, started approx a year ago and now barely works). Will be in touch with Ingleby directly (unless anyone knows of a SatNav specialist in the South West who can fix it??)...
Perfectos
Super Poster
Lifetime VIP Member
See post #2Yep, ours has gone too (2017 T6 Cali - knackered touchscreen, started approx a year ago and now barely works). Will be in touch with Ingleby directly (unless anyone knows of a SatNav specialist in the South West who can fix it??)...
Bluebird
VIP Member
I’ve just had mine fixed. I didn’t fancy taking it out and then taking it apart. So following a recommendation on the T6 forum I spoke to Andy from Huddersfield 07788 988178. He is also on eBay as sat-navs-uk.
I popped over today, he took the unit out of the dash and replaced the screen whilst I had a very nice bacon sandwich in a local cafe. I’ve had a quick test of the unit and everything seems to be ok. Can’t complain at just over £200 compared to other prices I’ve seen. I believe he does various updates as well but I didn’t need any so I can’t advise on cost.
I popped over today, he took the unit out of the dash and replaced the screen whilst I had a very nice bacon sandwich in a local cafe. I’ve had a quick test of the unit and everything seems to be ok. Can’t complain at just over £200 compared to other prices I’ve seen. I believe he does various updates as well but I didn’t need any so I can’t advise on cost.
CaliOceanMike
Lifetime VIP Member
Many thanks for this. I've got a 2018 Ocean which I bought from VW last year. It developed touchscreen fault after the warranty had ended. Not wanting to have to spend a fortune on a new infotainment unit, I decided I would have to find someone who could repair it. I then saw this thread and the details of the DIY fix, so figured I'd give it a go. I spent £10 on a touchscreen from AliExpress, £10 on a set of decent trim removal tools from Amazon and £8 for some precision torx screwdrivers from Screwfix. After a few hours of very careful work (ensuring I didn't scratch, crack or otherwise damage any trim or the infotainment unit itself), I'm delighted to say that I now have a fully functioning touchscreen once again. Not sure how long the AliExpress supplied screen will last, but at least I now know how to replace it again if needed and have the tools to do so.Ok Brett, i‘ve just dug out the the photos, it was actually nearly a year ago looking at them now! Memory a bit rusty but the photos pretty much show the order of things
First the part, here’s the ebay link to the digitiser… no surprises it’s gone up in price like the rest of world. This is supplied from the EU (Germany) but you could take a punt on the cheaper Chinese delivered one (does look a different supplier though). I bought the EU delivered version.
ebay item 115045718856
If this link doesn’t work down the line then just search for “VW digitiser TDO-WVGA0633F00039”
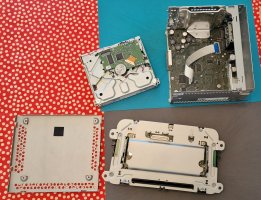
To fit you obviously need to remove the unit, clear the kitchen table and grab your screwdrivers, fairly sure the screws were all of the small torx variety. Then pull it apart to get to just the screen…
No great surprises here, pull off the front knobs, remove any sd cards and just look for the relevant screws…
View attachment 103438View attachment 103439View attachment 103440
Once here you’ll spot a small plastic clip holding each of the two card slot gubbins (below now removed laying on their side, were vertical)
View attachment 103442
then gently ease up the 2 ribbon connectors and slide them out…
View attachment 103441View attachment 103443View attachment 103444View attachment 103445View attachment 103446View attachment 103447
Basically keep striping it down until you get to the glass unit.
Now get your new screen and after cleaning stick it over the existing one with the supplied 3m edge tape. Yes on top of the exisitng!
You will not get the original one apart as it is bonded throughout to the LCD. It is only 1mm thick and will still fit fine. In the last photo it looks like i helped the ‘fit‘ with a bit of sellotape here! Then put it all back together in reverse order but obviously connect the correct ribbon in. I left the existing one tucked out the way hence this is all completely reversible back to your original condition should you need to go back for any reason!
The end result is it looks and performs as per the original ‘working’ screen.
As said been a year now and mine’s performed perfectply.
Good luck, Will
P
Petteri Mommo
Hi newbie here. Joined for this thread, but will stick around. Have a Caddy Maxi CNG at the moment but am an aspiring Californian. Or will convert the Caddy into a fake Cali. Time will tell. Thanks for the instructions. Just received a digitiser in the post, 19 squid from Candy Rock Mountain. One question: is there no way of removing the old one? Hairdrier? Just a matter of principle for me; feels weird to leave a broken part in place...Ok Brett, i‘ve just dug out the the photos, it was actually nearly a year ago looking at them now! Memory a bit rusty but the photos pretty much show the order of things
First the part, here’s the ebay link to the digitiser… no surprises it’s gone up in price like the rest of world. This is supplied from the EU (Germany) but you could take a punt on the cheaper Chinese delivered one (does look a different supplier though). I bought the EU delivered version.
ebay item 115045718856
If this link doesn’t work down the line then just search for “VW digitiser TDO-WVGA0633F00039”
To fit you obviously need to remove the unit, clear the kitchen table and grab your screwdrivers, fairly sure the screws were all of the small torx variety. Then pull it apart to get to just the screen…
No great surprises here, pull off the front knobs, remove any sd cards and just look for the relevant screws…
View attachment 103438View attachment 103439View attachment 103440
Once here you’ll spot a small plastic clip holding each of the two card slot gubbins (below now removed laying on their side, were vertical)
View attachment 103442
then gently ease up the 2 ribbon connectors and slide them out…
View attachment 103441View attachment 103443View attachment 103444View attachment 103445View attachment 103446View attachment 103447
Basically keep striping it down until you get to the glass unit.
Now get your new screen and after cleaning stick it over the existing one with the supplied 3m edge tape. Yes on top of the exisitng!
You will not get the original one apart as it is bonded throughout to the LCD. It is only 1mm thick and will still fit fine. In the last photo it looks like i helped the ‘fit‘ with a bit of sellotape here! Then put it all back together in reverse order but obviously connect the correct ribbon in. I left the existing one tucked out the way hence this is all completely reversible back to your original condition should you need to go back for any reason!
The end result is it looks and performs as per the original ‘working’ screen.
As said been a year now and mine’s performed perfectply.
Good luck, Will
WillSS
2 seater beach
VIP Member
- Messages
- 133
- Vehicle
- T6 Beach 150
Honestly when you get to the point of holding just the screen you’ll realise why it’s not feasible on a DIY basis! Yes it can be done but you’d need some proper kit to massively minimise the chances of cracking the underlying LCD you want.Hi newbie here. Joined for this thread, but will stick around. Have a Caddy Maxi CNG at the moment but am an aspiring Californian. Or will convert the Caddy into a fake Cali. Time will tell. Thanks for the instructions. Just received a digitiser in the post, 19 squid from Candy Rock Mountain. One question: is there no way of removing the old one? Hairdrier? Just a matter of principle for me; feels weird to leave a broken part in place...
Its glued throughout so needs to be heated, suction clamped and cheese wired and then follows the cleanup to remove all the adhesive! Just no reason to do it as you genuinely can’t tell the difference with overlaying the new screen on top. Plus you can always revert to the original state at any point.
Don’t let me put you off though, here’s an idea of what you need to create in your shed to give it a go…
P
Petteri Mommo
Decided to paste the old one on top of the buggered old one in the end. My 10yro son did the work. Piece of wee wee. Only four screws left over and the little plasticky bits that lock some of the connectors to the back of the radio were eaten by the air vents. Par for the course. Thanks again for taking the time to document and share your work!
I ordered the first digitiser that came up on Ebay for 19 quid. It´s shiny whereas the old one was matte. Perhaps if others decide to DIY this as well look for a matte one in order to avoid reflections?
I ordered the first digitiser that came up on Ebay for 19 quid. It´s shiny whereas the old one was matte. Perhaps if others decide to DIY this as well look for a matte one in order to avoid reflections?
BrettARudd184
Thankyou willSS. Seriously helped me out. Took a little longer than expected but no damage whatsoever. Cheers for adding the the l8nk for the screen. Great price even though its now a little more. Had it delivered the following day so cannot grumble. CheersOk Brett, i‘ve just dug out the the photos, it was actually nearly a year ago looking at them now! Memory a bit rusty but the photos pretty much show the order of things
First the part, here’s the ebay link to the digitiser… no surprises it’s gone up in price like the rest of world. This is supplied from the EU (Germany) but you could take a punt on the cheaper Chinese delivered one (does look a different supplier though). I bought the EU delivered version.
ebay item 115045718856
If this link doesn’t work down the line then just search for “VW digitiser TDO-WVGA0633F00039”
To fit you obviously need to remove the unit, clear the kitchen table and grab your screwdrivers, fairly sure the screws were all of the small torx variety. Then pull it apart to get to just the screen…
No great surprises here, pull off the front knobs, remove any sd cards and just look for the relevant screws…
View attachment 103438View attachment 103439View attachment 103440
Once here you’ll spot a small plastic clip holding each of the two card slot gubbins (below now removed laying on their side, were vertical)
View attachment 103442
then gently ease up the 2 ribbon connectors and slide them out…
View attachment 103441View attachment 103443View attachment 103444View attachment 103445View attachment 103446View attachment 103447
Basically keep striping it down until you get to the glass unit.
Now get your new screen and after cleaning stick it over the existing one with the supplied 3m edge tape. Yes on top of the exisitng!
You will not get the original one apart as it is bonded throughout to the LCD. It is only 1mm thick and will still fit fine. In the last photo it looks like i helped the ‘fit‘ with a bit of sellotape here! Then put it all back together in reverse order but obviously connect the correct ribbon in. I left the existing one tucked out the way hence this is all completely reversible back to your original condition should you need to go back for any reason!
The end result is it looks and performs as per the original ‘working’ screen.
As said been a year now and mine’s performed perfectply.
Good luck, Will
DanD
VIP Member
My 2017 California has developed the same touch screen problem with a vertical area covering about 1/4 of the screen just to right of centre no longer detecting touches. It took us a while to work out that it was the touch screen as we initially thought it was simply that the interface had become laggy when typing.
The forum has once again proven to be an invaluable source of information and sincere thanks to WillSS for your detailed instructions and pictures. I went for one of the really cheap touch screens on Ebay - £10.79 delivered and I'm pleased with the result. The process was pretty painless and I found removing the facia the trickiest bit as I was concerned that I might snap/scratch it, but it turned out to be far more robust that I suspected (I used stiff plastic wedges to prise out each of the many clips).
My only very minor gripe was that I had hoped that the replacement touch screen would have a non-reflective finish as it was mentioned in the item description, but it turned out to be shiny (maybe shouldn't have gone so cheap!). I'll try adding a matte screen protector if it causes too many problems with glare.
Dan
Truman
I've just had mine done, but it was free for me as I had just bought the vehicle. you tube has the repair method available and the part needed costs no more than £15. It takes around an hour to fix and TBH looks like an easy DIY task.We’ve had problems with the the touch screen for a couple of years on a 5 year old California,the L hasn’t worked for a long time on the satnav..You can’t programme satnav on touch screen only on voice control.If you try and touch the satnav screen when it’s running it will no longer move with the route and even jumps to countries all over Europe,you can’t re centralise the screen.The radio programmes jump all over the place too,keeps changing stations .Took it into the van centre they diagnosed that the control unit behind the touchscreen needs replacing at a cost of £2200.I’m not even convinced that it will fix it because the letter L isn’t working.A customer who overheard said to me it sounds rubbish seek a second opinion.Any ideas I don’t want to spend all that to have the satnav still not 100%
Snoopy23
VIP Member
I also have the dodgy screen, anyone had this replaced under the all in warrantee?
WelshGas
Retired after 42 yrs and enjoying Life.
Super Poster
Lifetime VIP Member
I doubt they will replace just the screen but the whole unit. Worth a try.I also have the dodgy screen, anyone had this replaced under the all in warrantee?
Similar threads
- Replies
- 5
- Views
- 1K
- Home
- Forums
- VW California T5 T6 & T6.1 Specific Sections
- VW California T5,T6 & T6.1 Specific Sections
- Audio & Navigation

About us
The VW California Club is the worlds largest resource for all owners and enthusiasts of VW California campervans.


