Wheel removal!

sidepod

sidepod

Super Poster
Lifetime VIP Member
Messages
6,320
Vehicle
T4 PopTop
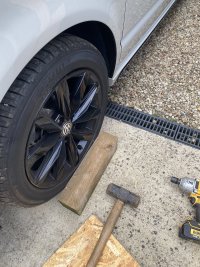
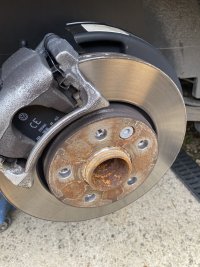
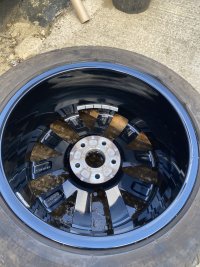
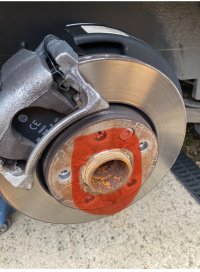
IMG_6290.jpegIMG_6291.jpegIMG_6293.jpeg12 months old. How hard can it be?

Thought I’d whip the old tyre brackets off and give them a buff inside.

Had to break out the big guns!
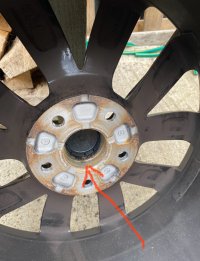
Quite bad really for such a young van!

Once cleaned up with Scotchbrite and copper slip, all is well.
Really easy wheels to mount. They have a nice deep shoulder on the centre bore so they happily sit on the hub without bolts.
 
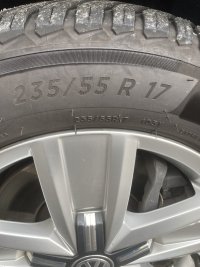
Big guns indeed! I am curious - what tyres are those? I don’t recognise them.
 
Well there round, black and made of rubber by sumitomo in picture one and a Bridgestone Monza in picture three
 
WTF? Well spotted! 3 Bridgestones and one Ditch finder!

A trip to the tyre shop tomorrow!
Aha. That explains it. I saw Bridgestone and then BC100 and couldn’t find any Bridgestone with that label.
 
Once cleaned up with Scotchbrite and copper slip, all is well.
Amateur mechanic question, which part of the wheel or hub do you clean up and grease?
 
The face that is in contact with the alloy wheel, because they are dissimilar metals they will expand and contract at different rates and become welded unless they are clean and lightly lubricated, copper grease is best.
 
Amateur mechanic question, which part of the wheel or hub do you clean up and grease?
The face of the hub is usually ok, the problem with the VW wheels is the projecting bit of the hub that fits into the centre hole in the wheel. On some of the designs of alloys that hole is a tight fit on others its much looser.
 
The face of the hub is usually ok, the problem with the VW wheels is the projecting bit of the hub that fits into the centre hole in the wheel. On some of the designs of alloys that hole is a tight fit on others its much looser.
Yes, had to use a wood block and mallet to release in the past as well as rolling van forward and back with loosened nuts.
 
You need to rub down and clean/grease this central spigot, the sticky out bit. This fits neatly inside the centre bore of the wheel and seizes!

Clean the mating face in the wheel also.
IMG_6294.jpeg
 
Yes they need some preventative measures to prevent the two dissimilar metals corroding together; we have had several punctures to deal with since it was new( 5+ yrs) now on Michelin cross climates which are noticeably better than the Bridgestone OEM tyres
We are still on VW Assist which gives us the roadside assistance which has been very helpful!
 
View attachment 127474View attachment 127475View attachment 12747612 months old. How hard can it be?

Thought I’d whip the old tyre brackets off and give them a buff inside.

Had to break out the big guns!
Quite bad really for such a young van!

Once cleaned up with Scotchbrite and copper slip, all is well.
Really easy wheels to mount. They have a nice deep shoulder on the centre bore so they happily sit on the hub without bolts.
Wheels are Hub centric which means that they must be a tight fit on the hub.
 
Amateur mechanic question, which part of the wheel or hub do you clean up and grease?
Over time I found that cleaning both wheel and hub then applying a wax polish gave no issue with grease spinning out and wheels just dropped off with no further rust corrosion . Did an annual repolish.
 
This discussion spurred me on to attend to the wheels on our March 2024 Cali.

I had quite a challenge getting one wheel off in May after picking up a puncture and at the time made a note to myself that I ought to remove them all and clean the spigots/apply copper slip.

So this afternoon I have done all four. Even the wheel that was removed back in May was tight. The other three all needed a block of wood on the tyre and a sledge hammer to free them up.
For them to have got so bad in just a few months is shocking.

At least it gave me an opportunity to give the alloys a really good clean in the areas that are hard to get to when the wheels are on the van.

It should make wheel changing a little bit easier now if I pick up another puncture on my travels.
I know I could call out VW Assist and let them deal with it. But I prefer to be self sufficient and would rather change the wheel myself and be on my way, than wait for hours for assistance to arrive.

I can't understand why VW don't just apply a small amount of copper slip or similar during the assembly process.
Second this.
After getting van at 7 months old and having to resort to the 14lb “Persuader” and block of wood to get the alloys off,” thought “That was almost as good as the fun filled half hour rounding the monkey puzzle wheel nut adapter getting the locking wheel nut off!
Don’t want to try this middle of nowhere, with the 4 seasons weather we can get.
Decided the best course of action if you want to be able change your own wheels/replace a puncture with the spare tyre.

1) Throw the locking wheel bolts away and replace with standard bolts.
2) Clean and copper slip as above (very sparingly) otherwise when the wheel assembly gets hot under sustained braking the copper slip is almost liquid and gets flung out from the join between hub and alloy. This leaves nice copper coloured streaks on silver alloys and pat yourself on the back if they are black coated alloys.
The polishing tip may be a lower risk option.
3) Buy a good 18 inch torque wrench and correct sized socket for the wheel nuts.

Having had 2 separate punctures when travelling and unable to reach a garage, it was straight forward, after the grovelling under the rear bumper to remove the spare, to slacken the wheel bolts with the 18 inch leverage of the torque wrench without having to stand on it, jack up and each alloy just falls off when the bolts are removed.
 
“That was almost as good as the fun filled half hour rounding the monkey puzzle wheel nut adapter getting the locking wheel nut off!


1) Throw the locking wheel bolts away and replace with standard bolts.
That's a good suggestion :thumb The locking wheel nut adapter does seem like a very flimsy design.

The original bolts were with the van when we collected it, so I'm going to remove the locking bolts now and replace them with the originals.

Let's face it, if anyone wants to steal the wheels they will have a set of those locking wheel bolt removal kits anyway.
 
IMG_7305.jpegThat's a good suggestion :thumb The locking wheel nut adapter does seem like a very flimsy design.

The original bolts were with the van when we collected it, so I'm going to remove the locking bolts now and replace them with the originals.

Let's face it, if anyone wants to steal the wheels they will have a set of those locking wheel bolt removal kits anyway.
There are upteen tools on line that the “light fingered toerags” can. If they want your alloy they will have it with or without your security measure.
My standard Davenport alloy has a cover over the bolts, so you can only know if the bolt is present when it is removed!
 
And whilst I am on a wheel bolt mission, I've just ordered a 1/2" drive, 24"long breaker bar and 19mm hex plastic coated impact socket which I'm going to keep permanently in the sliding draw under the rear bench seat.

In the event of a puncture out on the road, it will be much easier and safer to deal with the wheel bolts using this rather than the mickey mouse wheel wrench supplied by VW.

And it will save me from forgetting to put the one out of my garage tool kit into the Cali every time we go anywhere.

After the last punctured wheel change, I bought a cheap set of hi-viz waterproof overalls off fleebay a while back which are also stowed in the sliding draw. When I do get the next puncture, they will offer some protection from the elements and whilst grovelling around under the van to release the spare and locate the jack correctly.
 
Get a caravan extending wheel brace. it is all you need
 
Back
Top