Buy all your VW California Accessories at the Club Shop Visit Shop

Windblocker

Martin Adams has the windblockers (T5WOB) I was initially going go for these but ended up buying the California Camping side panels as they keep the rain out aswell, they are also made of sun reflective material, we use them all the time now as so easy to fit.
 
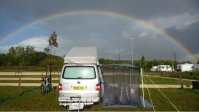
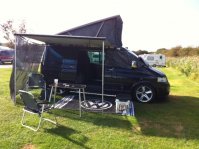
Here they are on our wagon. As Martin says, they are not rain proof, but as you may be able to see in the picture they let a lot of light through, so, while they protect you from the wind very well, you still get a fresh air, outdoor feel. So they are an option if that's what you want. We wouldn't be without ours, but often just put up one side to shield us from the breeze. Construction is robust and of good material - it's actually Dutch tulip netting dyed to your colour choice - though the arrangements to fit the side panels to the awning are not the slickest.

ImageUploadedByTapatalk1344636463.479743.jpg
 
Martin. do you have a link for California Camping please? \tried to google but got all sorts of hire companies etc.

TVM.
 
Hi Martin A,

We have the windstoppers all round and we're very pleased with them. I'm sure you've explained this before, but where do you attach your 1" elastic at the van? And how stiff is the elastic? Is it bungee strength, or what? We're still using the supplied poles but they are not very stable as you know

Cheers

Chris
 
Hi Chris, the front section slides into the awning channel and the side panels use either awning strut and attaches to it via a zip ... (a bit hard to explain), each panel has three eyelets at the bottom which then attach to a bungy and then onto a tent peg, this allows you to either have it at a slight angle or you can have them at 90 degrees and box yourself in if need-be as it has velcro to attach them all together ( if you had all three panels this would be a problem as you would never be able to get out )

After reading that back it seems to not make much sense, maybe I will take a photo :lol:

I remember seeing your windblockers at the Berks meet and was really impressed, only reason I changed my mind is we wanted something to keep the poxy rain out, we have since used these in some really heavy rain and it keeps everything dry under the awning.
 
chris the elastic needs to be tight .i thread elastic though the top eye lets ..each end of elastic has a large loop each end .to go round awning rail on van one loop 2nd loop goes on the extened awning end .at frist i used the wire with plastic around it you use for putting up net curtains ,with . a round eye let at each end loop .will try and take a pic this week for you . :hello
 
I must admit I was put off a bit when I phoned wind blockers to place an order as they said I need to purchase a pole that you would normally use with a washing line, this totally confused me :crazy
 
Hi Martin and Martin,

OK, understand how you've threaded it - thanks. We're going to try this as it sounds like a very good solution.

Yes, the washing line prop solution isn't great, and has fallen down a few times! So we're still experimenting.

We did look at the California Camping ones and they certainly looked good on the website. As to which type of awning, for us it's just nice to kill the wind, and we were happy to trade off the rain for the open air feeling. What I like about both solutions though is that you can put up just the sections that you need, which is fantastically flexible as you don't have to put up a whole extra tent!

Chris
 
Hi, Chris/Penney and Martin A

When you ordered your Windblockers can you remember which custom size you ordered?
We've decided to get some and are thinking:

  • Front panel: 245w (outer edges of awning legs to allow wrap-around side panels to overlap) x 175h
  • Side panels: 225w x 175/190h
We're not sure about the heights and are allowing about a 15cm drop from front to back - does that sound right? Is it good to have a bit of spare fabric at the bottom?

Any advice gratefully received :thanks

Best wishes,
Steve
 
Steve, I'll write a reply tomorrow morning when I'm on at my PC, as there are a couple of points about the measurements I need to check
 
ChrisandPenney52 said:
Steve, I'll write a reply tomorrow morning when I'm on at my PC, as there are a couple of points about the measurements I need to check

Much appreciated :)
 
Hi there,

I had my three made up rectangular... Used for over three years and spot on.

I got the poles, but now hold them up with curtain wire... much easier to store. 9kept all of mine under the drivers seat. (Side, front and wires)

Sizes for the front were 245cm (wide) by 180cm (tall)

The two side panels were also rectangular and are 185cm wide by 180cm tall each.

I know others have done them differently to allow for the awning to be "canted" either towards the van or away from it.

hope this helps.

Rgds
Mark
 
OK, here's a ramble. I find this all a bit tricky to explain and make sure I've covered all the bases, so there's probably far too much information here. PM me if you want to talk it though.

We didn't order a standard size as none fitted at the time. Also the wrap around side panels weren't available, though we would have taken them if they had been.

Firstly, our *actual* measurements, then some sort of an attempt at an explanation of why we bought this size. As you look at the awning from broadside on to the van, the rear side panel is on your left, the front side panel is on your right and and the awning panel is facing you. When you are ordering, be very careful to use their notation though, as we tied ourselves in knots with them.

Both our side panels are 187cm deep (van to awning rail). The rear side panel is 185cm high at the van and 189cm high at the awning. I think we did it this way because the pole sits slightly lower at the van than at the awning. The front side panel is 185cm high at the van and 194cm at the awning (see reason below). The awning panel is 245cm wide, 189cm high on the left (rear of van) and 194cm high on the right (front of van).

The 'logic' for the odd shape is that you can drop the awning at the tail end of the van, but you can't drop it at the nose end of the van because the driver's door will scrape on the Windstopper pole. So we designed it to lift at the front and be level or drop if needed at the back. If you look at the picture with the rainbow earlier in this post you'll see what we do. This actually runs rain off better, by the way, than dropping both front and back. Martin's fixing may avoid this problem.

The vendor will put loops on the base and also loops on each of the vertical seams at around 12cm from the ground. We had a second set of loops put on the rear side panel too at around 25cm, for tensioning with the lowered awning, but not sure we've ever used them.

A bit over-engineered I think, especially as we regularly put the wrong side panels in the wrong place and don't notice!
 
he should have sizes if you ask him he made them for the cali .they only peg in to the ground .so if you lower it just move the bottom out .i use a one inch thick peace of elastic on the side curtains .not the poles.they are not very good .

photo.JPG
 
Many thanks, Mark and Chris - I'm really grateful for your help.

We haven't used the awning much – and mostly in the rain rather than sun last summer – so hadn't realised that we could pitch it sloping upwards (from van to awning). Think we've just been repeating what we were shown at handover – and it didn't occur to me that the legs could go higher. Feeling a bit foolish now, as I realise that pitching it the other way would make it easier to walk under without stooping ;-)

When it's raining, is it still ok/better that way round, so long as it's canted so that the rain runs off towards the back of the van (and not onto the edge you exit). The rain doesn't pool on it more that way round?

Do you pitch it one way in sun and another in rain?


Linda phoned the guy at Windblockers today and he was really helpful and said that even though they only do three fixed side panel widths now, they can convert the excess into a "mini wrap".

Going to order a lovely green set tomorrow to coordinate with our Fresco :)

It's going to feel like we've got a whole extra room (one up, one down, one out!) – and fly/moth/mozzie free too :thumb
 
We started by always pitching flat until we woke up one day with a swimming pool on the roof. We now play it by ear. For preference we lower the rear leg in the rain but if there is a significant cross wind lower the windward side instead and take car with the driver's door. . The wind blockers give you a wider operating margin as they reduce the wind getting under the canopy. We're cautious about wind though and don't use the awning in high winds and also use guy ropes to hold the awning down - see other threads on this topic. We always try to get the rain to run off of the awning away from the van on one corner or the other.
 
We've just ordered our Windblockers set (handy that they take phone calls on Saturdays):

  • Front panel: 245w × 185h
  • Side panels: 187w × 185h (both the same)

Rather than the full "wrap around ends", they're going to do a "mini wrap", which won't cost as much as they'll just make a minor alteration to their standard 225w side panel but it'll still wrap around the edge of the front panel and press-stud onto it.

Going to get the ratchet tie-down as the one we have with a spring seems a bit of a faff and we seem to end up with one bit of it falling off!

Thanks again for helping us understand the options :thumb

Cheers,
Steve
 
coordinated said:
We've just ordered our Windblockers set

And impressively, it's been delivered today - two weeks ahead of schedule and just in time for our holiday :thumb
 
Hi, How did you get on with the sizes you ordered? I was thinking of ordering 180cm high?

They now only seem to do 175cm widths for the end panels and can only alter the height.
 
180cm seems fine- plenty of scope for adjusting by changing the angle of pegging out, also the elastic loops are at two different heights.
 

Similar threads

Back
Top