Buy all your VW California Accessories at the Club Shop Visit Shop

Adding another rear 12v Socket

NZCali

NZCali

Messages
10
Location
New Zealand
Vehicle
T6 Ocean 204 4Motion
Does anyone have any hints on the best place to tap into a good 12v power line at the rear of the T6 Cali? The goal is to add a more accessible 12v socket when laying on the lower bed with your head near the rear door, e.g. to power a laptop or phone charger without having to drag an extra-long lead from the socket at the front of the kitchen.

The socket under the bed in the boot RHS is inaccessible from a made-up bed without going outside. (Yeah, tough life!) . I haven't been able to decode the wiring diagrams to find the physical location of plug connection points .

Some options:
- Wardrobe LHS? Is there a handy 12v to tap in there somewhere, or is it best to run a fused cable off the leisure battery at the bottom of the wardrobe and bring up to the wardrobe?

- Overhead locker - up high, maybe next to rear light on the RHS beside the locker?

- C-pillars - but both seem too full and wont take the depth of a cigarette socket.

- D-pillar RHS . Maybe cable from the exisiting 12v socket under the bed in the boot, and pull up through to the D-pillar area? Presumably a bit of deformation of the foam a/c 'tube' that runs beside the metal D-pillar wont be a concern, so no problem to install the socket beside the rear door light switch in the plastic D-pillar cover? (I struggled to find the correct method to remove the lower panelling).

Anyone had a crack at this before?
 
- Wardrobe LHS? Is there a handy 12v to tap in there somewhere, or is it best to run a fused cable off the leisure battery at the bottom of the wardrobe and bring up to the wardrobe?

- ?

When fixing my solar panel controller in the rear cupboard, the controller had wires added to connect to both batteries which was a fairly simple operation. Currently the controller has a usb out that I use to charge phone etc.

Pull a cable from the battery and stick a usb hub on the cupboard somewhere untilnyou know that it works for you and then you can consider making it a permanent fixture.


Sent from my Pixel 6 Pro using Tapatalk
 
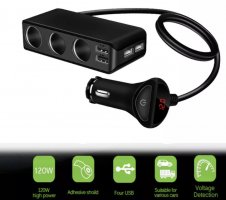
You could use one of these, simply plug into to boot 12v socket.
they have adhesive pads on the rear so can be mounted on a flat surface.
12v x3 + USB(2x1.a + 2x 2.1a)
Switch to turn it off + voltage display
7F09F2A3-B771-4541-ABEA-65CB9C136EB6.jpeg
 
You could use one of these, simply plug into to boot 12v socket.
they have adhesive pads on the rear so can be mounted on a flat surface.
12v x3 + USB(2x1.a + 2x 2.1a)
Switch to turn it off + voltage display
View attachment 86174
We have one of these, plugged into the existing socket by the side of the bench seat and mounted on the Shoe Box (shoe-boxx.de). Works well for us.
 
Last edited:
When fixing my solar panel controller in the rear cupboard, the controller had wires added to connect to both batteries which was a fairly simple operation. Currently the controller has a usb out that I use to charge phone etc.

Pull a cable from the battery and stick a usb hub on the cupboard somewhere untilnyou know that it works for you and then you can consider making it a permanent fixture.


Sent from my Pixel 6 Pro using Tapatalk
Thanks for the idea about trying this method, and testing different places to before taking the plunge and drilling into the cabinet to mount the socket. Or even leaving as a fly-lead extension socket in the bottom of the wardrobe or back cupboard.
 
You could use one of these, simply plug into to boot 12v socket.
they have adhesive pads on the rear so can be mounted on a flat surface.
12v x3 + USB(2x1.a + 2x 2.1a)
Switch to turn it off + voltage display
View attachment 86174

Thanks for this suggestion.

I did have a look at plugging an extension into that lower socket, but I have pull out boot organisers that rub up very flush with this socket. The plugs I have seen stick out proud of the socket for easy removal (and the 60W USB-C cigarette plug adapter that I need to use) - I am sure it wouldnt be long before I bash the plug.

But these might be a plan-B if I cant find an nice way to incorporate another built-in socket. Thanks for the idea.
You can get right-angled 12v plugs that you could swop over.
 
We are in the same situation and just landed in this thread. What did you do in the end? Like you, I don't see the one in the boot as a good option, as we would quickly break anything we plug in there when things go in and out of the boot. I see more suitable the one we have under the bench. May have to try one of those extensions.
 
Thanks for asking. TBH - a lot of procrastination, and lots of fluffing about buying lots of things to try. But guess that is all part of the fun, right?!

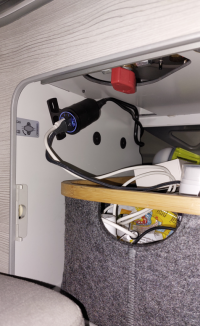
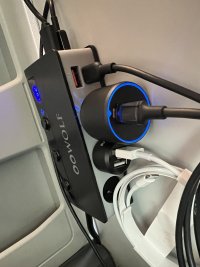
Current solution: very recently added a USB socket adapter in the cupboard under the gas cook top.

1674123160938.png

Might seem a strange location, but this is working better - for me anyway - for lots of reasons:
  • No holes drilled. Used a cigarette socket surface mount kit (with protective rubber boot) to house the USB power adapter. And used one of the existing fridge mount screws (removing the washer) to mount it. Easy as.
  • Power is piggybacked off the existing CBE socket panels at the front of the sink, routed back along the cupboard interior back wall (alongside the existing cabinet interior light cabling etc), back to rear cupboard here. Again, really easy to run. And bonus is utilizing the existing fusing etc.
  • USB sockets are now much easier to get to from the bed (or bench seat, or even the table) compared to using the existing front sockets. Cables can be plugged in and run outside the cupboard when needed, without the long cables running over the kitchen bench etc. The cupboard can 99% closed if preferred (but of course not 100%). And the USB cables remain plugged in when not in use, coiled up and closed in the cupboard.
  • This USB port is used to charge phones or laptop devices at night while sleeping, and those USB adapters have surprisingly bright power lights that annoyed me at night. Now devices can be put in the cupboard when charging and the door shut - no light. (But the power light is still needed to check it is switched on - didnt want to just black out the light!). This was quite a biggy for me.
  • This location is also great for safely tucking devices away in the cupboard to charge while travelling.
So, this is currently working really well for me.

Let me know if you require more info or are curious about the other options! There is probably a mini book in what I've learnt on this year-long journey! Extension units, various USB adapters - including the current one that gives a true 20V/3A/60W output when not on hookup, different locations, upgrading the front units. And of course, my next evolution plan for this one!

Anyway, hope it helps you, and is of interest.
 
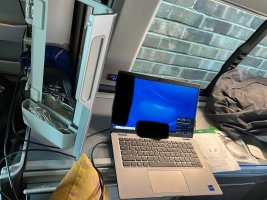
Also, for the power nerds struggling to get enough USB-C power... a bit more info on the USB outlet used above, and my findings along the way. When using the laptop to work from the van, this was key.

Note: this shouldn't be needed when charging phones or smaller tablets.

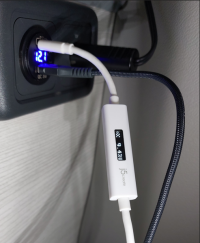
(BTW, I bought approx.10 different styles, shapes, and outlet models. Seriously. Plus, one of those USB-C cables to show the actual current, voltage and overall power being drawn/provided - great for testing like this. Yep...just a little bit obsessive).

(Also, a little background info for those not quite so nerdy obsessive! USB-A provides power like 5V/2.4A/12W. But USB-C can provide higher outputs - 30W, 60W etc. The challenge is these higher power levels push up the voltage/current combinations even higher - like 19 volts or 20 volts - obviously higher than the van battery). (Yes, there are higher power USB-A variants like QC3.0 for phones that also do this, but normally only up to 9v etc). Anyway...


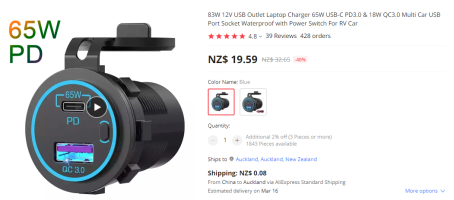
The USB power outlet I use now actually steps-up the voltage, giving a true 20v/3A 60W USB-C charge. For me, this was critical.

In reality many of the USB-C cigarette-plug outlets tried only provided 10v/2.5A/25W on USB-C, regardless of spec. Many capped out at 2.5A. When running on van battery alone, the input voltage to the adapter is around 12.5v. Rarely can it give the full 13.4v source required for the USB unit to provide 12v/2.5A/30W. Sure, maybe you get the 13.4v on hookup. Maybe. But then just use the laptop mains adapter! Most wired in USB adapters normally need 24v to give their full power - e.g., when used in trucks. So, the result were often disappointing.

The normal 25W didn't keep my laptop charged while in use working remotely in the van - it slowly drained the laptop battery. But because of the voltage step-up capability in this unit, it actually does the job, consistently giving 50W that my laptop and second monitor require.

(Also BTW, a second portable USB-powered LCD monitor is also game changing if you are used to two screens. Brilliant when working in the van - or from client sites. Well, game changing for me anyway).


Anyway, not endorsing the product - only sharing my results with it. To do your own testing, the USB outlet was bought direct from China but have seen it listed on the other big online stores as well. This one: https://www.aliexpress.com/item/1005004643920110.html. Wow, good discount at the moment - might have to get another one :)

1674124815881.png

Doesn't seem to get beyond barely warm when providing 50w Laptop + 15w Phone (powering mobile data). But the unit has lots of blue light! Also, despite what the blurb says, the little power switch on it does seem to switch off both the USB C and QC3 ports - a concern for some.

But be aware it is a little longer than the others. Fine for the mounting solution above - it does full the rubber boot to the max. Will need to test if it fits as a replacement in the front cabinet (hmm, maybe another post for another day).

Again, not endorsing the specific product - only sharing my findings with it. But hope that helps someone struggling to use a laptop in the van via the smaller 12v USB adapters.
 
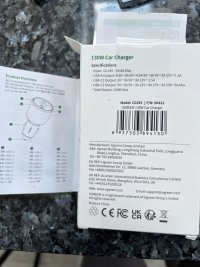
Received from UGreen in China via AliExpress.
12v cigarette 100 w and 20v / 5 amp lighter charger. Using a UGreen 100w cable and it’s charging my 65w USB-C laptop nicely. C988F458-8961-479B-B2A9-FBBA343471CF.jpeg
 
Also, for the power nerds struggling to get enough USB-C power... a bit more info on the USB outlet used above, and my findings along the way. When using the laptop to work from the van, this was key.
.

Again, not endorsing the specific product - only sharing my findings with it. But hope that helps someone struggling to use a laptop in the van via the smaller 12v USB adapters.
Really enjoying my new laptop which utilises the newer USB-C charging port.
A lot easier than crawling between the front seats and cables from front to back.
I concur :thumb:thumb
 
Might seem a strange location, but this is working better - for me anyway - for lots of reasons:
Many thanks for the thorough reply, @NZCali . Also thanks to @Californication69. I like both of those locations. For some reason I was only considering the other side of the van, plus I didn't know about all these different types of USBs. Will need to take into account all this information and ideas when working on this.
 
Many thanks for the thorough reply, @NZCali . Also thanks to @Californication69. I like both of those locations. For some reason I was only considering the other side of the van, plus I didn't know about all these different types of USBs. Will need to take into account all this information and ideas when working on this.
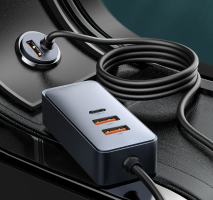
Hope it didn't over-complicate things. If you just need a simpler solution, then the plug-in styles like @Californication69 suggests can also be useful. One I tried was this one from Baseus, but there are of course others.
1674328455175.png

The part that plugs into the socket is low profile so does not sit too proud, and then you can run the extension part to a more accessible spot. This may be sufficient for you to run from the rear or under-bench seat socket.

But as above, these things normally expect the 13.4v source voltage provided when a car is being driven and charging. So when running from the leisure batteries (and not charging on hookup) it often it stepped down the power output, which may be absolutely fine for charging devices at a slower rate. For me, this meant the laptop kept giving annoying warnings like 'You are not getting full charge. Use the adapter that came from your laptop'. Again, if your use is not so power hungry, you may be fine with this.
 
And as others have posted, replacing one of the existing front cabinet sockets with a permanent USB adapter is also a worthwhile upgrade. Some have put a new one below the under-seat socket. While it doesn't help much with rear access, still useful.

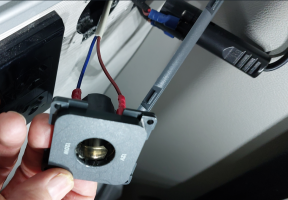
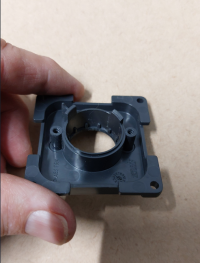
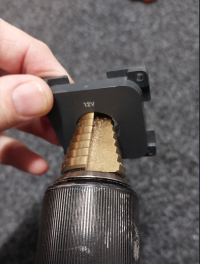
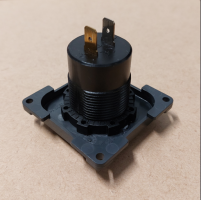
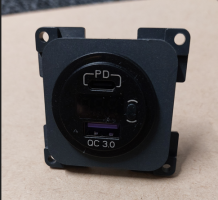
Others have already detailed elsewhere, but took pics at the time so... unclipped and unscrewed the panel, dismantled one side to remove the socket but retain the mounting plate, used a step-drill to bore out the hole, and then fitted one of the many USB adapters available online (with a power switch, and bonus voltage meter).

1674331013851.png
1674331027876.png
1674331048626.png
1674331102888.png
1674331380234.png

Pretty quick and easy, and much more compact and convenient than a plug-in adapter.

At the time I didn't have the voltage step-up version, so it didn't fully solve my power needs - see the pic of the device showing the batteries at 12.1v when parked-up, only producing 9v out for USB charging. This limited the power available (e.g., 9v/2.5A/22W) and can jump around as the fridge load kicks in and batteries slowly discharge. But I haven't yet swapped it out for the better version - and would need to double-check if the slightly longer length would fit.

1674330891076.png

But as others have also done, still a good solution for charging many devices, and recommended.
 
Back
Top