Buy all your VW California Accessories at the Club Shop Visit Shop

Cali Small Bench Drawer - not £550 …!

Thats annoying..! You'll need a right angle chuck/drill to get in there I guess.

Worth checking some of the other threads on here re: fitting the drawer to T5s. There may be an answer...
Yes I think its either the right angle drill, or lift the bench out job.

I have found this post, which could prove very useful! https://vwcaliforniaclub.com/threads/guide-fitting-the-small-under-bench-drawer.1768/post-72293

Although the runners are on different brackets, so im not sure if these measurements will still be accurate for the drawer runners you used if I used your runners to then mark the holes. But I assume they wouldnt be too far out.
The holes are in the same place on both types of runners - I think it must be an industry standard spacing. There are a set of holes 240mm apart in the bench seat and they line up with the holes in the rails.
 
The holes are in the same place on both types of runners - I think it must be an industry standard spacing. There are a set of holes 240mm apart in the bench seat and they line up with the holes in the rails.
Excellent! Thankyou! Ill just need to work out the starting height and position of the first hole for the top and bottom rail, then I should be able to measure 240mm level from there, or screw the front end of the rail using the first screw then the other holes will be easy to mark.
 
Thanks again for the detailed instructions and for sharing all of your hard work! Definately a great modification that i'm sure loads of people will make use of!

I have just built the box and bought the rails so almost ready to fit, but have just realised that I don't have any of the pre-drilled holes on my T5 bench, so ill need to line up and create the holes somehow, but really looking forward to adding this very soon.
On our 2006 Cali (some here call that vintage but i am from 1970 and thus pretty much a fossil) there are also no pre drilled holes. To drill holes in the side i need to remove the seat or remove the big drawer and line up the holes very, very, very carefull. Would like the smooth running drawer style but went for rollers instead. You can stil use the plug to create a front and as a way to lock it in place.
 
Given the number of variables when fitting the drawer, rather than give measurements from mine here is the method I use to attach drawers (I use this for kitchen drawers as well as Cali drawers).

For the rails, fit them to the seat base first. The holes will match up. I ran a self tapping screw through the holes in the seat base first before I attached the rails. After that, place your drawer on the floor on a couple of spacers, I used 18mm off cuts of ply. This seemed to be the right height. Then push the drawer into the seat base with the rails fully back and aim to get the box in the right place referencing the front of the larger drawer. You might need to temporarily attach the plastic front panel so you can find out the right position. Then mark a line on the side of the drawer where the end of the rails come.

After that, pull the drawer out (still place it on the 18mm spacers) and pullout the rails as far as they will come. Line up the front of the rails with your marks on the drawer. At that point, just screw the rails to the side of the drawer.

Hopefully that’s a bit clearer than mud..! If you still want my measurements let me know and I’ll go and measure.
Perfect, exactly how I'd do it myself, thanks.
 
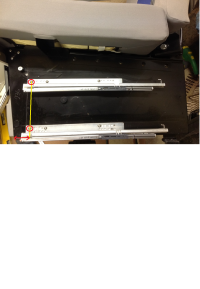
I know its an awkward place to get to, but I dont suppose anyone would be able to let me know the height of the front screw holes for me could they? Once I get this hole in the right place, the other holes will be easy to do.

Id need the height of the bottom front screw from the base of the drawer, and also the height of the top front screw from the base, and then the distance from the front of the drawer please?, however is easier, either measured at the very base of the drawer to the line 90 degrees going straight up through the 2 screw holes, or level with the screw hole.

Im hoping to attempt to fit the rails today, but rather than trial and error guessing, if someone is free to quickly measure these 2 screw holes please it would be very much appreciated.

Thankyou very much in advance!

drawer holes.png
 
I went for 600, but 550 would be fine too.

Here’s my process for getting the drawer in the right place on the rails. You may still need to fine tune…the rails have slotted holes so you can move them back and forth a few mm.

For the rails, fit them to the seat base first. The holes will match up. I ran a self tapping screw through the holes in the seat base first before I attached the rails. After that, place your drawer on the floor on a couple of spacers, I used 18mm off cuts of ply. This seemed to be the right height. Then push the drawer into the seat base with the rails fully back and aim to get the box in the right place referencing the front of the larger drawer. You might need to temporarily attach the plastic front panel so you can find out the right position. Then mark a line on the side of the drawer where the end of the rails come.

After that, pull the drawer out (still place it on the 18mm spacers) and pullout the rails as far as they will come. Line up the front of the rails with your marks on the drawer. At that point, just screw the rails to the side of the drawer.

Hope that’s clearer than mud…!
Thank you. Very much appreciated.
 
:thumb Very well done, that's for sure! Sometimes I spend money, sometimes I don't, sometimes I make something myself, sometimes not. I choose this solution: simple, cheap and done quickly; just put the flap of the felt bag in it. Does not slide under hard braking. It works for me (although I think your solution is well done).
View attachment 119855
Is this a diy job or did you buy it?
 
I know its an awkward place to get to, but I dont suppose anyone would be able to let me know the height of the front screw holes for me could they? Once I get this hole in the right place, the other holes will be easy to do.

Id need the height of the bottom front screw from the base of the drawer, and also the height of the top front screw from the base, and then the distance from the front of the drawer please?, however is easier, either measured at the very base of the drawer to the line 90 degrees going straight up through the 2 screw holes, or level with the screw hole.

Im hoping to attempt to fit the rails today, but rather than trial and error guessing, if someone is free to quickly measure these 2 screw holes please it would be very much appreciated.

Thankyou very much in advance!

View attachment 119907
So, it is incredibly difficult to get to with a tape measure, but measuring from the back through the boot. My best approximation is bottom screw is 25mm up from the bottom edge and the upper one is 180mm. Screw is 50mm in from front edge. Note the holes are on all vans regardless.

But please don’t cut or drill anything on this basis!!!!! To get a proper measurement means taking out the drawer, which is a step too far on Saturday morning

A
Wow that was quick especially this time of the morning! Thankyou! Yes its not very easy to access. Unfortunately i have 2006 van, and it appears the earlier models dont have the holes pre-drilled. I plan to (hopefully) lift the bench seat out to measure and drill the holes as ill never get a drill in that space and certainly wont end up in the right place. But If I can get one of the holes marked in the right place it should then be pretty straight forward.
I accessed mine through the removable cover at the front, but only any good if the small drawer isnt already fitted.
thankyou very much for the time and measurements, they will be a big help to start, Ill also see if anyone without the drawer is able to get any measurements as well.
Thankyou again!
 
The rails on the eBay link - are they left and right handed so would need to buy 2 sets?
 
If you can't get the GTV 600mm rails from the original eBay link for £12.50 I just found them on Amazon for £9.15 delivered, BUT not soft close :)

Also Push to open AND Soft close 600mm on Amazon for £13.79 delivered :) :)

GTV Push to open drawer runners slides, full extension, H45 600mm (1 Pair) https://amzn.eu/d/1M5XBHB

Push to Open with Soft Close - 45mm Ball Bearing Runners (600 mm) https://amzn.eu/d/hJArRWl
 
Last edited:
If you can't get the GTV 600mm rails from the original eBay link for £12.50 I just found them on Amazon for £9.15 delivered, BUT not soft close :)

Also Push to open AND Soft close 600mm on Amazon for £13.79 delivered :) :)

GTV Push to open drawer runners slides, full extension, H45 600mm (1 Pair) https://amzn.eu/d/1M5XBHB

Push to Open with Soft Close - 45mm Ball Bearing Runners (600 mm) https://amzn.eu/d/hJArRWl
The benefit of the push-to-open is that they lock in place so the drawer doesn't open when braking...!

My only concern is that in the event of a sudden stop/crash the drawer will overpower the latch and fly open. So be careful what you store in the drawer. In my case I'll be hit with gin and tonic bottles...;-)
They are both push to open but only one is soft close. Agreed about the sudden braking but I'm sure it would be easy to make a sprung cam latch from sheet steel that locks on a pin like the original draw which locks on closing and a lever that you push to open the drawer - another project!
 
They are both push to open but only one is soft close. Agreed about the sudden braking but I'm sure it would be easy to make a sprung cam latch from sheet steel that locks on a pin like the original draw which locks on closing and a lever that you push to open the drawer - another project!
Yes, I did wonder about making a latch. I have some 3mm Ali which would be suitable….:thumb
 
I have changed the title….any better…? Happy to take suggestions for an alternative.
How about ‘Cali small bench drawer…….. do this and save £500!‘

(yes I know, who cares?) :D
 
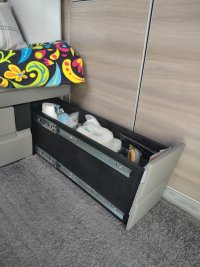
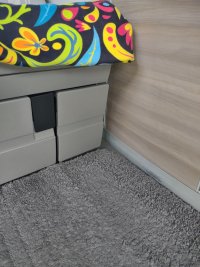
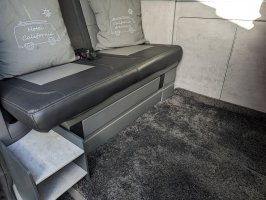
@couplands Thanks for the tips, new small bench draw all fitted and working fine thanks to your detailed instructions.
I used 12mm ply for all parts so increased the width from 160mm to 165mm to keep the 140mm internal dimension so the ikea boxes fitted inside. Also used the 550mm runners so they didn't protrude from the rear of the bench at all.

IMG_20240401_094424528.jpg

IMG_20240401_094412710.jpg
 
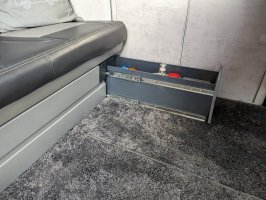
I also finally got around to completing the drawer this weekend, I had everything ready for a while, but unfortunately I dont have the holes already drilled on the side of the bench for the rails to screw into, so I had to guess where they went, and with the help of a 90 degree drill attachment, I managed to get in down the side of the bench with a drill.
I built it exactly as @couplands described above and works brilliantly! I will use this space all the time now, and have the same Ikea boxes. Ill probably use it for all the tea, coffee, sugar etc supplies, and sauces etc rather than scrabbling under the sink as we use the big drawer for all the food.

I also built a shoe rack using the left over plywood.

drawer.jpg

drawer1.jpg
 
Last edited:
I also finally got around to completing the drawer this weekend, I had everything ready for a while, but unfortunately I dont have the holes already drilled on the side of the bench for the rails to screw into, so I had to guess where they went, and with the help of a 90 degree drill attachment I managed to get in down the side of the bench with a drill.
I built it exactly as @couplands described above and works brilliantly! I will use this space all the time now, and have the same Ikea boxes. Ill probably use it for all the tea, coffee, sugar etc supplies, and sauces etc rather than scrabbling under the sink as we use the big drawer for all the food.

I also built a shoe rack using the left over plywood.

View attachment 121264

View attachment 121265
Great job :thumb with much more internal space than the factory drawer.
 
Campercentrum do a decent budget version in solid plastic for considerably less than £500. It's been our list for a while if we can find the time to detour after getting off the Rotterdam boat. I don't think anyone currently sells it in the UK :-(
 
Campercentrum do a decent budget version in solid plastic for considerably less than £500. It's been our list for a while if we can find the time to detour after getting off the Rotterdam boat. I don't think anyone currently sells it in the UK :-(
My drawer cost the price of the rails (£12:50) and some scrap plywood. I doubt the Campercentrum plastic planter costs less than that…;-)
 
@couplands Thanks for the tips, new small bench draw all fitted and working fine thanks to your detailed instructions.
I used 12mm ply for all parts so increased the width from 160mm to 165mm to keep the 140mm internal dimension so the ikea boxes fitted inside. Also used the 550mm runners so they didn't protrude from the rear of the bench at all.

View attachment 121254

View attachment 121255
Excellent work, it looks great. Good idea using the shorter rails, although the 600mm still don’t extend beyond the tool box holder.

Also, I found on mine, it rattled and eventually found that the rails at the rear tapped against the side of the seat box. I put some cloth tape between the rail and seat box and it’s fixed the rattle.
 
Last edited:
I also finally got around to completing the drawer this weekend, I had everything ready for a while, but unfortunately I dont have the holes already drilled on the side of the bench for the rails to screw into, so I had to guess where they went, and with the help of a 90 degree drill attachment, I managed to get in down the side of the bench with a drill.
I built it exactly as @couplands described above and works brilliantly! I will use this space all the time now, and have the same Ikea boxes. Ill probably use it for all the tea, coffee, sugar etc supplies, and sauces etc rather than scrabbling under the sink as we use the big drawer for all the food.

I also built a shoe rack using the left over plywood.

View attachment 121264

View attachment 121265
Another excellent job, although in ours we keep gin/tonic in the drawer ..;-)

Great job drilling the holes, that must have been tricky. What drill/90d chuck did you use..?

I also made the shoe rack, but after my Mrs trapped her finger pushing the bench seat backwards, we no longer use it.!!!
 
@couplands Thanks for the tips, new small bench draw all fitted and working fine thanks to your detailed instructions.
I used 12mm ply for all parts so increased the width from 160mm to 165mm to keep the 140mm internal dimension so the ikea boxes fitted inside. Also used the 550mm runners so they didn't protrude from the rear of the bench at all.

View attachment 121254

View attachment 121255
I also note that your signature is “Always look on the brighter side of life” …I played this at my Dads funeral - he was Mr Positive - I love that song…;-)
 
Back
Top