S
Sasillick
Guest User
I've read that you have to connect the small plugs back first when you install a new control unit - but is there any order in which you need to remove them in the first place??
Without any such guidance to fall back on I have recently replaced the control panel in my 2011 Cali SE and I connected the largest of the three connectors first. Whether I was lucky not to damage it, lucky I guessed right or it really doesn't matter I will leave to others to judge, but the replacement unit works just fine.I've read that you have to connect the small plugs back first when you install a new control unit - but is there any order in which you need to remove them in the first place??


Any use.Hi, how did you release the top clips please - we are having trouble. Thanks, Emma.
No use as he doesn't show how to push the top catches down. It's so frustrating!Any use.
Johneast Just watched the club tutorial video on control panel removal - he doesn't even mention the top clips! we're in the same boat as you were, we've released the two side clips but can't get to, or release, the top clips. Don't want to damage anything. Would appreciate your advice. About to send the unit to Eindhoven for repair, when we can get it out...I should have proof read my report before sending, I said that after I released the side clips the panel came out smoothly but I meant to say that it was after releasing the top clips that it came out smoothly.
Try this VideoJohneast Just watched the club tutorial video on control panel removal - he doesn't even mention the top clips! we're in the same boat as you were, we've released the two side clips but can't get to, or release, the top clips. Don't want to damage anything. Would appreciate your advice. About to send the unit to Eindhoven for repair, when we can get it out...
Thanks, WelshGas. Watched this video, several times. The chap (Nick, I understand) doesn't touch upon the existence of the two retaining clips on the top of the unit housing. He appears to 'just' release the lower ones, and, hey presto! the unit slides out. In contrast to this, we, JohnEast, and NickandEmma have found it impossible to get the unit out, owing to the existence of the top clips.Try this Video
Somewhere on the forum there is a post that has a series of photos that do show the 2 top tabs. I have a copy in my glovebox, just in case!Thanks, WelshGas. Watched this video, several times. The chap (Nick, I understand) doesn't touch upon the existence of the two retaining clips on the top of the unit housing. He appears to 'just' release the lower ones, and, hey presto! the unit slides out. In contrast to this, we, JohnEast, and NickandEmma have found it impossible to get the unit out, owing to the existence of the top clips.
So near, yet so far. I don't want to force anything, so I've called Campervanbits.com, and asked Nick to call me and talk me through the extraction process. I'll share the fruits of my enquiries on here, once I manage to achieve an intact extraction.
Thanks for the tip about Verotronics, by the way. I've already communicated with them, and shall get the unit off to Eindhoven as soon as it's out!
Once you’ve unclipped the 2 side clips have you tried a Credit/Membership plastic card in the top either side while pushing the unit upwards on the back lower edge, tipping it forward slightly?Thanks, WelshGas. Watched this video, several times. The chap (Nick, I understand) doesn't touch upon the existence of the two retaining clips on the top of the unit housing. He appears to 'just' release the lower ones, and, hey presto! the unit slides out. In contrast to this, we, JohnEast, and NickandEmma have found it impossible to get the unit out, owing to the existence of the top clips.
So near, yet so far. I don't want to force anything, so I've called Campervanbits.com, and asked Nick to call me and talk me through the extraction process. I'll share the fruits of my enquiries on here, once I manage to achieve an intact extraction.
Thanks for the tip about Verotronics, by the way. I've already communicated with them, and shall get the unit off to Eindhoven as soon as it's out!
I don't see access to the top of the unit at all. There's no space to gain access to the area. Have tried cut up c/cards in each side,opening the side clips, then endeavouring to tip/rock the unit so as to ease past the top clips. So far, to no avail, but thanks for the suggestion.Once you’ve unclipped the 2 side clips have you tried a Credit/Membership plastic card in the top either side while pushing the unit upwards on the back lower edge, tipping it forward slightly?
Try with a credit card. Just tried with mine and a card pushed the tang downwards.Have just found this, courtesy of Hotel California and 'Umberto' from another forum. Shall try in the morning, when it's not 110 in the shade, let alone on the drive!
View attachment 66272
Can you let us know when you find out about this please. Like everyone else I thought it was straight forward..I don't see access to the top of the unit at all. There's no space to gain access to the area. Have tried cut up c/cards in each side,opening the side clips, then endeavouring to tip/rock the unit so as to ease past the top clips. So far, to no avail, but thanks for the suggestion.
I take it that the spoon in the picture has to go in at an angle because the clips seen to be a long way inside? Maybe 10mm.Have just found this, courtesy of Hotel California and 'Umberto' from another forum. Shall try in the morning, when it's not 110 in the shade, let alone on the drive!
View attachment 66272
The surround is just a frame. Push down behind the frame to release the plastic tang/clip from pushing against the back of the frame. I just used a credit card because its wider, less likely to miss the tang.I take it that the spoon in the picture has to go in at an angle because the clips seen to be a long way inside? Maybe 10mm.

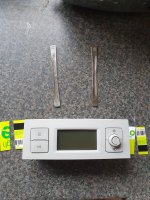
Did you follow the previous procedures as in the video? Or was this done while everything else was in place.Okay. See photo. I introduced a double thickness of credit card on each side, pushing the side clips in, but leaving the CU in situ, so that it was absolutely parallel in its housing. I then introduced the two coffee stirrers behind the housing, as per Umberto's photo, and gently manipulated them - they're a tight fit, by the way. After half a minute, the CU box cleared the housing, and I was able to pull it out.
Take care unlocking the clip holding the main plug in the socket, it's very brittle
View attachment 66310

The VW California Club is the worlds largest resource for all owners and enthusiasts of VW California campervans.

