Control panel removal

Did you follow the previous procedures as in the video? Or was this done while everything else was in place.

Peter,

I followed the video up to the point where Nick (he hasn't called me back, btw) had removed the lower assembly, and was introducing red plastic card to release the side tags/clips. His technique, on the face of it, is flawed, as the Control Unit is then tipped up in it's housing, making the top clips probably hard up against the frame of the mount.

By leaving the CU in place, but freeing the side clips by inserting compression outside each one, in my case by cutting up an old loyalty card, left the CU free to move, once the top clips have been overcome. By keeping the CU level in the housing, my then introducing pressure from above and behind, the CU was then tipped down slightly, with added pressure from the metal stirrers, making it likely to clear the top retaining clips - they don't protrude up very far - which worked, thankfully. Good luck!
Thanks for the answer.. I have just bought the fascia kit as I know mine is a bit iffy have printed off your pics so when it comes time I will follow your procedure...
 
Have just found this, courtesy of Hotel California and 'Umberto' from another forum. Shall try in the morning, when it's not 110 in the shade, let alone on the drive!
View attachment 66272
Thanks for this post, you are a life saver! I used a Credit Card, it was quite difficult to release, but eventually I found the right spot and it came out.
 
Once you’ve unclipped the 2 side clips have you tried a Credit/Membership plastic card in the top either side while pushing the unit upwards on the back lower edge, tipping it forward slightly?
Thanks WelshGas. Credit card trick works a treat.

I sent my control panel to Vertronics in Netherlands. It took 2 weeks to return. (A week stuck in Customs in Netherlands). I used Royal Mail tracked £11.70 so I could see it’s progress.

I used Google Translate to understand their website which worked well.

All emails to and from were in English.

Now back and refitted. All works as new.

Total cost including fitting a new knob, (which I sent with the unit) was £124.02.
Out of interest, what did you put on the Customs Form Declaration and how much did you value it at?
Also, what did Vertronics put on the same form on return?
 
Out of interest, what did you put on the Customs Form Declaration and how much did you value it at?
Also, what did Vertronics put on the same form on return?
They said to put £0 or low value to avoid duty and put it as a gift... (A bit risky if item gets lost of course...)
There was nothing for customs in UK on the package that was returned.
 
They said to put £0 or low value to avoid duty and put it as a gift... (A bit risky if item gets lost of course...)
There was nothing for customs in UK on the package that was returned.
Mind you, if it's not working then does it have a value? I see their point.
 
They said to put £0 or low value to avoid duty and put it as a gift... (A bit risky if item gets lost of course...)
There was nothing for customs in UK on the package that was returned.
Just found the Vertronics customs declaration, they put €50 as value…
 
If anyone are interested I have a replaced non functioning control unit (T5 Cali 2005). Probably only the datacords inside that needs to be changed. Hard to find so I bought a new control unit instead and you all know the cost of that.
Have you considered sending it to verotronics in the Netherlands and then selling it as fixed? Assuming your flag is indicative of your location, at least sending to NL should be painless for you !
 
Hi fellow sufferers! I have just successfully replaced the fascia and knob using the Campervanbits kit. Ridiculously expensive at £40 but it's a hell of a lot cheaper than buying a new unit!
Was it easy? Was it heck! Thanks to everybody who posted on this before me. Your advice and insights were invaluable! Getting the unit out was grim until I followed your advice and used a chopped up credit card to free the tabs at the top. The CampervanBits video stangely ignores these tabs. You also don't need to undo the ribbon connecters.
Once the unit was out, it was fiddly to get it open but we got there in the end and I was busy congratulating myself on my cleverness as I put it back together when my Torx 6 screwdriver rounded off the screws and I couldn't get the circuit board tightly back in place... Aaaargh! Very very carefully I managed to tighten them using a pair of long nose pliers. Not sure if that was due to my screwdriver or that the screws themselves were rubbish? Terrified that I would damage the circuit board it took for ever but imagine my relief when the unit worked great when I put it back in.
So it can be done. I am an amateur when it comes to these things and if I can do it, so can you! It is a great relief to be able to go away now and not worry that the knob will finally fail and leave me stuck with the roof up!
 
Try with a credit card. Just tried with mine and a card pushed the tang downwards.
Credit card worked a treat for me…simple.

Used Vertronics in July 2021 excellent service. I sent them a new button and asked them to fit it while they repaired the broken up screen.

Still all working perfectly in November…
 
Firstly thank you to everyone that has contributed to this thread, I have just successfully replaced the front facia and knob following the instructions and advice here. For completeness and anyone in future who has to complete this job, some additional observations that may be useful:
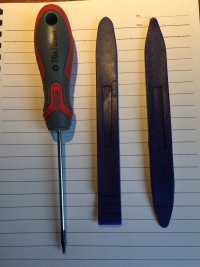
  • When ordering the facia kit (club shop) I also ordered a T6 torx screw driver and a set of trim removal tools (5 piece kit) (see photo)
  • Video's as highlighted by @WelshGas well worth a watch and get you 90% there
  • Instructions from @Mike Frost using cut up credit cards to hold open side clips of unit works perfectly
  • I released the top clips without any damage using the two trim tools shown but by inserting them between the unit and the frame (not as shown in #17)
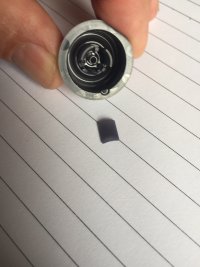
  • On removal the reason rotating the knob no longer scrolled the menu was clear one of the three prongs had snapped off - OK so I have banged my head on that damned knob on more than one occasion.

IMG_5818.jpg

IMG_5819.jpg
 
Have just found this, courtesy of Hotel California and 'Umberto' from another forum. Shall try in the morning, when it's not 110 in the shade, let alone on the drive!
View attachment 66272
Insert a credit card here and one the same distance in from the left you’ll hit the spot to realise both clips.
 
Worked a treat for us; ended up having to buy a new control panel, as ours was sent to a Dutch outfit to repair, who subsequently denied they'd received it!
 
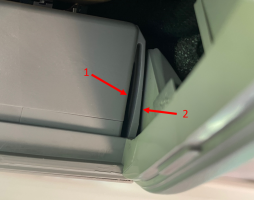
I'm trying to remove my control panel (2017 Ocean) to rectify the common 'broken knob' issue. I have purchased a new fascia panel /knob however I'm struggling to remove the panel. I have some very basic questions that I'm hoping someone can help with: 1) Comments refer to releasing the panel by inserting a guitar pick /credit card into 'the slot'. However there are two slots on each side of the panel (see my photo). I'm assuming slot 1 is the correct one to focus on, however can anyone confirm? 2) Any tips for releasing the catch? I've tried with a guitar pick and also a cut up credit card (see my second photo), however I can insert either tool into either slot, and I'm not feeling any resistance. Should I double up on thickness, or should I press the tool laterally?
I realise these are somewhat basic questions, however I want to avoid an expensive mistake and I'll be grateful for guidance from anyone who has successfully removed this panel!

2 slots.png

IMG_3127.JPG
 
I'm trying to remove my control panel (2017 Ocean) to rectify the common 'broken knob' issue. I have purchased a new fascia panel /knob however I'm struggling to remove the panel. I have some very basic questions that I'm hoping someone can help with: 1) Comments refer to releasing the panel by inserting a guitar pick /credit card into 'the slot'. However there are two slots on each side of the panel (see my photo). I'm assuming slot 1 is the correct one to focus on, however can anyone confirm? 2) Any tips for releasing the catch? I've tried with a guitar pick and also a cut up credit card (see my second photo), however I can insert either tool into either slot, and I'm not feeling any resistance. Should I double up on thickness, or should I press the tool laterally?
I realise these are somewhat basic questions, however I want to avoid an expensive mistake and I'll be grateful for guidance from anyone who has successfully removed this panel!

View attachment 128445

View attachment 128446
There is a complete How to Guide, with photos, in the Resources section of the forum available to paid up VIP members.
Slot 1 is incorrect.
 
There is a complete How to Guide, with photos, in the Resources section of the forum available to paid up VIP members.
Slot 1 is incorrect.
Thanks @WelshGas, all sorted! Thanks for pointing me in the right direction. I found the photo guides in the resources section a lot more helpful than the YouTube videos.
 
Back
Top