Cost of a VW awning

it can be bought with all the correct genuine brackets bolts and weather seal not sure about the handle
although we do sell it separately . i will find out for you
 
Make sure that the rain seal is fitted properly before you drive the van away - we found rain dripping through between the van and the awning cassette, and it was slightly fiddly to put it right (a seal was fitted, but had got pushed out of place, so I needed to get up a ladder and pull it straight).
 
The shop one can come with everything down to the last nut & bolt needed
 
The handle is included but if you purchase the fitting kit it will have everything needed inc seal
 
Ok I've ordered an awning from the shop I may need some pointers when it comes to fitting it if anyone could help that would be great
 
Fitting and removing the factory awning is extremely easy. I'm sure you'll be fine.
 
The older thules VW used had a seam in them (probably a cheaper option for them?), the ones direct from Thule did not have this seam. This seam was rather a weakness in hot weather for some and had a tendency to melt the glue. That said I understand that they have now got rid of the seam design? Can anyone confirm?

After ours melted along the seam VW replaced it under warranty with a new seam free version.
 
I don't have to drill anything do i

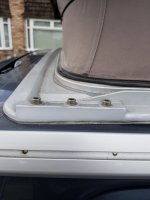
If you lift up the roof, you should see 2no threaded fixing holes at the rear, and 2no threaded fixing holes at the front, roughly over the B pillar.

The brackets bolt into these holes and also into the rail. Once the 2 brackets are fitted, you install the rubber rain guard between and the you can hook the Awning cassette onto the brackets.

Finally open the Awning out and fix the 2no bolts through the cassette into the Brackets.

If you watch Hotel California's Video on YouTube it will become very clear!
Brilliant but I looked before and couldn't see any threaded fixing holes under the roof
 
If you lift up the roof, you should see 2no threaded fixing holes at the rear, and 2no threaded fixing holes at the front, roughly over the B pillar.

The brackets bolt into these holes and also into the rail. Once the 2 brackets are fitted, you install the rubber rain guard between and the you can hook the Awning cassette onto the brackets.

Finally open the Awning out and fix the 2no bolts through the cassette into the Brackets.

If you watch Hotel California's Video on YouTube it will become very clear!
20180428_141830.jpg are these them
 
Yes. You should have another set over the B pillar. Sorry, I thought it was 2no fixings.

It looks like you've had brackets installed previously as you can see bolt mark's in the Awning channel
Yeah maybe the previous owner mate thanks for the info it does sound uncomplicated
 
You do need to drill two holes in the casing or you can buy from VW with the holes pre-drilled but they will charge you about £200 for those two holes !
 
You do need to drill two holes in the casing or you can buy from VW with the holes pre-drilled but they will charge you about £200 for those two holes !
Well that sounds like fun then
 
if you have any problems call nick at the club shop he has fitted them before without issue
 
Fitted my awning today 2 hours it took and pretty straight forward however on closer inspection there are some scrapes on the end cap of one end and a crack in a piece of plastic on the front also the holes in the back of the casing were already drilled so I suspect this was not exactly brand new I am mortified and will contact the shop tomorrow
 
Fitted my awning today 2 hours it took and pretty straight forward however on closer inspection there are some scrapes on the end cap of one end and a crack in a piece of plastic on the front also the holes in the back of the casing were already drilled so I suspect this was not exactly brand new I am mortified and will contact the shop tomorrow
Have to update.....spoke to nick who was very helpful and today received replacement parts excellant service
 

Similar threads

M
Replies
7
Views
4K
soulstyledevon
soulstyledevon
Diverboy 61
Replies
4
Views
2K
Diverboy 61
Diverboy 61
Back
Top