steve_b
Lifetime VIP Member
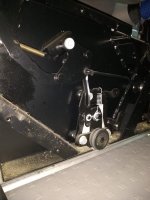
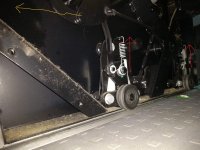
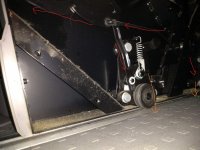
So in an earlier thread I needed to access the mechanism that locks the bench to the rails in my 2008 SE as the mechanism was't working properly. It was an awkward job but not beyond the capability of anyone with a basic tool kit. In case it is of interest to anyone, the steps I took along with some pictures to help. If anyone can confirm the applicability of this to later models then that may be useful.
I can see that the work would be much easier if you removed the bench from the Cali, or tipped it back, however it it perfectly doable without doing so as long as you can fit in the space where the drawer goes under the seat - and since I was on my own it was the only option I had
Firstly, make as much space as you can - I removed the rear stop to let me push the bench back further but that's not strictly necessary to do, as long as you can fully open the under-bench drawer. Open the drawer, then inside the drawer at the bottom there are only 2 small screws, front left and front right - circled red below - remove them and the drawer unit simply lifts off of the sliding rails. I put the screws back into the holes in the side rails in order not to lose them.
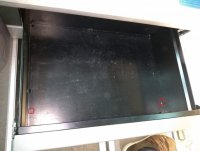
Then if you look in the cavity that you have opened up, you will see the area that you will be spending a lot of quality time in shortly.
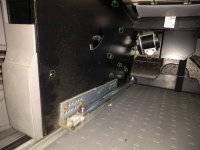
The red screw is the screw that fixes the drawer to the sliding rail that I put back for safekeeping
The green bolts are what need to be removed to access the mechanism - all of them, they all look the same, the lot come out.
The orange bolt at the back holds on the seat belt inertia reel - this has to be removed by unbolting a single 17mm bolt in order to access one of the side panel bolts that you need to unscrew. This is easier done from the other side - remove the tool kit and you can physically access the bolt more easily even though you can't see it.
I unscrewed it and turned the reel round and bolted it temporarily on the reverse side of the bracket just to keep it out the way. Do NOT forget to put this back the right way if you do this...
-edit- if you have a 4mm Allen key and arms like a gorilla you may be able to undo this without removing the seat belt reel, however I didn't rate my chances of not rounding off the bolt head by not having it exactly straight so moving the seat belt reel was a no brainer for me.
Link to earlier thread:

 vwcaliforniaclub.com
I can see that the work would be much easier if you removed the bench from the Cali, or tipped it back, however it it perfectly doable without doing so as long as you can fit in the space where the drawer goes under the seat - and since I was on my own it was the only option I had
Firstly, make as much space as you can - I removed the rear stop to let me push the bench back further but that's not strictly necessary to do, as long as you can fully open the under-bench drawer. Open the drawer, then inside the drawer at the bottom there are only 2 small screws, front left and front right - circled red below - remove them and the drawer unit simply lifts off of the sliding rails. I put the screws back into the holes in the side rails in order not to lose them.

Then if you look in the cavity that you have opened up, you will see the area that you will be spending a lot of quality time in shortly.

The red screw is the screw that fixes the drawer to the sliding rail that I put back for safekeeping
The green bolts are what need to be removed to access the mechanism - all of them, they all look the same, the lot come out.
The orange bolt at the back holds on the seat belt inertia reel - this has to be removed by unbolting a single 17mm bolt in order to access one of the side panel bolts that you need to unscrew. This is easier done from the other side - remove the tool kit and you can physically access the bolt more easily even though you can't see it.
I unscrewed it and turned the reel round and bolted it temporarily on the reverse side of the bracket just to keep it out the way. Do NOT forget to put this back the right way if you do this...
-edit- if you have a 4mm Allen key and arms like a gorilla you may be able to undo this without removing the seat belt reel, however I didn't rate my chances of not rounding off the bolt head by not having it exactly straight so moving the seat belt reel was a no brainer for me.
Link to earlier thread:

2008 SE Rear seat/bed won't latch back to the rails
Hi all, I hope someone can help. I bought a 2008 SE today privately. I had a local VW chap give it the once over so have a list of 40 "faults" of varying degrees of interest, however one is perplexing me. The rear seat/bed when you pull the level to move it the handle kind of sticks out and...
Last edited:


