How to replace the sliding window on the kitchen side

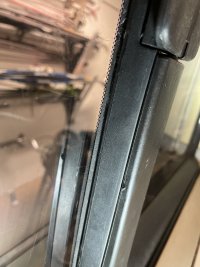
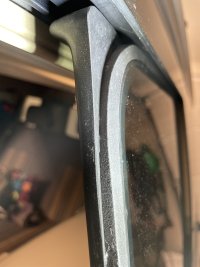
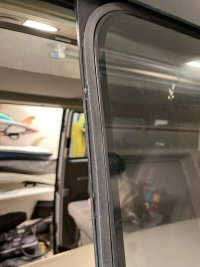
Update! Window back in its frame with a new D-shape rubber sealing. That was the easy part. Still has no solution for the drain holes other than replacing the whole frame. For anyone considering renovating the sliding window here comes a couple of pics. But as mentioned I have no idea yet if the water will pour in. My hope is as long as it is closed (it seem to tighten against the frame) no water will ingress. Maybe naive. I am waiting also for a new mechanism. Also an easy work to fix. Replacement parts are cheap. View attachment 92239View attachment 92240
Great news, did you get the 10x9mm D shaped seal from the link I sent you on the other forum, hope it seals and slides ok. Put a hose on it and post an update. Good luck!
 
Last edited:
Good job with the new seal - where did you get it from?

With regards to the water leaking in from the drain holes, the system seems to be a truly awful design. I have some pictures somewhere but the hole goes down to a little plastic tray that then directs the water outside, and this tray is sealed with some gunge. If the seal is not good then it leaks inside.

Replacement windows probably won't fix it, but redoing the gunge may - which of course you cannot get to due to the kitchen. Of course if you replaced the window they probably would remove the kitchen and hence get to the gunge...
I got the seal from a domestic supplier. It’s a standard D-shape seal. Normally comes in large or small. Got both. Not expensive. The small, about 9mm wide, one fitted quite nice. Very easy job.
On the contrary, drain holes! Some posts I’ve seen says the window can be replaced without affecting the cupboard. I’ll give it a try first with WD40 and se if it helps. I contacted the recommended VW Calif specialist in Netherlands but no response yet.
Or I just see what happens and in worst case silicone it back tight again. That’s life!
 
Great news, did you get the 10x9mm D shaped seal from the link I sent you on the other forum, hope it seals and slides ok. Put a hose on it and post an update. Good luck!
Yes I did. Thank You. But I picked another supplier (domestic) since the one Google “recommended” had terrible ratings (a Chinese based import company).
 
Yes I did. Thank You. But I picked another supplier (domestic) since the one Google “recommended” had terrible ratings (a Chinese based import company).
Good news! Please let us all know the results of the new seal with a hose water test on the window :)
 
Yes I did. Thank You. But I picked another supplier (domestic) since the one Google “recommended” had terrible ratings (a Chinese based import company).
Hi, just seen your thread and it's been very helpful.
One question I have is was it easy enough to remove the sliding window? I just didn't want to damage the window blind when trying to prize it out at the top. This was just the method shown in a youtube video that I saw but it was a transporter without the integral blinds that the Calis have.
Hi. It was actually not that hard, but I experienced the same problem. So I prized it out from the bottom instead. Using plastic trim removal tools. The drainage channels is unfortunately still not working but the seal seem tight so far. Meaning I need to be aware of water dripping in behind the cupboard if I use the window on rainy days.
 
When you prised the window out from the bottom did it mark the trim? Some have said it's better to remove the locking mechanism before removing the window.
Have you tried the new seal with a hose to check if it's watertight? If it is then the drain hole not working shouldn't be too much issue unless you get a lot of condensation inside when camping.
Does the window slide, open and close ok with the new seal?
 
Hi. It was actually not that hard, but I experienced the same problem. So I prized it out from the bottom instead. Using plastic trim removal tools. The drainage channels is unfortunately still not working but the seal seem tight so far. Meaning I need to be aware of water dripping in behind the cupboard if I use the window on rainy days.
Thanks for the reply. Rain forecast all day here so a job for tomorrow I think.

Also, I don't know if anyone has mentioned this but the video I saw on Youtube pointed out that the pegs on the bottom of the window that locate in the locking holes could be worn on one side. He actually rotated them 180 degrees in situ which meant the window seated more securely when closed.
rotating the pins 180 degrees does work, although there is a chance that the pin can rotate back into the original position.

replacing the pins is the best fix, but

The worn pin can actually be taken out and refitted upside down I.e the worn part placed into the location hole in the window, meaning that the exposed part of the pin is the correct round shape.

for completeness here is the other thread discussion mentioned in this thread

 
Last edited:
rotating the pins 180 degrees does work, although there is a chance that the pin can rotate back into the original position.

replacing the pins is the best fix, but

The worn pin can actually be taken out and refitted upside down I.e the worn part placed into the location hole in the window, meaning that the exposed part of the pin is the correct round shape.

for completeness here is the other thread discussion mentioned in this thread

Thank you, good tips there.
 
When you prised the window out from the bottom did it mark the trim? Some have said it's better to remove the locking mechanism before removing the window.
Have you tried the new seal with a hose to check if it's watertight? If it is then the drain hole not working shouldn't be too much issue unless you get a lot of condensation inside when camping.
Does the window slide, open and close ok with the new seal?
The trim wasn’t affected at all. I put the power on the black “plastic” frame. I had already removed the locking mechanism but I assume it won’t matter. And I did try with the garden water hose and placed a roll of paper tissue where the water drops on the inside. Seem to be tight. I also replaced the closing mechanism. I still have some issue to get the plastic trim cover back in place, but the window glides and opens smoothly. As for the pegs there was a new set delivered together with the new closing mechanism, but I didn’t bother dismounting the window and replace them. Maybe in the future.
 
Good news! Please let us all know the results of the new seal with a hose water test on the window :)
Update;
Sorry to announce that the window leaks! Noticed after a rainy day and a test with the garden hose.
The solution will be to get the sliding window more tight towards the fixed window frame. Replacing the pins and order a different rinner seal.
 
Update!
Third try. This time with a solid 8x8 mm square solid foam rubber seal. More firm than the D-shapes and fits just in the track on the sliding window. The window runs nice. I have to press the sliding window towards the frame up and down when closing it, which gives a tighter seal. Looks tight. I had problem finding a glue that attaches to the plastic frame, so that’s my remaining concern for the moment.

I had more of a problem fitting the window back this time. I dismounted the locking mechanism and that made it much easier to fit the back pins to the track. I also managed to get trims in place by cutting some plastic from the spring holders (bad fitting!).

Surftrip and rainy weekend so I will come back with an update again

image.jpg

image.jpg

image.jpg
 
rotating the pins 180 degrees does work, although there is a chance that the pin can rotate back into the original position.

replacing the pins is the best fix, but

The worn pin can actually be taken out and refitted upside down I.e the worn part placed into the location hole in the window, meaning that the exposed part of the pin is the correct round shape.

for completeness here is the other thread discussion mentioned in this thread

I don’t see how they can be turned upside down. There is a hole in one of the ends that fits into a small metal pin on the sliding window. It looks that new plastic pins comes with new locking mechanism. I don’t believe in metal pins since they will tend to wear out the track (plastic) in the frame instead.
 
I don’t see how they can be turned upside down. There is a hole in one of the ends that fits into a small metal pin on the sliding window. It looks that new plastic pins comes with new locking mechanism. I don’t believe in metal pins since they will tend to wear out the track (plastic) in the frame instead.
The fixed pins are in the window frame and slide in the track, they simply slot into the window, there is no orientation, simply a round pin that can be removed, rotated through 180 degrees and inserted back in.

New plastic pins will wear over time as original ones do, if you have new pins I would use them

understand the statement regarding metal pins.
an ideal metal pin would be brass as it self lubricates and is not that abrasive And will not corrode.
 
The fixed pins are in the window frame and slide in the track, they simply slot into the window, there is no orientation, simply a round pin that can be removed, rotated through 180 degrees and inserted back in.
I took the plastic pin from the top (not worn at all) and swapped it with the one at the bottom which was worn, but ideally I want something better for both. I also replaced my rubber seal but I think it's still unsatisfactory (especially as it seems to move with friction so has separated at the joint where the ends meet so I need to do something like glue the ends together or put a blob of silicone in there.

@Kjetil , where did you get the 8x8 square seal from - I might try that if my 10x9 D section is unsatisfactory. I am happy to experiment with the window in the sliding door as that is fairly easy to remove whereas I only want to take the kitchen one out, once!
The rubber seal i got from a Danish supplier on link. I have realised the base of the sealcannot be wider than 6-8 mm max and the height 8-10 mm depending how easy it squeeze. The 8 x 8 square solid seal creates a good pressure. 9 mm in height would make the locking difficult to work.

Btw rainy night, still tight. It will leak for some reason eventually, but for now…
 
I need to do something like glue the ends together or put a blob of silicone in there.
There are some brilliant all weather glue products on the market, available from proper builders merchants. many will set under water and maintain a tight adhesion. Ideal for sticking rubber.

SIKA do some as well as many others, not cheap at about £10+ for a tube
 
The rubber seal i got from a Danish supplier on link. I have realised the base of the sealcannot be wider than 6-8 mm max and the height 8-10 mm depending how easy it squeeze. The 8 x 8 square solid seal creates a good pressure. 9 mm in height would make the locking difficult to work.

Btw rainy night, still tight. It will leak for some reason eventually, but for now…
Hi

Are you still watertight since fitting the square rubber seal and also did you manage to find the right glue to attach it?
I have ordered some square rubber foam and hope to do the same. Not looking forward to removing the sliding window though.
 
Hi

Are you still watertight since fitting the square rubber seal and also did you manage to find the right glue to attach it?
I have ordered some square rubber foam and hope to do the same. Not looking forward to removing the sliding window though.
Yes, the seal is still watertight (touch wood!). But my drainage holes are also still kaputt. I have no clue how to fix them without removing the kitchen tablet or replacing the whole kitchen window section.

Good luck anyway and be careful you don’t break the trim. Use plastic trim tools. It does feel at little uncomfortable but you just need to lift the window about 5mm. And remove the locking mechanism first.
Thanks so much for replying. What glue did you attach it with?

Taking the locking mechanism out is the bit that scares me most as worried I will crack the plastic bits or not be able to put them back on. Was rather hoping I could remove window without. Oh well .

Pleased your water tight still!
 
It may be worth a couple of cheeky calls to campervan conversion specialists as they often remove the factory windows and replace with something that won't leak... Might have a spare unit lying around or could save one for you in case you break yours..
 
It may be worth a couple of cheeky calls to campervan conversion specialists as they often remove the factory windows and replace with something that won't leak... Might have a spare unit lying around or could save one for you in case you break yours..
That’s a jolly good idea

Thanks
 
Back
Top