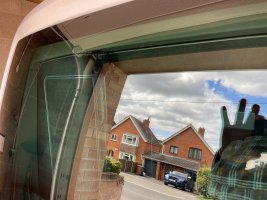
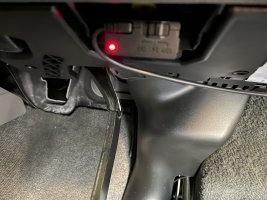
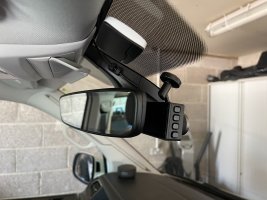
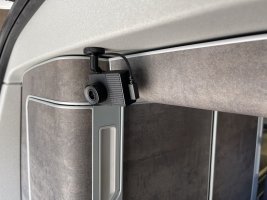
Installed 2 garmin dash cams

This Eva

This Eva

Messages
285
Location
Andover
Vehicle
T6.1 Ocean 199 4Motion
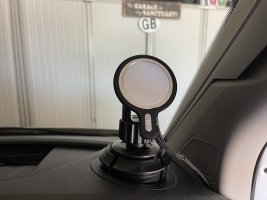
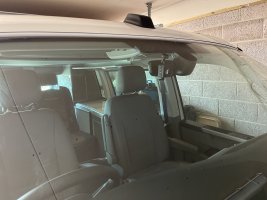
One 56 facing back and the more modern 57 facing forward. Powered via the Garmin OBD constant power lead. All wires hidden. Used some cabl e rods to get lead to rear camera via the tunnel above the kitchen. B pillar removed as well as door seal and side window vents. No dramas in removing and then replacing these parts. Rear camera is fixed using their stick on magnet and feeding cable through the small gap above the rear cupboard
 
i don't believe you without photographic evidence.
 
One 56 facing back and the more modern 57 facing forward. Powered via the Garmin OBD constant power lead. All wires hidden. Used some cabl e rods to get lead to rear camera via the tunnel above the kitchen. B pillar removed as well as door seal and side window vents. No dramas in removing and then replacing these parts. Rear camera is fixed using their stick on magnet and feeding cable through the small gap above the rear cupboard
Well done. Is it Constant Live using the OBD port or only Ignition Live?
 
Well done. Is it Constant Live using the OBD port or only Ignition Live?
The switch on the unit allows 3 settings. On for 10 minutes after ignition off. One for one hour and final is on all the time when ignition is off.
 
… and side window vents. No dramas in removing and then replacing these parts.
Hey, Am in the process of trying to install the cable from the back, had given up and looking to plumb it into the rear leisure battery… however…

What do you mean by removing the side window vents? I couldn't get my cable all the way down the tunnel. Is this the vent right next to the wardrobe, above the fridge?
 
I fitted a Road angel halo view to my van.Brilliant bit of kit. I hard wired it So it can record if the van gets bumped. As all California owners know the rear view is not great from the rear view mirror but with one touch of the halo rear view mirror you can see everything. It was quite easy to run the wire from the front to the rear. You just need to take off the B pillow plastic cover (seat belt bit ) and pop out a few of the lights above the kitchen I used some electrician cable passing rods and tape to pass the cables to the rear of the van. Easy job. I’m surprised there isn’t more on the forum about this product.
 
I fitted a Road angel halo view to my van.Brilliant bit of kit. I hard wired it So it can record if the van gets bumped. As all California owners know the rear view is not great from the rear view mirror but with one touch of the halo rear view mirror you can see everything. It was quite easy to run the wire from the front to the rear. You just need to take off the B pillow plastic cover (seat belt bit ) and pop out a few of the lights above the kitchen I used some electrician cable passing rods and tape to pass the cables to the rear of the van. Easy job. I’m surprised there isn’t more on the forum about this product.
Watching this - YouTube/phots would be great
 
Hey, Am in the process of trying to install the cable from the back, had given up and looking to plumb it into the rear leisure battery… however…

What do you mean by removing the side window vents? I couldn't get my cable all the way down the tunnel. Is this the vent right next to the wardrobe, above the fridge?
Hi. On the t6.1 there are on the dashboard vents that point towards the side windows these are the ones I referred to. The hardest part for most would be removing the passenger side b pillar cover and then feeding the set of glass fibre rods ( with cable attached 10 cm from lead end ) passenger door and tailgate needs to be fully open so that a straight line feed is possible. I measured the length of rod that was necessary so that I knew I was going to poke out into the rear cupboard ( doing the job on my own ) got there first time. Best of luck
 
Hi. On the t6.1 there are on the dashboard vents that point towards the side windows these are the ones I referred to. The hardest part for most would be removing the passenger side b pillar cover and then feeding the set of glass fibre rods ( with cable attached 10 cm from lead end ) passenger door and tailgate needs to be fully open so that a straight line feed is possible. I measured the length of rod that was necessary so that I knew I was going to poke out into the rear cupboard ( doing the job on my own ) got there first time. Best of luck
You just need to pop out some of the lights above the kitchen then you can easy pass the cable along a section at a time. around the front window screen you just need to use a plastic tool to push the cable behind the panels.
 
pop out a few of the lights above the kitchen I used some electrician cable passing rods and tape to pass the cables to the rear of the van. Easy job
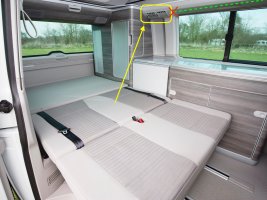
Hey, does your cali have passenger air vents above the fridge? Mine does, and I can't seem to get past it with the cable pole…
 
Hi. On the t6.1 there are on the dashboard vents that point towards the side windows these are the ones I referred to. The hardest part for most would be removing the passenger side b pillar cover and then feeding the set of glass fibre rods ( with cable attached 10 cm from lead end ) passenger door and tailgate needs to be fully open so that a straight line feed is possible. I measured the length of rod that was necessary so that I knew I was going to poke out into the rear cupboard ( doing the job on my own ) got there first time. Best of luck

Are you feeding the cable above the slide door, or above the kitchen. I can't seem to get the cable feeding pole past the rear passenger air vents above the fridge…
 
You just need to pop out some of the lights above the kitchen then you can easy pass the cable along a section at a time. around the front window screen you just need to use a plastic tool to push the cable behind the panels.
Yeah, I've installed above the main windscreen no problem, but I can't seem to get the cable and pole past the passenger air vents above the fridge in the kitchen. Do you have a vent up there?

Cali with Vent.jpeg
 
Hey, Am in the process of trying to install the cable from the back, had given up and looking to plumb it into the rear leisure battery… however…

What do you mean by removing the side window vents? I couldn't get my cable all the way down the tunnel. Is this the vent right next to the wardrobe, above the fridge?
I took mine down the other side at that level and it’s a pig.

For the cable I needed to take down that side I found it easier to go behind the sink and the up from the water tank.

I’ll post a link when I find it.

Link -
Thread 'Starter Battery Cable Install For Solar Setup'
https://vwcaliforniaclub.com/threads/starter-battery-cable-install-for-solar-setup.50828/
 
Yeah, I've installed above the main windscreen no problem, but I can't seem to get the cable and pole past the passenger air vents above the fridge in the kitchen. Do you have a vent up there?

View attachment 118933
If i remember correctly i popped out the light closes to the vents use a torch and you can see where to push a rod with the cable taped to the end pass the vents.
 
Thanks @California Rob @dspuk @This Eva and everyone else who posted, managed it in the end…

I'd almost lost hope to be honest, no matter which way I tried to thread past the air vents from the front, my cable feed rod would always block.

I ended up using the dash cam itself (Garmin Mini 2) as a makeshift camera probe…realised in the end, that there isn't that much on the other side of the air vent, when looking from the rear.

In an inspired move, I fed the cable rod from the rear, making sure the lead flexi rod was fed into the correct channel. It slid down and popped over the air vent with barely a push.

I'm over-the-moon as I've been trying unsuccessfully on-and-off for about two weeks. Even started to consider wiring a new 12v socket into the leisure battery as I couldn't manage the cable feed.

Getting the cable from front to back now meant I could pop off the grab handle, and the flappy-downy handle around the door and feed it through the headliner, down the A-pillar and into the trim where my ODB power adapter is (LHD).

Two sad parts:
1. The cams don't run from the Leisure battery, but the engine. Why have two AGM leisure batteries in there if I have to connect to the engine battery and hope it doesn't run flat. To be fair, I don't reckon those two mini cameras use so much power while they're in parking guard. Plus, the ODB adaptor cuts off if the voltage goes too low. Still, running from the leisure might be worth investigating in future.
2. I really didn't fancy attempting to disassemble the rear tailgate trim to run the cable nicely. It would have been my ideal, but the process of taking it all apart seems so difficult (too many breakable plastic clips) I didn't feel it worth while.


Now have two Garmin Mini 2 cameras installed (mostly) properly!
Feel your pain and still have the knuckle scars. Like you I ended up with various cable rod kits to get it to work and a lot of trial and error.

For the leisures I get the thinking. They are just two car batteries in the end chained together so the threat of deadening them is as great and I’d rather they were protected for the living accommodation.

I changed my solar setup to charge the starter but as it’s only a trickle charge it was pointless in the end. The good news is on EHU they stay on fine, so there is that.

For the rear trim - I did end up taking it off and it is a pig. Managed it though and the job a lot neater. You could technically just prise away the nearside trim side as that is where the two holes are you can thread the cable through from the rear connector.
 
@dspuk A question on removing the rear trim please.

From your experience would it be easy to get to the rear wiper motor by just releasing the trim partially at the top of the trim?

On my last three vehicles, I have always wired the rear dashcam into the ignition switched live feed going to the rear wiper. (Most wiper systems have such a feed which is part of the design to park the wiper in the correct position when not in use). The small dashcam power pack is cable tied close to the wiper motor behind the trim and then the USB power cable to the dashcam protrudes slightly from the trim.

The beauty of doing this is that there is then no need to thread any dashcam power leads back through the grommets to the body of the vehicle.

The downside is that the dashcam is then only on an ignition switched feed, so no good if you want to wire it up to a permanently live feed.
Hard to say but I needed to pull the whole side and top off for access, leaving the offside part in place. I never touched the trim in and around the wiper but could see you could possibly do. The whole back trim is quite notorious. I wanted a perm live so does not work for me.
 

Similar threads

J
Replies
10
Views
2K
T6 CFO
T6 CFO
R.Hay
Replies
17
Views
3K
Blue Yonder
Blue Yonder
Racing 47
Replies
14
Views
3K
Van Diesel VW
Van Diesel VW
M
Replies
4
Views
4K
JamesTT
J
B
Replies
10
Views
3K
Hawthorn37
Hawthorn37
Back
Top