Leaking roof or door??

Ian Brown

Ian Brown

Messages
21
Location
Cornwall
Vehicle
T5 SE 140
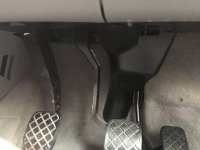
Hi there - help please!! I have read as many of the leaking roof forums on here as I can but I'm not sure whether they apply in this case. I have water ingress into the drivers side footwell from above. I have previously checked the roof drains by clearing with a syringe as others have done and water does flow down into the wheel arches on both sides. On the drivers side I removed the black panel under the bonnet and was clearly able to see the water coming out of the drain hole when I syringed at the roof. So I'm not sure if my problem is a roof drain or not. This morning after persistent rain overnight - but with the roof down all night, the water is coming in fast. Pictures below. does anyone know how to get the A pillar covers off so that I can inspect the pipes for splits or to see if a joint is leaking please?

IMG_9356.jpegIMG_9366.jpeg
 
Windscreen?
 
If you google something like ”Vw T5 (or 6) a pillar removal“ there’s a chap showing the technique. I’ve done it when fitting a dashcam and it’s pretty easy. He doesn’t show removal of the grab handle.

You could take the trim off the end of the dash (visible with door open) to get a look at where the A pillar disappears behind the dash. Then you might be able to see if it’s leaking from the pillar or as @WelshGas suggests the screen.
 
Last edited:
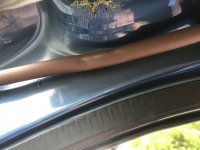
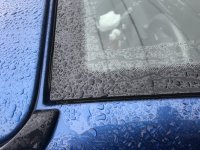
Thanks for the suggestions, I managed to get the A pillar grab bar and trim off (scary stuff) and did find that the down pipe had been crimped by the trim somehow, picture below, but that wasn't the problem. The pipe was dry and still firmly connected at the top. Water was tracking down the edge of the windscreen rim until falling onto the inside of the trim and then down into the vehicle footwell. Examination of the top corner of the windscreen on the out side seems to show missing or distorted seal so it looks as though I have a leaky windscreen. I may try and do a temporary fix with some gutter sealant but will have to get a new windscreen fitted. :( Thanks again for the help.IMG_9373.jpegIMG_9372.jpeg
 
Thanks for the suggestions, I managed to get the A pillar grab bar and trim off (scary stuff) and did find that the down pipe had been crimped by the trim somehow, picture below, but that wasn't the problem. The pipe was dry and still firmly connected at the top. Water was tracking down the edge of the windscreen rim until falling onto the inside of the trim and then down into the vehicle footwell. Examination of the top corner of the windscreen on the out side seems to show missing or distorted seal so it looks as though I have a leaky windscreen. I may try and do a temporary fix with some gutter sealant but will have to get a new windscreen fitted. :( Thanks again for the help.View attachment 61927View attachment 61928
Before you put anything on it, might be worth talking to a windscreen replacement company. They might have way of fixing without removal of screen.
 
Thanks for the suggestions, I managed to get the A pillar grab bar and trim off (scary stuff) and did find that the down pipe had been crimped by the trim somehow, picture below, but that wasn't the problem. The pipe was dry and still firmly connected at the top. Water was tracking down the edge of the windscreen rim until falling onto the inside of the trim and then down into the vehicle footwell. Examination of the top corner of the windscreen on the out side seems to show missing or distorted seal so it looks as though I have a leaky windscreen. I may try and do a temporary fix with some gutter sealant but will have to get a new windscreen fitted. :( Thanks again for the help.
The windscreen is bonded on. Using Gutter sealant might just sort out the problem.
 
If it's not the roof drain , it could be the drain collecting the water from the windshield in under the bonnet?
 
Took the van and had the windscreen replaced, its still leaking :-(. I'll have to take the A pillar trim off again but the water runs down the A Pillar from the top corner (drivers side) until it gets to the grab handle mount then across to the inside of the trim and from there down to the footwell etc. I wasn't able to see any damage to the drain pipe and it is still connected at the top right angle. However I cannot see where it goes up to meet the roof hole from there. Any thoughts please?
 
Hi Ian,

The roof channels have fixings in them, there are others posts where people have had leaks from faulty roof rail, but that showed more of a general wetting in the pop top, not a specific area like your issue.

In your earlier post you mentioned that you could see water tracking down the windscreen edge. Was the water from the roof during rain or did you apply the water to test the area for leaks ?

windscreen replacement has not fixed the problem, but should now discount that potential issue. Did you ask the fitter to look for possible water entry points or observations whilst the windscreen was out ?

Following a logical path you now need to investigate other possible options and discount the various possibilities.

You sound confident that the problem is not around the internal drain pipe or seal, but I would revisit this potential issue to discount this fully

1j With the A pillar trim panel removed, repeat the drain test , to determine if the pipe Is split to discount this fully and unequivocally. Use the syringe method making sure water is only discharged down the pipe ( not around the general roof area)

Repeat this test several times (important) checking each time for water ingress and allowing enough time between test for the water to naturally work its way through to the foot well.

Before each test check and Dry the whole area and route of the water from the roof downwards ( inside and out side the vehicle, where you can see it)

place some paper towel in the area where water was observed in the cab previously ( this will assist visually)

After the syringe test and if this proves uneventful,

2) With the roof and bonnet up: pour a measured amount of water into the the general area of the roof problem, ( flood the area ) place a bowl or other receptical under the exit point, to collect the water, is the water a similar amount to the “ measured amount” poured in the area of the suspected problem ?

(Do this with the bonnet up)

Look for signs of water running down the drain pipe over it’s visible length (as observed previously)
Look at the path of the water and where it flows and how it dissipates

( video it if necessary to help you review later)

If the amount of water collected under the van is similar to the measured amount discharged and there are no obvious signs of water tracking down the drain pipe ( or signs of water inside the vehicle footwell) this discounts the seal around the pipe and the pipe itself for the section from the top seal to where you can no longer see the pipe.

water observed running down the pipe where you can see the pipe indicates the seal or a split pipe.

If water ingress is observed in the footwell, but is not observed from the area where trim is removed, it could be the pipe is split where you cannot see the pipe or elsewhere in the engine Bay Area?

Is the amount of water discharged, similar to the amount collected ? (Was the amount observed inside the vehicle ( if any) commensurate with the amount not collected under the van ?

During the water test inspect under the bonnet and Check the scuttle panel and area in the engine bay looking for points where water could enter the cab ( follow and investigate any water tracking from the test in to each area).

3) With the roof and bonnet down, get an assistant to flood the roof area,, simulating a deluge, whilst you sit in the van and look for water ingress.

Unfortunately water ingress is very hard to pin point unless you can physically see the specific area where it is coming in, it will be a case of trial and error and discounting the possible options.

Good luck, I don’t envy your situation, Report back on any findings or not as the case may be.
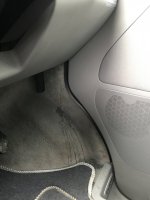
 
One thing I noticed in your original post, but forgot to mention above, the dented pipe, what is the material the pipe is made of ?
 
Windscreen?
@WelshGas

Hi WG
I seem to remember you posted a parts a Diagram in another thread, showing the exploded layout of the drainage system.

Would you be kind enough to repost it here please to assist the OP
 
It may assist to to remove the lower trim from under the dash in the foot well area as the water looks as if it coming from that area, although the trim panels could be allowing the water to track along the panel giving a false perception of its route
 
Check the scuttle/ drainage panel under the front wipers. Sometimes the drainage holes get blocked and water will find any hole it can find and make its way into the cab. (At least this is what used to happen on our BMW 5 touring and it was enough to soak all the floor carpets in front footwells - you just removed the rubber bungs and it would drain. On a BMW 1 series the water would come in through the rear arches, flood the boot area under the trim, fill the subframe with water, overflow and eventuallly flood the rear passenger area carpet - to fix that you just removed two small rubber bungs in the chassis so the water had somewhere to go.)

Pour a bucket of water down the lower part of the windscreen, if all is working correctly then the water should trickle through and end up on the driveway. If the drains are blocked with leaves/ debris etc then your cab carpet will get wet fairly quickly. I'm not sure how the scuttle panel is set up on a T5, but expect you will find photos on google and should be an easy fix.
 
Hi Perfectos, thank you very much for the detailed comprehensive post, it is very much appreciated indeed.

I now have done as you suggest, with the a pillar trim off and the roof lining pulled away I poured water into just the roof drain area with the roof up. I.e. Not enough to spill over into the windscreen or surrounding area. Water does flow down the drain and onto the front tyre BUT it also comes into the cab. It isn't easy to see or even feel how /where but I think there must be a split in the short rubber tube where it joins the roof.

I don't want to risk further damage to it without first understanding how it attaches to the roof gland assembly, does anyone know or better still have any photos of it please?
 
Hi Ian,

No problem p, glad I could help

At least you now have an area to concentrate on.

The top part of the tube can indeed become dislodged if thing are pushed into the tube in an attempt to clear a blockage.
I suspect the former owner did this and then attempted to fix the issue, hence the damage to the pipe aka your first post photo !

There is a thread with an exploded diagram, somewhere on the forum, I though @WelshGas posted it, but I may be wrong.

I will have a look for you and pos5bif I find anything

Unfortunately I do not know how the tube and top section are joined, I would suggest they are a push fit ! Due to the fact that they can be inadvertently separated
 
Hi Perfectos, thank you very much for the detailed comprehensive post, it is very much appreciated indeed.

I now have done as you suggest, with the a pillar trim off and the roof lining pulled away I poured water into just the roof drain area with the roof up. I.e. Not enough to spill over into the windscreen or surrounding area. Water does flow down the drain and onto the front tyre BUT it also comes into the cab. It isn't easy to see or even feel how /where but I think there must be a split in the short rubber tube where it joins the roof.

I don't want to risk further damage to it without first understanding how it attaches to the roof gland assembly, does anyone know or better still have any photos of it please?
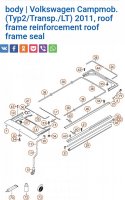
This might help.
Screenshot_20200702_121557.jpg
 
Has the front roof moulding been subject to any VW roof corrosion repairs?
 
Thanks guys, I presume the short tube that joins the elbow and then does a 90 degree turn before joining onto the roof gland is item 12 on the diagram? I have tried pulling it off the gland but it's pretty firmly on there.. I'll keep trying
 
Yes it was done in Feb but they say that it was a minor repair with nothing being removed
I can see the edge of your front panel above and it looks "factory fit" to me. Some repairs are removing/cutting out the original panel and sticking a new cap on top, usually not very well. Just a thought.
 
No they just did corrosion inhibition work involving some paint work and applying a film or so they said..

I can't get this pipe off the internal gland connection and am worried that it may get worse if I try harder. It may even be the gland fitting that's at fault.

I think it's probably best if I give it to vw to sort unless anyone has any other ideas?
It could be leaking around the Gland, Part 20. There is normally sealant around this part?
 
So the latest is that Carrs VW in Cornwall say that the gland needs to be cut out and replaced requiring body work etc. Sounds expensive to me... The vans gone to the body repairers now for a quote etc..
 
So the latest is that Carrs VW in Cornwall say that the gland needs to be cut out and replaced requiring body work etc. Sounds expensive to me... The vans gone to the body repairers now for a quote etc..
Not only expensive but sounds crazy that something as basic as a rubber grommet replacement requires such invasive work. Fingers crossed!
 
If as you say it has had corrosion work done on it and if it didn't leak before it was done then I would bet they've cocked something up. Ours has been in four times now to try and stop leaks after corrosion work so before committing to any work by another bodyshop I would get on to VW Customer Services and complain. May take a while though, we've been into this over three years now. Good luck.
 
Back
Top