Buy all your VW California Accessories at the Club Shop Visit Shop

Removable drill free solar installation in a Beach.

One of the very few problems with a Beach is that the EHU circuit breaker is hidden up inside the tool storage compartment in the boot where you can't even see it. This is a difficult switch to get at especially if the Multiflex board is fitted and you regularly carry stuff in your boot. We also have a pull out boot tray which doesn't make this tool compartment any easier to access. This switch location is an appalling piece of vehicle design or as I should say lack of thought and VW should be ashamed with themselves.

It is in exactly the same position on the Ocean/SE. It’s just that they have a Wardrobe in front of it and the Beach has a Trim Panel.:thumb
 
It is in exactly the same position on the Ocean/SE. It’s just that they have a Wardrobe in front of it and the Beach has a Trim Panel.:thumb
That's true. However, at least on the SE/Ocean you can actually get to it.

On the Beach the access is torturous. You have to go in via the removable trim panel which is located low down behind the N/S Multiflex leg. Once you've got the access panel off you can't see the wretched thing as it's mounted high up behind the trim. You can only see it if you use a mirror and a torch but even then it's very difficult. VW couldn't have made it much more awkward to reach. At least you don't need to go near it that often. I just leave ours switched on all of the time.
 
When I install the Victrons in Beaches I simply place the Victron at the very back, at the bottom of the jack compartment, loose. i.e. as far rearwards as possible, and at the bottom, standing up. I cable tie the battery and solar cables together and leave plenty so you can remove the charger if needed. The charger sits happily there.

It is "plug in and forget" and bluetooth accessed. The only time you'll ever need to get to it is if it fails, and I've had one failure in around 5 years of selling them. And then, you just reach in, grab it, and pull it out!
 
Thanks Roger. I'm not sure I would want it rattling around in there and prone to damage when moving the jack/tow bar. I appreciate my fixing is a tad more than "drill free" but its fixed, held out of the way and still removable if needed
 
Thanks Roger. I'm not sure I would want it rattling around in there and prone to damage when moving the jack/tow bar. I appreciate my fixing is a tad more than "drill free" but its fixed, held out of the way and still removable if needed

I'd vouch for Roger's method -- sits in there snugly and seems pretty secure. not sure how fixing it would help anything. This way it comes in and out easily.
 
Thanks Roger. I'm not sure I would want it rattling around in there and prone to damage when moving the jack/tow bar. I appreciate my fixing is a tad more than "drill free" but its fixed, held out of the way and still removable if needed
Could secure it with velcro ?

Sent from my SM-G950F using Tapatalk
 
I've tried - it pulls the adhesive off. Perhaps there is super -velcro out there.
 
I put mine on with 3m VHB. Hasn’t moved so far.


Sent from my iPhone using Tapatalk
 
Thanks guys - will look at the Velcro - its handy to be able to pull the unit out in the event of a problem. Saying that, only one Victron failure so far, and I sell a lot.
 
From the roof, the cable enters the vehicle through the tailgate loom. This is the loom which takes power from the engine battery to the rear wipers and some internal lights.

Once in the van the cable is concealed under the trim to the rear tool bay. This is where the jack and other bits and bobs are located on the left side of the boot. The charger gets installed there. From the tool bay the cable can be poked under the trim at floor level and runs exposed for the very short distance from under the trim at the B pillar to under the front passenger seat.

It is all very neat and tidy. The only irreparable damage is a small incision in the tailgate loom.


Follow my blog: www.au-revoir.eu
Can anyone post a picture of how the cable gets into the car from the roof?
thank you
 
Can anyone post a picture of how the cable gets into the car from the roof?
thank you
See pictures in Post 1.

 
This is what I decided to install
6b72946a535f1a4e6d9cc02c3ae65909.jpg
af06c6abb364864a2998a13002becc94.jpg
9d12122868ddfc6d4b55aeda6e7c758c.jpg


Inviato dal mio Mi MIX 2S utilizzando Tapatalk
 
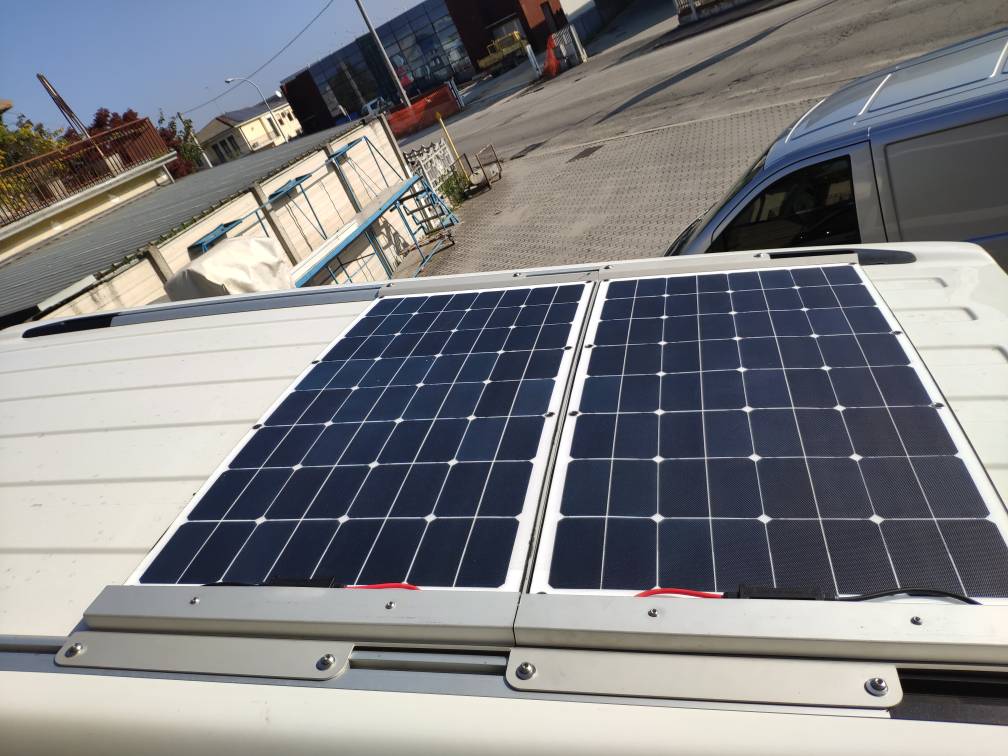
I fitted one of my kits in a Cali Beach today, and I know a few people have been asking for details of how to, and where to put the solar charger so here it is...

It actually turned out really easy.

1st thing is to pull back the rubber seal that runs round the boot on the top left, a bit along the top, and most of the way down.

Next up is removing the middle grey trim panel at the back. It is held on by two clips that can simply be pulled off. They are designed so the bottom releases if you slide the trim towards the front of the van, and then the top one if you push the panel up. However, I found, whilst levering the panel and looking inside, that the plastic pins pull straight out anyhow, with not too much resistance. The front edge of the panel slots into vertical retaining clips (you slide the front edge into these 1st when refitting the panel.

36064862896_4ddeac3b2f_b.jpg


You can then unplug the connector to the light to get the panel out of your way.

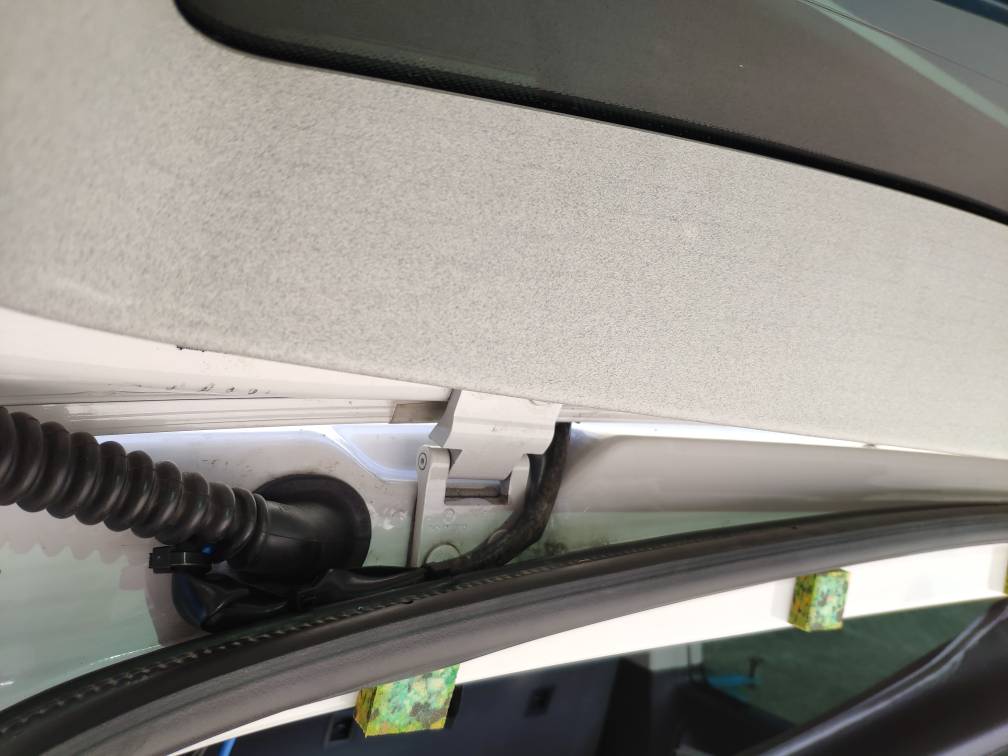
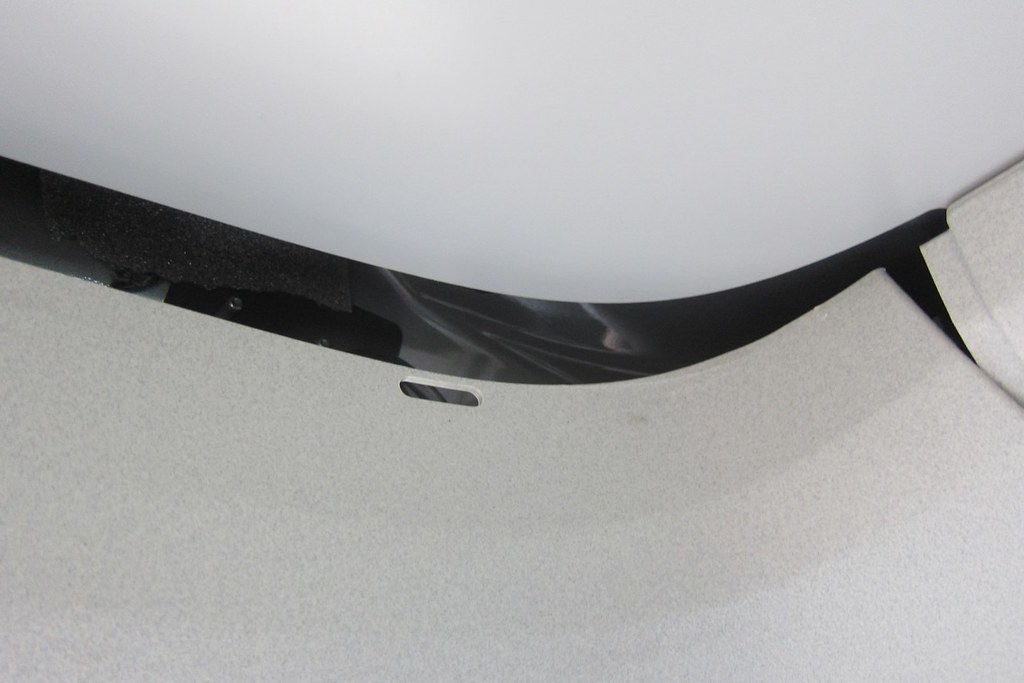
Next up is the panel above that runs the width of the roof at the back. We just need to release it enough to gain access to where the wire is going to to come in from outside via the rear upper tailgate grommet .

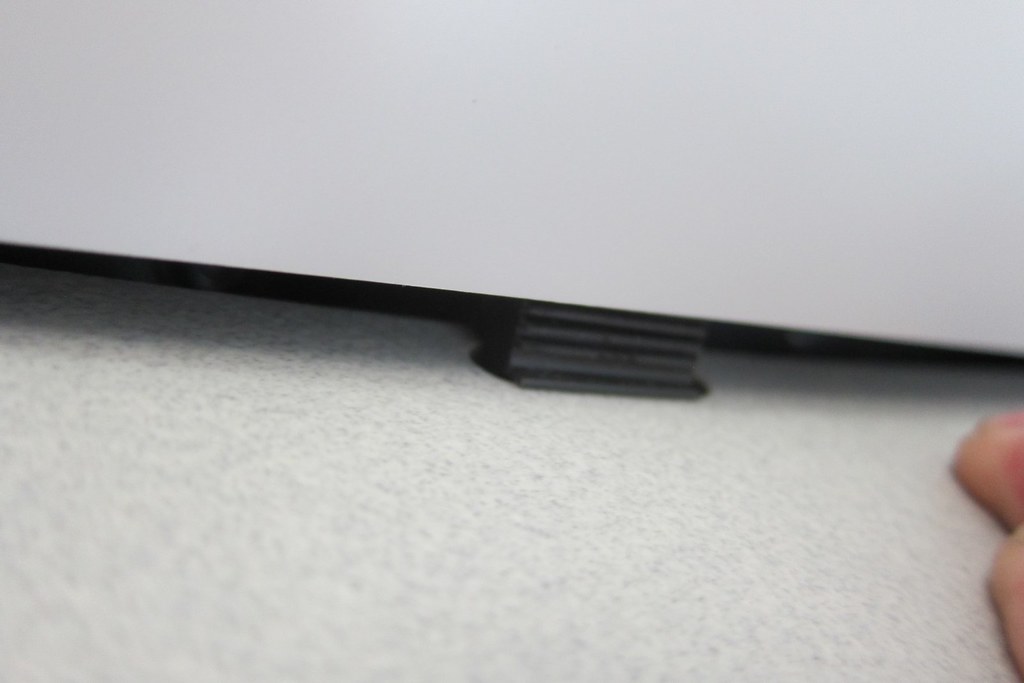
The panel is held in place with little rubber "thingies" that sit in slots in the panel and then rest on the roof panel above. All you have to do is push the panel in question where the rubber thingies are and they drop down (or you pull them out). You only need to do the left three or so.

35715850100_07edaba2ce_b.jpg


35298518473_07077147fd_b.jpg


This frees up the panel plenty enough.

35937371792_5577dc6ff4_b.jpg


You can see in the pic above where the solar cable appears inside after being threaded through the outer grommet. Once you pull the grommet off, you can see straight inside the van. It's super easy.


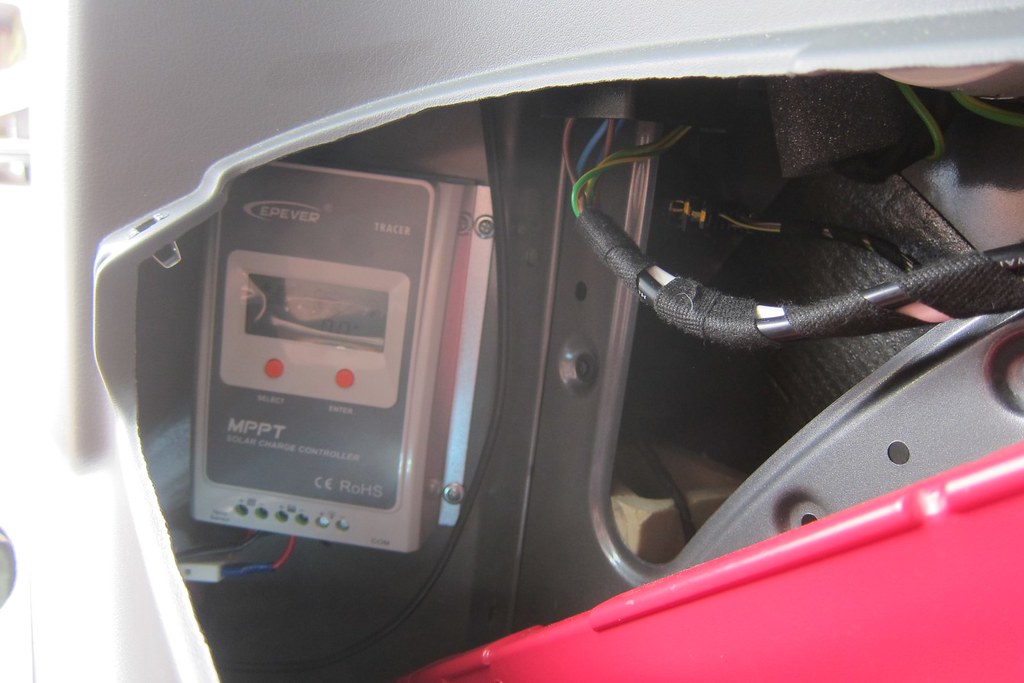
Now you run the cable down, past the removed side panel, and push it down so it appears inside the area where the jack is stored. This is where I put the solar charger.

35937367842_a8a8a9703f_b.jpg


35937368562_238d6ea682_b.jpg


The last photo (above is actually a bit deceptive, the charger is actually fitted at the back of the jack storage area. The pic above it is more representative.It fits nicely and doesn't interfere with the jack.

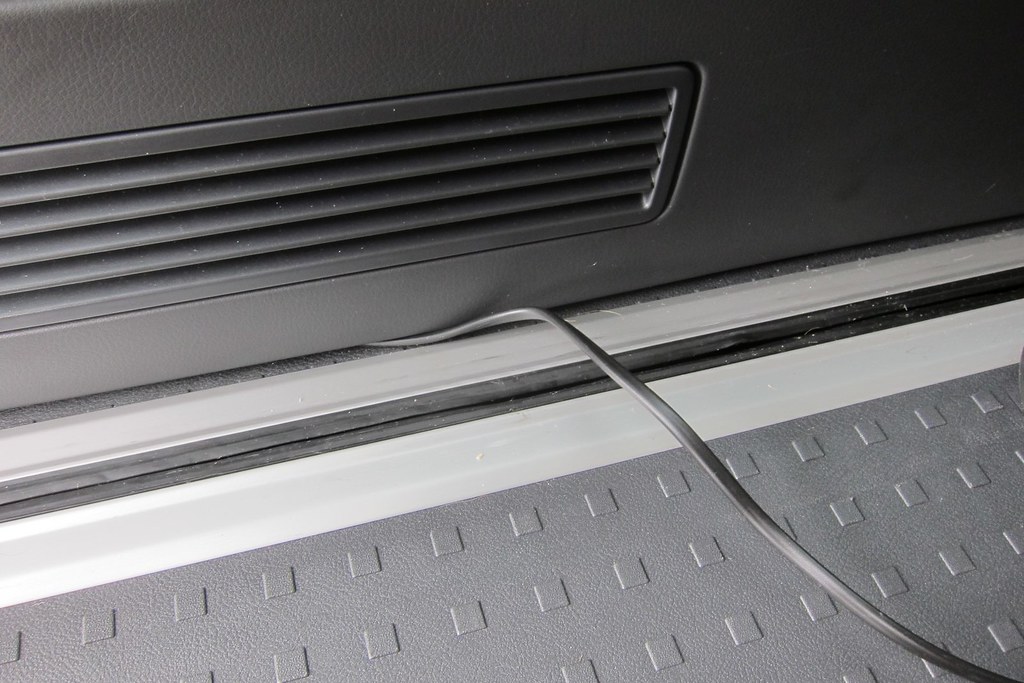
Then, I ran the battery cable from the solar charger to right by the side of the passenger seat by simply poking it under the plastic interior trim at floor level. Easy!

35937371082_829b5456de_b.jpg


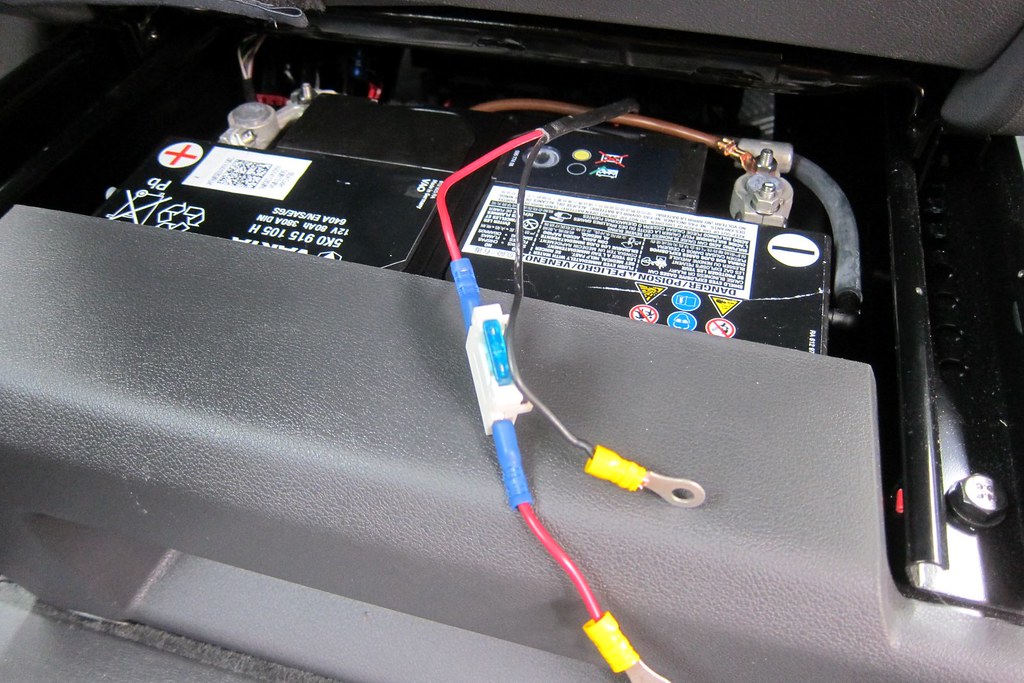
Finally, I slid the passenger seat all the way forwards, pulled off the plastic trim at the back of the battery box (it just pulls off), pulled the rubber battery cover off, and bolted the connectors to the battery. (the cable goes from the side panel to the battery area, entering at the bottom where the plastic trim goes (underneath it) - this leaves a couple of cm of cable visible on the carpet at the side of the seat - you don't notice it)

35937370282_3581aa427b_b.jpg


Hope that helps![/URL]

[RSVP=14349]Click here to RSVP[/RSVP]
Hi Roger , I fitted your system to my Beach today as you described and it’s working perfectly. Thankyou. Like the hidden Victron MPPT and access with VictronConnect. The only issue I have is that for the life of me I can’t get the leisure Battery rubber cover back on! I had pushed the seat as far forward as it goes and now I am wondering should I rotate it 90 degrees ? Grateful for your experience refitting it. Thanks Sandy
 
It goes on with the shorter side forwards. With the seat unbolted there is no need to rotate it you will have loads of room. The battery bay should be totally uncovered.

R

R
 
Fitted mine today , all good. I feel like I did overkill as I took the seat out and lifted the base to run the wire up the B pillar and along the roof panel to the jack cubbyhole. Consequently the battery wire wasn't long enough, but I nicked some off the PV wire and wagod it together.

The plug for the panel sits in the wider part of the track, sort of, but the wire doesn't really sit down between the panel and the track, maybe because its new. I've ordered some super sticky pads which should ever come that.

The controller is in the jack cubbyhole but I think I will sticky pad it to some flat metal surface in there. Any tips or advice for what to do with it?
 
Having read page two I have placed the controller as per Roger's advice. I'll see how it goes nestled down there it does seem tone sitting in a 'fold'. I shall play around with the sticky pads in the groove though for the roof cable.
 
The first part of the cable from the panel I've stuck under the edge of the panel. I have some sticky pads in the track to try to keep the cable flush.
 
Fitted my solar panel kit yesterday to my T5 beach, everything was very straightforward and the instructions on this thread covered everything.

I opted for the remote display but was not keen on mounting it on the rear panel as i felt it would be prone to getting knocked by the kids and didn’t really want to drill the panel.

I found an alternative that allows me to check what the solar is doing easily from inside the van. Simply run the data cable from the tool/jack box through the access hatch handle to the rear bench drawer and leave enough excess cable for when the bench needs to be slid forwards.
AB2D2635-BFF4-43AE-BFA7-AFAA74690C6A.jpeg98CE49DE-6E33-4826-96A0-5622FAD5151A.jpeg
 
Fitted mine today , all good. I feel like I did overkill as I took the seat out and lifted the base to run the wire up the B pillar and along the roof panel to the jack cubbyhole.
Hello bloomers100
I'm planning a reversing camera install in my T5.1 Beach and think running the cable from the tailgate umbilical along the top of the windows/roof area and eventually down the A-pillar similar to what you did for your solar would be neat.
How did you find running cable along the tops of the rear windows/roof to the B-Pillar?
Did you use a longish electrical cable access pole to pull the cable through?
Any tips?
Thanks.
 

Similar threads

Back
Top