colintfcolintf
VIP Member
Have you asked your dealer the question?I also have the dodgy screen, anyone had this replaced under the all in warrantee?
Have you asked your dealer the question?I also have the dodgy screen, anyone had this replaced under the all in warrantee?
It’s a known issue !Have you asked your dealer the question?

Excellent Guidance, cheers @WillSS, just completed the job on my 2016 Beach that was beginning to refuse to let me operate the perimeter of the touchscreen. Including searching for my trim tools, and a quick trip to screwfix to find a small enough torx set (thanks @CaliOceanMike ) took about 1.5 hours. Simple enough task.Ok Brett, i‘ve just dug out the the photos, it was actually nearly a year ago looking at them now! Memory a bit rusty but the photos pretty much show the order of things
First the part, here’s the ebay link to the digitiser… no surprises it’s gone up in price like the rest of world. This is supplied from the EU (Germany) but you could take a punt on the cheaper Chinese delivered one (does look a different supplier though). I bought the EU delivered version.
ebay item 115045718856
If this link doesn’t work down the line then just search for “VW digitiser TDO-WVGA0633F00039”
To fit you obviously need to remove the unit, clear the kitchen table and grab your screwdrivers, fairly sure the screws were all of the small torx variety. Then pull it apart to get to just the screen…
No great surprises here, pull off the front knobs, remove any sd cards and just look for the relevant screws…
View attachment 103438View attachment 103439View attachment 103440
Once here you’ll spot a small plastic clip holding each of the two card slot gubbins (below now removed laying on their side, were vertical)
View attachment 103442
then gently ease up the 2 ribbon connectors and slide them out…
View attachment 103441View attachment 103443View attachment 103444View attachment 103445View attachment 103446View attachment 103447
Basically keep striping it down until you get to the glass unit.
Now get your new screen and after cleaning stick it over the existing one with the supplied 3m edge tape. Yes on top of the exisitng!
You will not get the original one apart as it is bonded throughout to the LCD. It is only 1mm thick and will still fit fine. In the last photo it looks like i helped the ‘fit‘ with a bit of sellotape here! Then put it all back together in reverse order but obviously connect the correct ribbon in. I left the existing one tucked out the way hence this is all completely reversible back to your original condition should you need to go back for any reason!
The end result is it looks and performs as per the original ‘working’ screen.
As said been a year now and mine’s performed perfectply.
Good luck, Will
I have just booked in for my final service under the All In Plan, and have same touchscreen fault. Did you manage to get your fault rectified under the All In Plan warranty?I also have the dodgy screen, anyone had this replaced under the all in warrantee?
Mine booked in for replacement 2nd April under All in Plan WarrantyI have just booked in for my final service under the All In Plan, and have same touchscreen fault. Did you manage to get your fault rectified under the All In Plan warranty?
Touchscreen arrived from eBay.The touchscreen in my 2016 Cali is failing now. Does anyone know of a company in the Southampton area who can do the repair for a reasonable price? If not I go the DIY route using the excellent instructions in the thread.
Sent from my Pixel 7 using Tapatalk
Probably better described as Satnav Systems of Hook/Tolworth/Surbiton rather than Chertsey.Satnav systems Chertsey can repair all faults for a fraction of the £2.2K a dealer Will charge for simply swapping the unit (the replacement would be supplied and fitted By a third party company on behalf of VW ! )
they operate a postal service if you can’t get to them
call Hamid, letting him know you’re on the Forum.

SNS - SatNav Systems | Technology Specialists for Volkswagen Group: VW, Audi, Porsche, Lamborghini, Seat, Skoda
SNS - SatNav Systems | Technology Specialists for Volkswagen Group: VW, Audi, Porsche, Lamborghini, Seat, Skodawww.satnavsystems.com
one of my previous posts details that all units with a suffix code are known to have a fault and will fail sooner or later ( . Later suffix does not !, search my previous posts)
edit here is the thread and my post #2

Infotainment system jumpy & glitchy
Have just replaced the 2 dead batteries after a long period of Covid lockdowns & no use. The batteries are fine but the infotainment system is acting very irrationally. It’s constantly beeping & changing screens & positions in the GPS. Have tried turning it on & off a few times, removed the GPS...vwcaliforniaclub.com
Edit, the suffix is “c” or older

Discover Media Pro blackscreen
Got in the van this morning and the big screen (Discover Media Pro) was black and I had a warning in the cockpit screen regarding traffic sign recognition not working. Tried in vain to get it back to life by locking/unlocking/starting with no success. Phoned Citygate Wooburn Green to book it in...vwcaliforniaclub.com
you are welcome, I would not recommend them if they were not 100% Each time I have used them.Thank you for the excellent recommendation!
Likewise...Fixed mine myself. 40 quid . Stuck a new touch screen over the old one. Works great. If it fails again I'll just unstick it and put another new one on top.
Start bottom left with the trim. Seems to come out OK. Trim removal tools help. Good to see we can fix these screens though. If it fails again will be a faster job. Mine stopped working all down the rhsLikewise...
I bought the replacement screen off ebay for £30. Did the job myself - probably took 1 1/2 hrs because I was going slow and steady.
You need down to sixe TX6 to remove the smallest screws - my screwdriver sets only go to TX8, but I improvised with a small screwdriver for mending spectacles.
For me the most difficult bit is removing the trim. I always think it is going to crack - i used some plastic tyre levers to help with this job.
It works a treat now......
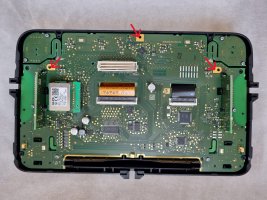
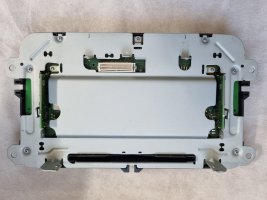
Many thanks, WillSS, for your very helpful step by step guide - I just replaced our touchscreen digitiser in a 2016 Ocean. The one dilemma I hit was during reassembly, after replacing the digitiser in the front panel: where to put the 8 screws that secure into the display PCB / front panel, as there are 11 holes ? The answer is to avoid the three gold plated holes (see red arrows on photo 1) - these are for 3 of the second set of 8 screws that secure the metal front of the unit (see photo 2). I only discovered this after putting screws into those 3 holes, then trying to add the metal unit front when it would not go flat because of the screw heads - silly me ! Otherwise a relatively simple job, albeit requiring attention to detail at each stage... probably an hour in all. Thanks again for all the helpful postings here, and best of luck to those yet to do the job !Ok Brett, i‘ve just dug out the the photos, it was actually nearly a year ago looking at them now! Memory a bit rusty but the photos pretty much show the order of things
First the part, here’s the ebay link to the digitiser… no surprises it’s gone up in price like the rest of world. This is supplied from the EU (Germany) but you could take a punt on the cheaper Chinese delivered one (does look a different supplier though). I bought the EU delivered version.
ebay item 115045718856
If this link doesn’t work down the line then just search for “VW digitiser TDO-WVGA0633F00039”
To fit you obviously need to remove the unit, clear the kitchen table and grab your screwdrivers, fairly sure the screws were all of the small torx variety. Then pull it apart to get to just the screen…
No great surprises here, pull off the front knobs, remove any sd cards and just look for the relevant screws…
View attachment 103438View attachment 103439View attachment 103440
Once here you’ll spot a small plastic clip holding each of the two card slot gubbins (below now removed laying on their side, were vertical)
View attachment 103442
then gently ease up the 2 ribbon connectors and slide them out…
View attachment 103441View attachment 103443View attachment 103444View attachment 103445View attachment 103446View attachment 103447
Basically keep striping it down until you get to the glass unit.
Now get your new screen and after cleaning stick it over the existing one with the supplied 3m edge tape. Yes on top of the exisitng!
You will not get the original one apart as it is bonded throughout to the LCD. It is only 1mm thick and will still fit fine. In the last photo it looks like i helped the ‘fit‘ with a bit of sellotape here! Then put it all back together in reverse order but obviously connect the correct ribbon in. I left the existing one tucked out the way hence this is all completely reversible back to your original condition should you need to go back for any reason!
The end result is it looks and performs as per the original ‘working’ screen.
As said been a year now and mine’s performed perfectply.
Good luck, Will


 itechnologyrepairs.co.uk
min failed at the rhs so where the go back X was i couldn't use it. so yes i would say your screen needs changingHi all, lot's of info! Very good. But still a question, mine does not respond anymore to the three "quick menu" items on the left side, de rest is still working good. (see photo) Did the problem start that way also with everybody else? Mine is from 2018 and cleaning, reset(s) did not help so far
View attachment 125315
wow, why would anyone pay that ?Thank you - My Infotainment System broke whilst I was away, 2019 Ocean, booked into my VW Dealer yesterday and almost had a heart attack, they want £2600 to replace it!
Read through this whole thread, booked in with Hamid on Friday, fingers crossed all will be fixed and I won’t need to sell any of my internal organs!
Thank you everyone
I nearly did, I didn’t think I had much choice!wow, why would anyone pay that ?

The VW California Club is the worlds largest resource for all owners and enthusiasts of VW California campervans.

