What have you bought for your Cali today :-)

Hi all sorry to come to the party late on this, but is this available and does it work for the 6.1 with the ocean pano option? I’ve got one arriving in 3 months so would be great to know. Cheers and all the best
There is a 6.1 panoramic option, but its out of stock in the forum shop atm. Suggest you set it to email you when available
 
I love it, definitely makes it warmer and more cosy up top in winter and helps keep the heat down in summer. When your are on your own all you have to do is fit the front panel from the inside so much easier than fitting an outside wrap. Also when it's raining you don't get wet fitting it and if it has rained you don't have something wet to store inside the van when you want to move off.
hi so you need remove the full front iso top panel before lowering ? if that's the case the wet canvas could leak through as the barrier is now broken.
 
The inside of the canvas should be dry no different to if it wasn't fitted or have I missed your point?
 
The inside of the canvas should be dry no different to if it wasn't fitted or have I missed your point?
its just people have said if the weather is really wet and the canvas outside is soaked the iso top stops the water soaking through into the bedding area when the roof is closed,if the front panel needs removing then this could be a problem. Are you sure it cant be left in place?
 
Isotop is inside, never had a problem with it being wet.
 
its just people have said if the weather is really wet and the canvas outside is soaked the iso top stops the water soaking through into the bedding area when the roof is closed,if the front panel needs removing then this could be a problem. Are you sure it cant be left in place?
Canvas on latest models (last few years), doesn't get wet inside . The complaint you've read are for years ago on older models
 
OK so here’s the camera installation.
I’m afraid it’s not easy to see exactly where they’ve wired the Power Magic Pro but you just need to find a permanent live, a switched live, and an earth. Hope that helps.

View attachment 69199

View attachment 69200

View attachment 69201

View attachment 69202
Hi GG - these photos are really useful
We had a guy out today who was going to fit the Blackvue front and rear cameras to our van, but he said that although the front camera would be easy to fit, he was concerned about the rear camera and how the wiring would not be straight forward - we asked him to leave it for now. Is your internal wiring visible or completely hidden? Are you happy with the finish - trims all ok etc? Thanks in advance

I have installed the the camera myself and, although a bit fiddly, quite doable. Instead of an using a flexible rod as used in the video I used a long round wooden rod thingy. follow the instrusctions on the video and Bob’s your uncle. No wires visible and all the trim back into place. No spares left over...

 
I have installed the the camera myself and, although a bit fiddly, quite doable. Instead of an using a flexible rod as used in the video I used a long round wooden rod thingy. follow the instrusctions on the video and Bob’s your uncle. No wires visible and all the trim back into place. No spares left over...


Handy tip, when pushong through the camera wire tie a cord along with it so it will be a doddle next time you have to put something through.
 
Hi GG - these photos are really useful
We had a guy out today who was going to fit the Blackvue front and rear cameras to our van, but he said that although the front camera would be easy to fit, he was concerned about the rear camera and how the wiring would not be straight forward - we asked him to leave it for now. Is your internal wiring visible or completely hidden? Are you happy with the finish - trims all ok etc? Thanks in advance
All wiring is hidden. Happy with the installation - done by SatNav Solutions in Surbiton.
If you’re intending to use Parking Mode you will need the Power Magic Pro fitted.
 
I know they cost a lot of money and I know they will protect your seats, but I could fit bin bags for the same look to be honest, I just don't get them. SORRY.
Relatively inexpensive compared to some covers i.e. second skins. I know they don’t have the best look but they are practical for us when it’s wet/muddy. Will probably remove them in Summer.
 
Relatively inexpensive compared to some covers i.e. second skins. I know they don’t have the best look but they are practical for us when it’s wet/muddy. Will probably remove them in Summer.
Yes, I understand. They just wouldn't be for me. We all have our own ideas for our vans, my choices would likely not suit you.
 
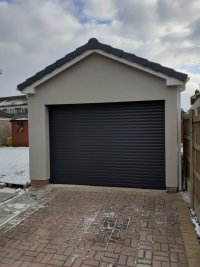
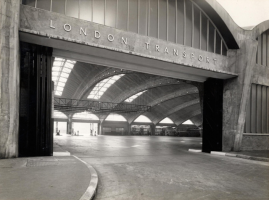
@flying banana , nice ...seems you have the little version of mine;)
8x12m , full open space no inner walls , polished conctrete floor , door 6m wide .
with accesable attic on top .
fits 4 Cali’s easy and still able to open the doors :D
only shame is i can’t open the roof inside due the attic floor...
View attachment 73544
Careful, or you’ll be accused of male dick measuring! ;)
 
:) :)
Decided against cloth second skins because they are expensive AND mark as easily as the original fabric. I’d end up putting covers on my covers.
Yep thats exactly what Im going to do GG put throws on my 2nd skins:)
 
Yep thats exactly what Im going to do GG put throws on my 2nd skins:)
I started with inks waterproof covers in our old van, they were ok for muddy dogs but not so good for rear seat passengers, they were sliding all over the place. In summer I found the front seats sweaty.
We ended up with brandrup second skins, they felt and looked exactly like the original covers. Just with huge advantage of being able to take them off and wash them. After 6 years use our second skins still looked like new after a wash & have just sold them for 50% of the cost of new ones.

At 11am today we have a CampervanBits delivery due of a complete set in the new design and palladium grey. Expensive but I am sure that part of the high trade in value of the old van was due to having unmarked upholstery.
Thats good to hear Andy as yes they are very expensive - no muddy dogs for us but with all the merriment about to take place just thought Id get them covered & I do love the Mixed Dots fabric:)
 
@flying banana , nice ...seems you have the little version of mine;)
8x12m , full open space no inner walls , polished conctrete floor , door 6m wide .
with accesable attic on top .
fits 4 Cali’s easy and still able to open the doors :D
only shame is i can’t open the roof inside due the attic floor...
View attachment 73544
YOU CAN'T BEAT A GOOD GARAGE
 

VW California Club

Back
Top