Buy all your VW California Accessories at the Club Shop Visit Shop

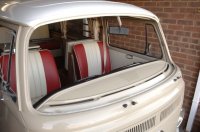
Lovely new seat covers!

Hi Ken.

Yes, I know exactly what you mean, it is a bit vague in the video as the panel appears to simply pop off.

Like you I attempted to pull the panel off but stopped as I was very worried I’d break it! It's certainly stuck fast and clearly isn’t designed just to pop off! So I called Martin in the shop and he advised to leave it in place and fit the cover around it, which I did. You can pull the retaining cord pretty tight and just tuck the front edge of the seat cover under.

Good luck, I’m sure it will be fine :thumb

Carole

Thanks Carole,

Sorted the rear bench lower. I ended up working out how to get the panel at the front of the rear seats off as I could not lift the bench sufficiently to get the cover on. I can't really describe how I did it but it involved some moves that any self respecting contortionist would be proud of.

That then leads to the next question. What did you do with the pull cord that is used to lower the rear seat? It is now under the bench back cover and I cant find any slot for it to be placed through? The only solution that I can think of involves a knife. And again, the first half of the relevant video doesn't load up properly so doing this blind.

For the sections that I have on so far - they look great, very happy.

Ken
 
and where did you get your bunting? The wife and kids love it :)

Thanks Mark :) I made the bunting myself, the fabric came from ikea. I cut out the triangles, sewed them up and then washed them in the washing machine to give them the frayed look.

Campervans and bunting are a bit like beans and toast, always look good together!
 
Thanks Carole,

Sorted the rear bench lower. I ended up working out how to get the panel at the front of the rear seats off as I could not lift the bench sufficiently to get the cover on. I can't really describe how I did it but it involved some moves that any self respecting contortionist would be proud of.

That then leads to the next question. What did you do with the pull cord that is used to lower the rear seat? It is now under the bench back cover and I cant find any slot for it to be placed through? The only solution that I can think of involves a knife. And again, the first half of the relevant video doesn't load up properly so doing this blind.

For the sections that I have on so far - they look great, very happy.

Ken

Hi Ken, yes, it was a tight fit getting the cover on without moving the front panel, well done you! I have fairly small hands so was able to ‘negotiate’ the cord but its fair to say there were a few expletives said during the process :sad !!

I cut a small slit in the fabric edge for the pull cord to go through, couldn’t see any way around it to be honest. There is quite a large excess flap of the fabric that goes under and behind the actual seat cover so its safe to cut the slit without compromising the cover itself.
 
Thanks for the comments, they do look great
These covers look really good - have shown Hubby and am now contemplating purchase for our Ocean. But have I read comments correctly that there is not a "slot" for the bench release strap and manual cutting is involved ?
 
They look superb, mind you I've just washed the brandrups that came with ours and they've come up like new. Seat covers have got to be the best accessory purchase you can make.
 
Thanks again Carole. Now have all the covers on. Really happy with them but was a bit of an effort to get them on. I wouldn't call them washable because I sure ain't going to be taking them off.

Lorri, there are a few adaptions that you need to apply but the result well worth it.
 
These covers look really good - have shown Hubby and am now contemplating purchase for our Ocean. But have I read comments correctly that there is not a "slot" for the bench release strap and manual cutting is involved ?

Hi Lorri, no, there isn’t a pre-cut slot for the release strap.

However, its a simple process to cut a small slit in the excess fabric that surrounds the main seat fabric. I don’t believe that it compromises the cover in any way.

I’ll post up a pic later for you to explain, that will be easier!

Carole
 
Thanks again Carole. Now have all the covers on. Really happy with them but was a bit of an effort to get them on. I wouldn't call them washable because I sure ain't going to be taking them off.

Lorri, there are a few adaptions that you need to apply but the result well worth it.

Ken that was exactly my first thought once they were finally on, washable or not, they ain't ever coming off!!!

I agree, they were challenging to fit, but that is a reflection on the fact that they are such good quality, because the fit is superb.

Back in the day I bought replacement vinyl seat covers for my T2 Earlybay front seats. Gorgeous red and cream with cream piping, and oh boy they were a complete b**ch to fit, I had to warm them up with a hairdryer to get them on, and my hands and thumbs were hurting for days afterwards, but they looked great once they were on.

The Gti covers for the Ocean were easier to fit than the ones shown below, definitely! Fingers crossed the Gti covers last the test of time :)

_1CL0103.jpg
 
Folks can you pop a picture up of what your having to slit for the seat release Please?? Just a bit concerned as I've fitted these and didnt have to cut any slits or anything. As my seat release feeds through where the seat belt buckles are. :thumb be good to just check if you dont mind grabbing a picture.
 
Folks can you pop a picture up of what your having to slit for the seat release Please?? Just a bit concerned as I've fitted these and didnt have to cut any slits or anything. As my seat release feeds through where the seat belt buckles are. :thumb be good to just check if you dont mind grabbing a picture.
Correct. There is no need to cut anything. Mine fitted easily and the release fitted through with the seat belt buckles.
 
These do look great, I'm currently on the Inka covers but like the colour scheme with the Acupulco Blue. Do these wipe clean easily? They're obviously fabric, so I worry that it won't provide the same protection as the Inkas? I honestly don't know why I bothered to specify Alcantara since it's always covered, but I like the piece of mind that comes from using covers, and not having to nag children about being careful on the seats (nor me having to be careful when cooking).
 
What did you do to cover your folding table? Love the seat covers btw!

Good old sticky-back-plastic, or Fablon if you prefer. Mine came from B&Q but there's an endless choice of designs on-line. I also covered the outdoor table with it. Use a credit card to get it super flat and then a sharp craft knife to trim the edge.

I like it because if I get bored with it I can just peel it off and use a new design :thumb
 
They are really nice, and If I hadn't just bought a set of VW waterproof ones I'd be having a set of those!
 
I’ve just bought a set too, they are fab, fitted the front ones, didn’t know if I was meant to remove trim around side and remove the base via 2 bolts but I did, 2 hours that took,
Just the back ones to do, dreading it, but very well worth it
 
OK, I have these beautiful new seat covers for my beautiful new T6 Ocean. I've taken a look and this isn't going to be easy!

Has anybody any idea how to get the plastic panel off the bottom of the front seat at the back without forcing it off. Especially the bottom lugs.? Also, can't quite see what part of the bottom of the seat the cords and elasticated pulls go around. As the seat swivels they must be near the foam?

Is there not a manufacturers video demonstrating this?

Thanks for any advice
 
Sorry no one has stepped forward to help. Give Nick a ring at the club shop and I’m sure he’ll help. When I’ve fitted similar covers I’ve not removed the base but have tried to thread the bits through and fish them out the other side....with lots of pain.
 
Hi 2into1,

I did talk to the guys in the shop and they were very helpful. Thanks.
 
Just fitted these covers- they do look amazing. Just like the pictures earlier in the thread unsurprisingly but in the flesh they really do look like original seats!

There were a few times through the process that I wished someone had already put up their struggles on the forum so thought I would just add to this thread for future people facing the same dilemmas!

Before you start - remove front headrests, everything from the boot, toolkit from the seat bench, plastic hatch next to the bench drawer, then remove armrest covers. Put everything somewhere safe outside the van to give yourself room to crawl around. Don't swivel the seats! If doing in stages, I would prudently suggest giving 1.5 hours for each front seat all in, and 1 hour each for the seat bench and seat back. If doing in one go, you can do it in less I would expect.

Front armrests - no tools needed to remove the cover, don't risk damaging them. If you move to upright position, you can just get a nail under one of the corners and they pop off really easily. Pull the covers onto the arm rests really hard in order to stand a chance of doing the zip up, I actually braced it by pulling them against my foot.
When fixing the armrests back, attach them in the same position you took them off in (upright in my case) or the movement won't work properly; when putting them back on just do them up and test before putting the cover back and zipping cover over.

Rear seat base - as the instruction leaflet says, don't need to remove any trim. Just use a blunt knife to push loops through gap under seat. Rear bench can be lifted at rear about 6 inches which helps - but seatbelf clips fall through. Keeping these in place is a real pain - we used a dog seatbelt lead clip to pull the seatbelt clip vertical while we set the seat back down.

Rear seat back - This goes on the easiest of all and straightforward, but then VERY hard to zip up. Spend some time REALLY tugging it in place before you even try with the zips... although don't tug it down too far over the plastic seatbelt mounts. I found the opening for the seatbelt to be slightly too small so if you pull it too far down over these, the zip will never do up. Leave the top of the cover slightly covering the plastic seatbelt mount then do the zip up.. hopefully that'll make sense to anyone trying it! Pull the "soft" bit through from under the bottom, and then the back velcros onto it at the bottom.

Front seat base - removing the rear seat trim. Oddly much easier on my drivers side. There are three clips, at top, middle and bottom. Careful pulling will work, I dont think tools would help and would only risk damaging. Passenger side was stiff and required a fair bit of force, but came away without damage. Make sure the front of the cover is really pushed down behind the plastic trim, get your head in the footwell to make sure it looks nice and tight down over the bottom of the seat base and not bunched up behind the trim. When fitting mine there were 3 seemingly redundant elastic tabs in the back - assume supposed to use hooks to hook them to something - but fits fine even leaving them.

Front seat back - pull all the way down and push the bar at the bottom of the front through the seat gap until you can pull it with your fingers from the back. Pull this really hard, the tension in this bit is what makes the seat cover hug the middle between the seat bolsters. Try as I did though, it would not reach the tab on the seat back. California Camping had the same problem and I thought I could overcome it... spent a long time and lot of effort... then gave up! Check position of arm rest holes on seat sides and keep pulling cover down until these look OK. You can tuck the bottom of the cover under the trim near the seat adjuster and it looks really neat.

Negatives about seat covers - only downside is the heated seats arent as effective as they used to be, and it does slightly impede the folding of the headrests. I leave the headrests down at all times - we don't have any rear passengers! - and the fact they dont fold back completely, and the comfort mattress getting in their way too, means a fair bit of the boot is taken up in a slightly messy fashion with the headrests.

Positives - THEY LOOK REALLY GOOD! hopefully they will protect the beige seats from two muddy dogs and give us a chance of protecting the resale value! However they might look too good and we'll probably now put blankets over the covers over the seats...:embarrased
 
Cazmatt hope you don't mind me asking but does the check patten line up, seat beck to seat cushion.
I have tried to 2 set and returned both as neither set did, it's a shame as I really wanted these covers but not sure if to try a 3rd set.:cheers
 
Cazmatt hope you don't mind me asking but does the check patten line up, seat beck to seat cushion.
I have tried to 2 set and returned both as neither set did, it's a shame as I really wanted these covers but not sure if to try a 3rd set.:cheers

Across the four seat pattern joins they do vary between 0-2cm alignment (eg rear left looks perfect but rear right is actually a couple of centimetres out)

Because the front join disappears a bit into the crevice I don’t think it’s too noticeable.

It may be to do with the way I’ve tensioned them.. it doesn’t bother me personally but my wife is certainly a bit more particular and so I hope she doesn’t notice..! I’ll attach pictures when I get back to them later


Sent from my iPhone using Tapatalk
 
Glad you are happy with them, they look superb
Hi Martin, are we able to get them (Front and Rear) shipped to New Zealand? We have limited local supply for Cali...
Regards
Emile
 
Hi Martin, are we able to get them (Front and Rear) shipped to New Zealand? We have limited local supply for Cali...
Regards
Emile
Hi, if you speak to the guys at the shop they can get you a quote on shipping.
 

Similar threads

Lee Thomson
Replies
19
Views
3K
Dr-Snickers
Dr-Snickers
T
Replies
19
Views
3K
Meoncoast
Meoncoast
Denzilgts
Replies
0
Views
2K
Denzilgts
Denzilgts
Ocean's 4
Replies
3
Views
1K
andyinluton
andyinluton
Back
Top