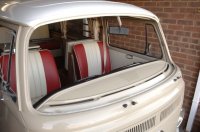
Just fitted these covers- they do look amazing. Just like the pictures earlier in the thread unsurprisingly but in the flesh they really do look like original seats!
There were a few times through the process that I wished someone had already put up their struggles on the forum so thought I would just add to this thread for future people facing the same dilemmas!
Before you start - remove front headrests, everything from the boot, toolkit from the seat bench, plastic hatch next to the bench drawer, then remove armrest covers. Put everything somewhere safe outside the van to give yourself room to crawl around. Don't swivel the seats! If doing in stages, I would prudently suggest giving 1.5 hours for each front seat all in, and 1 hour each for the seat bench and seat back. If doing in one go, you can do it in less I would expect.
Front armrests - no tools needed to remove the cover, don't risk damaging them. If you move to upright position, you can just get a nail under one of the corners and they pop off really easily. Pull the covers onto the arm rests really hard in order to stand a chance of doing the zip up, I actually braced it by pulling them against my foot.
When fixing the armrests back, attach them in the same position you took them off in (upright in my case) or the movement won't work properly; when putting them back on just do them up and test before putting the cover back and zipping cover over.
Rear seat base - as the instruction leaflet says, don't need to remove any trim. Just use a blunt knife to push loops through gap under seat. Rear bench can be lifted at rear about 6 inches which helps - but seatbelf clips fall through. Keeping these in place is a real pain - we used a dog seatbelt lead clip to pull the seatbelt clip vertical while we set the seat back down.
Rear seat back - This goes on the easiest of all and straightforward, but then VERY hard to zip up. Spend some time REALLY tugging it in place before you even try with the zips... although don't tug it down too far over the plastic seatbelt mounts. I found the opening for the seatbelt to be slightly too small so if you pull it too far down over these, the zip will never do up. Leave the top of the cover slightly covering the plastic seatbelt mount then do the zip up.. hopefully that'll make sense to anyone trying it! Pull the "soft" bit through from under the bottom, and then the back velcros onto it at the bottom.
Front seat base - removing the rear seat trim. Oddly much easier on my drivers side. There are three clips, at top, middle and bottom. Careful pulling will work, I dont think tools would help and would only risk damaging. Passenger side was stiff and required a fair bit of force, but came away without damage. Make sure the front of the cover is really pushed down behind the plastic trim, get your head in the footwell to make sure it looks nice and tight down over the bottom of the seat base and not bunched up behind the trim. When fitting mine there were 3 seemingly redundant elastic tabs in the back - assume supposed to use hooks to hook them to something - but fits fine even leaving them.
Front seat back - pull all the way down and push the bar at the bottom of the front through the seat gap until you can pull it with your fingers from the back. Pull this really hard, the tension in this bit is what makes the seat cover hug the middle between the seat bolsters. Try as I did though, it would not reach the tab on the seat back. California Camping had the same problem and I thought I could overcome it... spent a long time and lot of effort... then gave up! Check position of arm rest holes on seat sides and keep pulling cover down until these look OK. You can tuck the bottom of the cover under the trim near the seat adjuster and it looks really neat.
Negatives about seat covers - only downside is the heated seats arent as effective as they used to be, and it does slightly impede the folding of the headrests. I leave the headrests down at all times - we don't have any rear passengers! - and the fact they dont fold back completely, and the comfort mattress getting in their way too, means a fair bit of the boot is taken up in a slightly messy fashion with the headrests.
Positives - THEY LOOK REALLY GOOD! hopefully they will protect the beige seats from two muddy dogs and give us a chance of protecting the resale value! However they might look too good and we'll probably now put blankets over the covers over the seats...


 !!
!! 


