2nd AGM leisure battery in the back of the Grand California

I do not need to work or live in the van, but would like to spend 3 days maybe 4 “off grid”. Whilst a jackary or similar seems to be the simplest option, it’s not cheap, or the most efficient way to top up the 12v leisure battery. I have no need for 230v power and so the attractiveness of the 2nd leisure battery is it seems to be the perfect solution for my typical usage/needs, and wouldn’t cost more than £200ish if it could be added as described by our German colleague.
Then go for that option. Easily done.
 
Then go for that option. Easily done.
Is it?!!
The bit that’s got me in a spin is the cable size issue. If look at a 16mm2 battery cable it is rated for 110A, a 50mm2 cable is rated for 354A, and you are suggesting the need for a 42mm2 cable. I appreciate some voltage drop over distance but what am I missing here?
 
I do not need to work or live in the van, but would like to spend 3 days maybe 4 “off grid”. Whilst a jackary or similar seems to be the simplest option, it’s not cheap, or the most efficient way to top up the 12v leisure battery. I have no need for 230v power and so the attractiveness of the 2nd leisure battery is it seems to be the perfect solution for my typical usage/needs, and wouldn’t cost more than £200ish if it could be added as described by our German colleague.
Is it?!!
The bit that’s got me in a spin is the cable size issue. If look at a 16mm2 battery cable it is rated for 110A, a 50mm2 cable is rated for 354A, and you are suggesting the need for a 42mm2 cable. I appreciate some voltage drop over distance but what am I missing here?
See attached.
 

Attachments

  • Cable-Chart.pdf
    3.6 MB · Views: 69
See attached.
OK, thanks, so the issue simply is the length of run, anything over 2m and you should be stepping up the CSA of cable for this worst case current of 95A.
Thank you.
 
OK, thanks, so the issue simply is the length of run, anything over 2m and you should be stepping up the CSA of cable for this worst case current of 95A.
Thank you.
Before you do all that though. Purchase or borrow a similar battery and test like I mentioned a few posts ago, check if it’s everything you need.
 
Before you do all that though. Purchase or borrow a similar battery and test like I mentioned a few posts ago, check if it’s everything you need.
Need to take delivery of my GC first, stuck in build at the moment :headbang "awaiting parts".
 
That’s a shame. Weather is fantastic now, looks set to be a great summer.
Yeah, sure it will be here soon……
So does your £6500 investment give you 100% self sufficiency with regards to electricity?
 
Yeah, sure it will be here soon……
So does your £6500 investment give you 100% self sufficiency with regards to electricity?
In terms of what I can power, yes! With the 2nd 200ah I’ll get 7 days.
 
That’s using 100% electric. If I use both gas and electric. If no idea how long I’ll get.
 
That’s using 100% electric. If I use both gas and electric. If no idea how long I’ll get.
Amazing. Look forward to seeing what you’ve done when you have time to share the installation you have done.
 
The concern for correct cable size is from a charging perspective, the alternator has the capacity to charge at 90ah + from a 180ah rating.

Ok that sounds like a sensible concern.

What I'm comparing the German board proposal with:

The VW Ocean has a near identical set up to that proposed, a battery at the front & a battery at the back connected by a similar sized cable it may be 1m shorter but not a huge difference in length. The rear battery has a 50amp fuse fitted to the +ve terminal. It has the same 180ah alternator.

My Conclusion:

The rear battery is never going to receive anywhere near 50 amps - if it was there wouldn't be a 50 amp fuse. If it was charging at anywhere near 50amps the battery would be destroyed very quickly. Therefore I think the 16mm2 cable should be adequate.

I need to accurately measure the length of the cable to check its capacity.
If the cable is 6m long I will put in a 35 amp cube fuse on the rear battery, that is less than the capacity of the cable but more than the recommended maximum charging rate for a AGM battery of that size. If that blows - I'll consider going up a cable size in conjunction with a bigger fuse.
 
Hi Folks,

I thought I’d update on our upgrade as we’re on day 3 of proveout in the Alps and I’m pretty happy so far. Before I provide the details it’s worth saying that if I was competent enough to do what @T3Z-GB has done, I would, but I’m not, and all the installers I spoke to were reluctant to touch the van based on warranty and not knowing it. So the upgrade I’ve done is relatively simple, it’s not cheap, and I imagine people might argue that I’m risking the warranty (but AFAIC it’s worth it). My wife and I work from the van on 130W laptops and the kids are tablet addicts and it looks like we can survive at least 4 days off grid which is what we’ve been targeting (maybe more but we haven’t got that far). I spent a fair amount of time working with Solbian to try and add additional solar to the roof, but I have the satellite dish and frankly it’s a super expensive way for relatively modest increase in capability so I haven’t gone that route (yet). So…

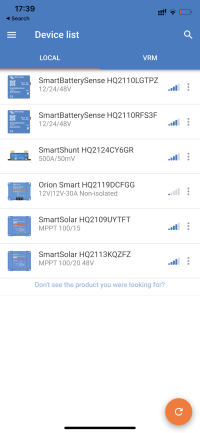
Upgrade was as follows… everything is Victron, because of seamless networking and configuration via iPhone app:

1) 2 x 11Kg Gaslow cylinders with the Wave / Dimes Bluetooth monitors - awesome! Love gas for cooking, heating and hot water.
2) removed votronic solar controller and installed a Victron one.
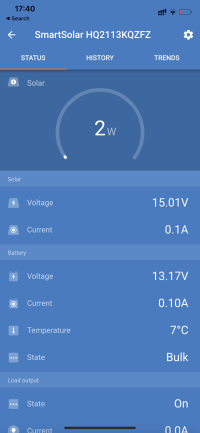
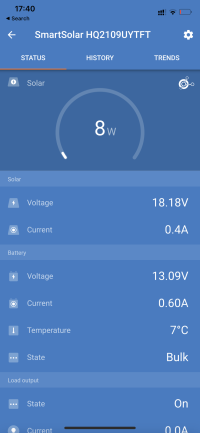
3) Addred a Victron smart battery sense to the 94Ah leisure battery - works in conjunction with my OEM 105W solar panel and Victron controller in 2).
4) wired in an eco flow delta max and transfer switch - this provides the inverted 240 volt system - I avoid charging the leisure batteries from this and so far have relied on solar or car charger input port (bouncing off leisure batteries plus solar) - IMHO it’s awesome.
5) upgraded the isolator switch as above to support a second battery.
6) added a Victron dc dc charger
7) added a Victron 170ah AGM deep cycle battery as the 2nd AGM battery. @andyinluton has pointed out I should go straight to lithium - he’s probably right, but I already had the battery and I was unsure of the effect of a lithium battery within the charging system I’ve rigged - OEM trickle charger, Victron dc-dc charger, solar controllers
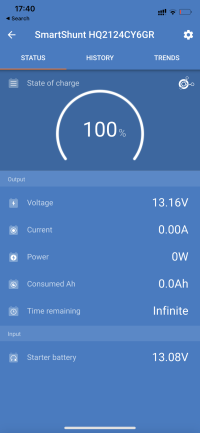
8) added a Victron smart battery sense to this second leisure battery and also a Victron smart battery shunt to this.
9) leave the van supply on setting ‘2’ connected to the 170ah battery (never 1+2 because they’re different sizes, chemistries, etc).
8) installed a second Victron smart solar charger to this second AGM leisure battery and connected a solar extension lead.
9) Added an ecoflow 160w portable panel that can power the ecoflow or the extension lead to the second leisure battery.

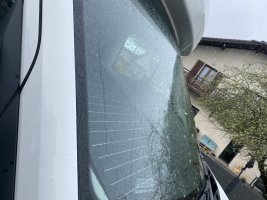
It’s snowing here and the OEM 105W panel is iced up, but the ecoflow panel fits internally within the van and the windscreen and so an unintended benefit is I’m still recharging

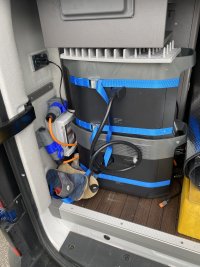
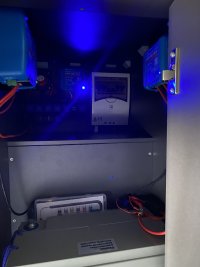
Photos below - eco flow installation; dc-dc charger and 2 x Victron solar chargers (smart shunt and battery sense are hidden behind the panel) And second AGM battery; ecoflow 160w panels in windscreen.

Happy to answer any questions and will continue to update on upgrade and pros and cons as I experience them!

Kr

Andy

D9A30FF5-0E77-4060-A5CD-FE650C4E3EBD.jpeg

0C1E216B-A531-4586-9C82-9E564045AC5B.jpeg

2C60342D-D8B3-4B61-9038-5C01D85BBF97.jpeg

6F15E8DB-66CA-4E40-A11B-2406DD2B0EC1.png

BDD38F5B-20B3-45B5-80F4-9A15C4C4F384.png

C053A378-A5C9-40CB-8CAC-789A705DCD05.png

AA8AA7C1-E153-4D4D-81B9-205511FFD834.png
 
Hi Andy,

looks really good to me
Hi Folks,

I thought I’d update on our upgrade as we’re on day 3 of proveout in the Alps and I’m pretty happy so far. Before I provide the details it’s worth saying that if I was competent enough to do what @T3Z-GB has done, I would, but I’m not, and all the installers I spoke to were reluctant to touch the van based on warranty and not knowing it. So the upgrade I’ve done is relatively simple, it’s not cheap, and I imagine people might argue that I’m risking the warranty (but AFAIC it’s worth it). My wife and I work from the van on 130W laptops and the kids are tablet addicts and it looks like we can survive at least 4 days off grid which is what we’ve been targeting (maybe more but we haven’t got that far). I spent a fair amount of time working with Solbian to try and add additional solar to the roof, but I have the satellite dish and frankly it’s a super expensive way for relatively modest increase in capability so I haven’t gone that route (yet). So…

Upgrade was as follows… everything is Victron, because of seamless networking and configuration via iPhone app:

1) 2 x 11Kg Gaslow cylinders with the Wave / Dimes Bluetooth monitors - awesome! Love gas for cooking, heating and hot water.
2) removed votronic solar controller and installed a Victron one.
3) Addred a Victron smart battery sense to the 94Ah leisure battery - works in conjunction with my OEM 105W solar panel and Victron controller in 2).
4) wired in an eco flow delta max and transfer switch - this provides the inverted 240 volt system - I avoid charging the leisure batteries from this and so far have relied on solar or car charger input port (bouncing off leisure batteries plus solar) - IMHO it’s awesome.
5) upgraded the isolator switch as above to support a second battery.
6) added a Victron dc dc charger
7) added a Victron 170ah AGM deep cycle battery as the 2nd AGM battery. @andyinluton has pointed out I should go straight to lithium - he’s probably right, but I already had the battery and I was unsure of the effect of a lithium battery within the charging system I’ve rigged - OEM trickle charger, Victron dc-dc charger, solar controllers
8) added a Victron smart battery sense to this second leisure battery and also a Victron smart battery shunt to this.
9) leave the van supply on setting ‘2’ connected to the 170ah battery (never 1+2 because they’re different sizes, chemistries, etc).
8) installed a second Victron smart solar charger to this second AGM leisure battery and connected a solar extension lead.
9) Added an ecoflow 160w portable panel that can power the ecoflow or the extension lead to the second leisure battery.

It’s snowing here and the OEM 105W panel is iced up, but the ecoflow panel fits internally within the van and the windscreen and so an unintended benefit is I’m still recharging

Photos below - eco flow installation; dc-dc charger and 2 x Victron solar chargers (smart shunt and battery sense are hidden behind the panel) And second AGM battery; ecoflow 160w panels in windscreen.

Happy to answer any questions and will continue to update on upgrade and pros and cons as I experience them!

Kr

Andy

View attachment 91236

View attachment 91237

View attachment 91238
Hi Andy,

looks good to me annoying though the amount of effort and money we have to spend to do what should have been done or at least optioned from VW.

How are you getting along with the solar panel, I was always concerned if or how much sun you lose through the windscreen? I guess you’ll only know the answer to that when the sun comes out.

Enjoy the setup and keep us updated. By the way like the flip flops in the pic ;)
 
Hi Andy,

looks really good to me

Hi Andy,

looks good to me annoying though the amount of effort and money we have to spend to do what should have been done or at least optioned from VW.

How are you getting along with the solar panel, I was always concerned if or how much sun you lose through the windscreen? I guess you’ll only know the answer to that when the sun comes out.

Enjoy the setup and keep us updated. By the way like the flip flops in the pic ;)
Yeah, VW really missed a trick. It’s both amazing and frustrating. I have learnt the hard way that more important than electricity and water, it’s important to litter flip flops around the van… the 45kg menace below is the reason why…

2C631949-C31A-4943-9E29-E1EA4A7C9888.jpeg
 
Hi Andy,

looks really good to me

Hi Andy,

looks good to me annoying though the amount of effort and money we have to spend to do what should have been done or at least optioned from VW.

How are you getting along with the solar panel, I was always concerned if or how much sun you lose through the windscreen? I guess you’ll only know the answer to that when the sun comes out.

Enjoy the setup and keep us updated. By the way like the flip flops in the pic ;)
Absolutely, the loss through the windscreen in combination with angle is significant and easily 50%. But it’s been sufficient to recharge us while we’re away from the van and when we’re in it it goes nicely externally on the windscreen or wherever is required to track the sun. Clearly not as convenient as an installation on the roof, but I’m happy atm.
 
Thanks for sharing @andy_c interesting setup. I have questions :Iamsorry
Trying to understand what is connected to what, and what does what.

So you’ve replaced the main isolation switch with an”1-2-both-off” switch, This is where the 2nd battery is wired into, enabling you to use either original battery OR new. That I understand.
The OEM factory fitted solar panel is connected to the original leisure battery only? Or can you divert/link this to your new 2nd battery? My understanding is with the isolator switch off the OEM solar would still charge the original leisure battery.
The additional 174ah AGM battery gets its charge from what? You mention OEM trickle charger and victron dc-dc, Does this 2nd battery somehow get connected to the alternator?

Just curious to understand this as if you are not using the delta’s to charge the Leisure batteries, and if you have the isolation switch on the new 2nd battery (so original battery is only doing some basic lights?) what is charging the new battery, or is it’s capacity enough to last your 4 days static with a weak solar trickle charge?
Thanks, and sorry for the questions, just trying to get my head around how this all works! Very interesting, regretting only studying Mechanical Engineering now!
 
No worries @Mr T, all sensible questions!

Yes, the isolator switch allows me to switch between the two batteries and the original leisure battery is now a backup. But it’s a bit more than that…

Solar controller 1 is on the original leisure battery. Solar controller 2 is on the additional leisure battery.

My original design concept included switches to allow me to switch the solar controllers between the batteries as you suggest… However, I have avoided doing this to date and while I may still have to I don’t currently expect to… thanks to the dc-dc charger - it’s this that is the bridge to the entire charging system!

The original leisure battery provides the input to the dc dc charger. In this configuration the smart alternator, trickle charger and OEM solar panel charge the original leisure battery and then this feeds the dc dc charger that charges the second leisure battery alongside the second solar controller. So I’m largely “bouncing” off of the original leisure battery. Inefficient and not ideal maybe. But the simplest mods that leave the original system in place and pleasingly I haven’t fried anything yet nor blown the I’ve added (see Victron ref design fo dc dc charger).

Does that all make sense and answer your questions?

Kr

Andy
“…nor blown the fuses I’ve added…”
 
No worries @Mr T, all sensible questions!

Yes, the isolator switch allows me to switch between the two batteries and the original leisure battery is now a backup. But it’s a bit more than that…

Solar controller 1 is on the original leisure battery. Solar controller 2 is on the additional leisure battery.

My original design concept included switches to allow me to switch the solar controllers between the batteries as you suggest… However, I have avoided doing this to date and while I may still have to I don’t currently expect to… thanks to the dc-dc charger - it’s this that is the bridge to the entire charging system!

The original leisure battery provides the input to the dc dc charger. In this configuration the smart alternator, trickle charger and OEM solar panel charge the original leisure battery and then this feeds the dc dc charger that charges the second leisure battery alongside the second solar controller. So I’m largely “bouncing” off of the original leisure battery. Inefficient and not ideal maybe. But the simplest mods that leave the original system in place and pleasingly I haven’t fried anything yet nor blown the I’ve added (see Victron ref design fo dc dc charger).

Does that all make sense and answer your questions?

Kr

Andy
Thanks Andy, that makes a bit more sense, starting to visualise the wiring diagram in my head now! So have you run any additional cable from front to back for the dc-dc charging, (where have you located the dc-dc charger?) as this area was topic for conversation earlier, and if so how easy was this to sensibly locate/hide away?
Thanks for your patience and input.
 
Last edited:
Thanks Andy, that makes a bit more sense, starting to visualise the wiring diagram in my head now! So have you run any additional cable from front to back for the dc-dc charging, (where have you located the dc-dc charger?) as this area was topic for conversation earlier, and if so how easy was this to sensibly locate/hide away?
Thanks for your patience and input.
The maximum cable size an Orion converter can take it 16mm2 over that distance of 5-6m and 30ah is no problem.
 
The maximum cable size an Orion converter can take it 16mm2 over that distance of 5-6m and 30ah is no problem.
Thanks, I assume it is located in the electrical cupboard looking at the 2nd photo Andy has put up.
 
Yes, the dc dc charger is in the electrical cupboard - it’s in the photo on front left. The other two blue units, centre rear and front right are the solar controllers.

I’ve run no additional cable. I’ve rationalised as follows: If I ever have to use the original leisure battery, I’ll turn off the dc dc charger. But I really don’t expect to, so the 170ah battery in position 2 will always be selected and supplying the dc electrical system. Thus the original supply cabling to the isolator is now only used to supply the dc dc charger.
Brilliant, that’s as I imagined it. Thanks, plenty for me to think about now. This could be a sensible way to get a LiFePO4 battery in the rear as the “main” leisure battery.
Thanks very much! Love this community :cheers
 

VW California Club

Back
Top