Buy all your VW California Accessories at the Club Shop Visit Shop

As promised: Changing the electrohydraulic roof pump!

I put the sliding frame back to close the blind. I did drive around for a couple of weeks without the headlining or trims.
It might be that the sliding frame is glued to the front spoiler.
Try to tap the frame upwards from the middle (they are 2 parts) after warming the frame with a hairdryer.
Put something firm but thin between the headlining and the frame and give it a good slap with a hammer or something to break the glue (without damaging anything, because the frame must be made of gold if you see the price).
It will not be that easy, but it will get loose one time.

THX I will try one more time because for sure I have to add oil to the system. Headlining is expensive as well? I almost destroyed today because I was so angry after hours of fighting :)


Another question is how can I check what makes a problem (pump or left ram where is some strange coating and the ram head)?
 
What exactly is your problem?
On mine, it was excessive sagging on the near side (left?) of the roof. I replaced the left ram by a new one. This didn't help. You couldn't see anything from the outside of the ram.
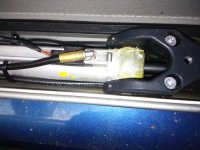
The right ram looked like this:
IMG_20151125_120845.jpg
Yellow crystallisation on the head. Strange, as the hydraulic oil is pink. Maybe it's a reaction. But the right side is ok.
As the changing of the ram didn't help, and I saw no external leakage, I replaced the pump in the end. This solved the problem. And now I have changed the right ram by the "old" left ram. Now everything works ok, so it was certainly not the ram leaking.

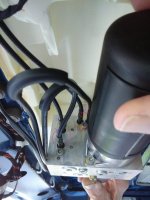
What you could do is swap the left hydraulic lines by the right ones.
IMG_20200201_154707.jpg
If the sagging (if that is your problem too) switches to the other side, then it's the valve block that has an internal leakage.
If your oil reservoir is empty (or too low) and there has been no work done in the area of the hydraulics, then you must have an external leak. But that should be visible between the rams on the roof, and the pump under the roof.
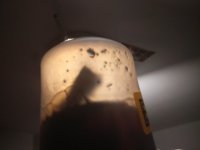
If you see this:
IMG_20200204_215117.jpg
Then you must have a decomposed rubber seal that is making the internal leakage.

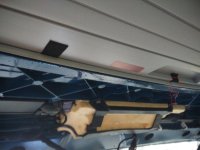
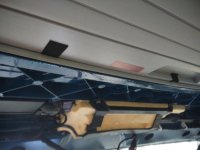
The frame is divided in this place:
IMG_20200114_125016.jpg
There you should be able to lift both sides up, then alongside to the back, and lift it out of the rest of the plastic linings. Otherwise you should have to get those trims off too, but it isn't necessary if you can release them from the front.

Good luck.
 
That is great answer thx a lot.

Yes my problem is sagging on right side. Therefore (after your post) I disassembled headlining and I discover low level of oil.
Previous owner did something with car probably and I have no idea if low oil level is effect of his action but I cannot see any leakage.

What should I do before switching pipes? Should I release pressure from the system? If you how to do it? Is there any need for bleeding after this operation? Or bleeding is automatic?

Do you have 50ml of this oil maybe?? :) VW provide 1l only as I know.
 
I dropped my roof on wooden blocks to support the roof.
But you could leave your roof down. I would just release the pressure by turning the copper coloured screw open.

No I don't have oil. Apart from in the hydraulic system of course.
Yes, VW only sells the oil per liter, and here in Belgium it's about €120 per liter.
I did see a picture from @westfalia from a bottle, maybe he has some left? He lives in Germany, so it's closer to Poland.

The bleedin will be done automatically when opening and closing the roof. Just open the top screw on the reservoir while doing that. Don't forget to close it back for normal operation. And first of all, close the bottom screw too!
 
No I have not at the moment.
If I remember it, I will give it a go this week sometime.
Keep tagging me if you don't have it by the end of the week.
Unless someone else has pictures of it, or is able to get pictures sooner?
 
Anyone have old damged pump? I can try to repare it with local workshop. My company is responsible for many pump, GT, ST and blower design and we have experience with this type of equipment.
 
My pump is should be in repair.
But due to the circumstances it will take a bit longer till I will have it back.
 
One more question for confirmation just.

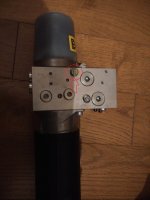
1) Is the bolt on the picture for pressure release?
2) Do I need to unscrew the bolt completely or partially?
3) How I will recognize if pressure is released?
4) Should I expect some leakage for the bolt?

IMG_3568-2.jpeg
 
One more question for confirmation just.

1) Is the bolt on the picture for pressure release?
2) Do I need to unscrew the bolt completely or partially?
3) How I will recognize if pressure is released?
4) Should I expect some leakage for the bolt?

View attachment 60322
I think you’ll find the pressure release screw is the slotted cheese head screw to the right of your arrow.
 
Just screw it a few turns and see what happens. It should not be leaking I guess.
 
OK I
I waited a little bit for the oil and spent a lot of time looking for the cause of the roof sagging and testing.
What I did.
I released the pressure from the system, unscrewed the filler plug and added 30ml of oil. The fluid level was exactly between min and max.
I lifted the roof several times and a strange hissing from the pump as the air stopped. The roof does not sag down even on hot days anymore. There is no leakage either. The small amount of liquid was probably caused by interference of the previous owner.
It looks like everything works properly. But one thing worries me.

I started checking the oil level and it looks like this:
- the roof has been closed for some time - the oil level in the middle
- open roof - min
- roof closed and after closing checked oil level - a little above the maximum
- second opening and closing (both closures at short notice - oil almost under filler plug
- if I wait, there's oil level in the middle or a little lower.

The question is this:
- what can different oil levels be caused by?
- Have any of you done these tests and checked the oil level?
- Is there any special way to vent the system?
- How do you start this system with a new pump and new cylinders?
 
One more info
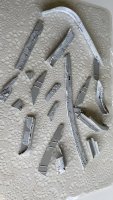
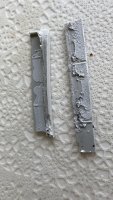
Be careful with what you stick the hatch frame to the roof.
The previous owner glued it to some glue or silicone. The effect as in the picture and lost 5 hours to pull it out of the slot and 130EUR

IMG_3774.jpeg IMG_3775.jpeg
 
One more question for confirmation just.

1) Is the bolt on the picture for pressure release?
2) Do I need to unscrew the bolt completely or partially?
3) How I will recognize if pressure is released?
4) Should I expect some leakage for the bolt?

View attachment 60322
How did you get to the front two black screws that hold the frame in? Many thanks
 
Just screw it a few turns and see what happens. It should not be leaking I guess.
Hi TripleBee Can you help with bleeding of the system. How you did this. I have constantly different oil level for some reason.
 
@westfalia , indeed, my lockdown in Vendôme, France is over.

@szczota81
I just opened and closed the roof a few times to see if the roof opened and closed good enough. Suddenly the roof stopped working because of the electro motor overheating. This is normal.
After some waiting time, the roof worked again, and it still works good for now, apart from the wonky lowering.

I tested it the last 2 weeks in very sunny weather, and for me it's ok. Just stop before complete close, even the roof by hand (gently pushing or pulling the left or right side of the roof at the from until it is even again, and then fully closing.
 
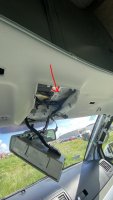
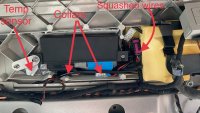
Does anyone (or another forum thread) have more photos of the roof controller installed with the roof lining removed?
Our controller and wiring don't fit as neatly as I'd like so I'm keen to see how the original installation looks. Our wiring was replaced in the UK two years ago and the new wiring wasn't installed very carefully.
Given that our fault is apparently a wiring / earth fault, I'm not very happy with how the wires are squashed in and bent awkwardly around the controller.
Thanks.
This is the best shot I have. Nothing much to see.
Show me a picture of your mess and maybe I can remember how it's fit?

IMG_20200114_125016.jpg
 
Photo below.
This is after another repeat attempt to arrange the wires and hoses comfortably around the control box.
I have a few concerns with the wiring:
1. Those big connectors are weird - I'd love to trim the plastic collars from both connectors because they dont seem to help protect the cables - they just take up more of the space that the cables and hoses need so the cables and hoses have to bend up or down out of the way.
2. The thin single wire that comes out of the blue plug was bent awkwardly and it's so fine that it seems fragile. I've tried to locate it above the black and pink/purple connector so it's held in place without excessive bending.
3. That pink connector and the other one that is squashed up with it are more bent and squashed than I would prefer, given I know this system is got some intermittent wiring fault.
I've put a bluetooth temperature logger in the space with the controller so I can monitor the temperature for a while. It got up to 54C this afternoon in the sun even though it's only about 25-30C outside. I'm amazed that these things dont stop working as soon as they go out in a Mediterranean summer! Especially with the dark roof I can see in your photos, TripleBee.
Anyway, I'm trying not to get my hopes up yet but the controller has not shown a fault since I added 2 white "air-cell" padded envelopes between the controller and the metal roof. I've even put a temporary cardboard ceiling under the controller, so it should be as hot as it gets with the ceiling installed. Fingers crossed!

C5674874-BE1B-4F91-92D2-2B932277A25E.jpeg
 
Interestingly, the diagram in the self help document on the dutch Poptop website shows the controller with the plugs on the other side, as if mine is back to front, but I dont think mine would fit the other way around.

I saw a comment about adding another switch to control the hydraulic pump, but haven't been able to find more detail on that option.
Does anyone know if it's safe to add another 12V supply onto the pump power supply without disconnecting the controller?
My multi-meter confirmed that the voltage to the pump is simply reversed depending on whether the roof is opening or closing. So I *could* duplicate that with a simple momentary rocker switch, but I'd be worried about killing the controller if I just wired that switch in parallel. I don't suppose anyone here has tried this?
Of course I'm hoping my envelope-insulation has fixed my faults so I won't need to add another switch, but I figured I'd start researching just in case...
 
Back
Top