Smiffy4bikes
VIP Member
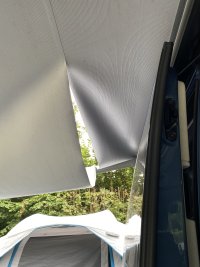
On holiday in Dorset and we suffered the almost inevitable seam-split on our 2017 Cali Ocean. But, we've fixed it ourselves
We quickly realised that the awning can't be rewound back into the cassette without the whole thing splitting apart because the tension has been compromised. No choice but to try and either do a quick repair job, or fix it properly. A quick look the forum gave us some ideas about how we could remove the awning fabric on it's
own to be able to repair it.
So, the next morning we got the bus into Swanage, and paid a visit to the very well stocked old-school hardware shop on the High St!
We bought some Gorilla Tape, and Gorilla super-glue. We always carry tools on the van so that wasn't an issue, but actually all you need is a decent Phillips screwdriver. They only had black tape but you can get it in silver. As it was we had some silver 'gaffer tape' in the van but it would not have been strong enough for this repair. Gorilla Tape is stupidly strong, and that's what you need to stop it happening again.
I'd advise using a small pot to put all the screws in, and take lots of photos along the way in case you forget where everything goes. It's not technically difficult, but an extra pair of hands is useful especially if like me you're not the tallest!
The first thing to do is use the winder to release the tension on the awning fabric so you've got some wiggle room for when you slide it out. Leave the legs standing as you would normally. I'd also advise using some guy ropes on the legs as once the fabric is removed the framework becomes wobbly as it's lost stability. The last thing you need is the framework or legs getting damaged by a gust of wind!
You then need to remove the front end cap on the cassette, and both end caps on the awning front.
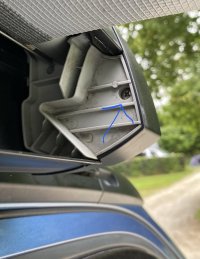
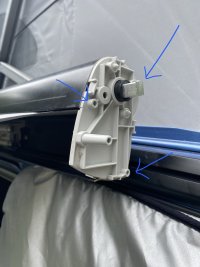
One screw to remove the outer cap. You might need to give the cap a gentle tap to remove it. Then there are three screws on the grey cap (already removed in the second photo) Pull the grey cap off and the awning roller will then be free. Don't move it yet! Keep an eye on the small black plastic washer that is on the square metal rod, it isn't fixed so might fall off. There is another identical black washer on the other end of the rod which you'll see when the roller is fully removed.
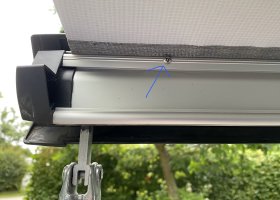
Next job, remove the two tiny screws that hold the awning beading in place on the front rail. There is one screw at each end.
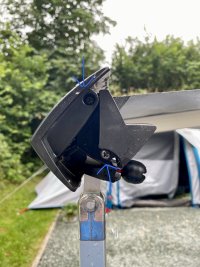
Then remove the end caps on the awning front. Each cap is held in by two screws, and will come apart in two pieces when the screws are removed. Technically you only really need to remove the front end one, but I removed both of them.
Now the awning fabric can be removed from the van, all as one. The beading on the front edge will slide out. The metal roller holding the beading in the cassette will literally pull out. Make sure you pull both sides out together as much as you can, and watch the front legs as they will want to go the same way!
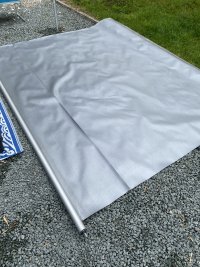
So now the awning fabric is off the van and can be repaired. You'll notice the small black plastic washer on the winder-end of the awning roller. Don't lose it!
This is also a good opportunity now the fabric is off to give the fabric, awning cassette, rails etc a good clean. You can access the areas you wouldn't be able to with the fabric in place. It goes without saying to make sure the seam itself is super clean and dry before you start to apply glue and tape.
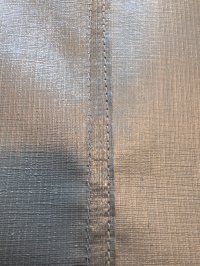
I took the belt and braces approach and super-glued the seam back in place, and then used the black gorilla tape along the entire length of the seam, on both sides.
As we already had a roll of silver gaffer tape with us (which was super thin) I decided to put that over the black gorilla tape, purely for aesthetic reasons. I'm glad I did as the repair is much less noticeable now it's back on the van. I was a bit concerned about the overall thickness of the repair, but it's been fine. No problems rolling it in and out when you use the awning.
Next job is to put it all back
Essentially it's the reverse of the removal. But, a couple of points to note.
Push the roller back into the cassette a bit at a time, making sure you do the same with the beading at the front end. I gave the beading channel a wipe over with some Wd40 on a skinny screwdriver, so it made it easier to push the beading through. Keep it as square as you can when refitting it, and watch the awning legs as they will lean forward as you push the bead through. When you screw the two tiny screws back into the beading rail on the front, you should be able to see where the original holes were, so that way you know its gone back exactly where it was.
When you slide the roller back in the cassette you will need to align the square metal roller correctly at the winder end. As this is the winder-end the square 'female' end rotates so you will probably need to use the winder to align the hole with the end of the square rod so that it will slide in fully. This is a bit tricky as it's difficult to see, so a small torch may be useful! You'll also need to ensure the beading channel lines up with the cassette end when you slide it back in, see photo below. Once it's flush at the front end of the cassette then it's in the right place. Replace the cassette end caps and you're good to go.
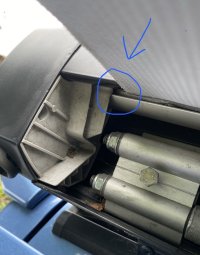
All done
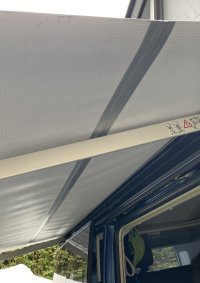
Hopefully this will help anyone who suffers the same fate! Take your time, have a nice cuppa on the go, and don't be scared!


