DIY solar installation

  • Thread starter Almost bought a california
  • Start date
Almost bought a california

Almost bought a california

Messages
34
Location
Kettering
Vehicle
T6.1 Ocean 150
Just finished installing a 100W solar panel and thought there might be some interest in a DIY option - I did see the post by MCEv (Moxie) asking for experience of the Solar Campers Solution but didn't want to hijack his post as the DIY route won't be for everyone and by all accounts the Solar Campers Solution is very good if you want a ready to fit kit.
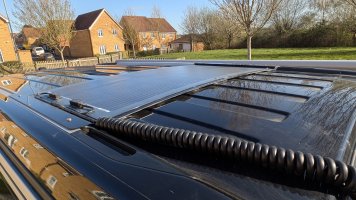
Total price was just under £300 so not cheap! I loved the Califaktur solar module and the AMAG solution but the prices were way out of my reach and so got a local sheet metal firm to fold a mounting panel for me. I managed to find a suitable curly cable for under £20 but after ordering the solar panel and the controller I discovered that the company only had orange cables in stock so I had to get a one off made at great expense by a super helpful company in Ireland (£61 after carriage and taxes!)
PXL_20250409_155540629.jpg
I order to keep the roof neat I had to chop the plugs off the solar panel - I did test it first but needless to say I suspect this will negate any warranty LOL
PXL_20250409_155935300.NIGHT.jpg
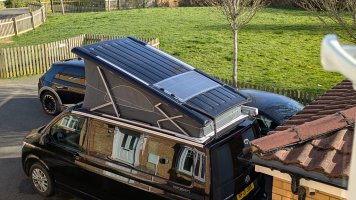
I opted of a 100W Renogy panel and it was giving 50W here at 5:00 on an April evening so happy with that!
PXL_20250409_155111108.jpg
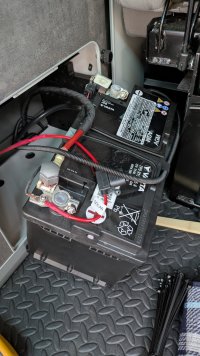
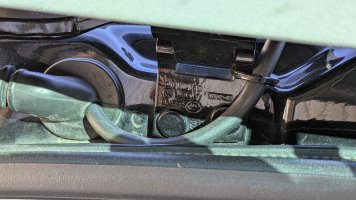
I expected the cable route would be straight forward - it was in the end but the back end is double skinned and so it didn't end up taking the expected route.
PXL_20250409_155224253.jpg

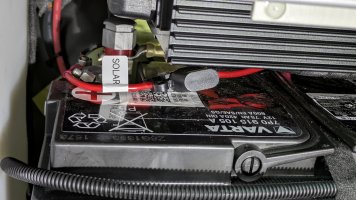
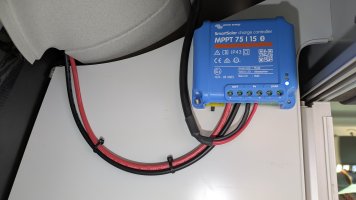
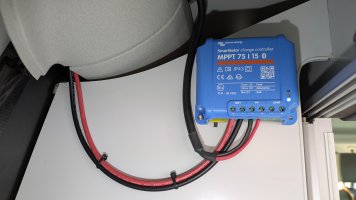
I opted for the 75v, 15W controller incase I fit more panel(s). still overkill I suspect but it's a very nice bit of kit and has an App to monitor and log the solar and battery parameters.

Happy to share the panel mount drawing if anyone else fancies having a go ;-)
 
I think this shows that while Rogers kit and service are very dependable there are better looking solutions out there. I much prefer this low profile “factory look” frame to the tig welded home made aluminium one that comes with SCS kits. A little innovation would be great in the look and feel. I’ve seen these kits in Germany but they have a hefty tag to match. Be nice to clip them on and off easier too to clean under them. Mine gets pretty manky!
 
Hi - I am looking at installing 200W and very impressed by this. Could you give a breakdown of prices and suppliers please as I am looking to do something similar.
 
I have done the same, lovely job you have done, love the bracket. I have 2 x 100w. There is a guy on eBay that makes the curly cables for about £25 plus postage
 
Hi - I am looking at installing 200W and very impressed by this. Could you give a breakdown of prices and suppliers please as I am looking to do something similar.
Hi DGB99 the price will vary a bit depending on exactly what you buy and how much of the work you do for yourself but here's what it cost me;
- Renogy 100W Flexible Solar Panel - £89 from Amazon
- Victron Energy SmartSolar MPPT 75V 15 amp 12/24-Volt Solar Charge Controller (Bluetooth) - £53 from Amazon
- Curly cable (4 * 1.5mm2, 500mm coil, 300/800mm tails with PUR outer sheath) - £61 from Flexform Cable Engineering / E.J. Harper & Co. although you might also want to check out the eBay link above from Carl______________
- 3mm thick Aluminium panel approx 1260 * 622mm with bends to drawing - £61.60 from HB Humphries and Co ltd (Sheet metal fabricators, Kettering)
- Sikaflex-522 adhesive sealant (also available in white so check your getting the colour you need) - £13 from Amazon
- 12 AWG Inline Fuse Holder (30A) fitted at the battery positive to protect the cable in the event of a short (not to protect the controller!) - £5 (pair) from Amazon or eBay
- Paint - £5.99 from Toolstation
Total £289
In addition to this I also had / used;
- 4mm cable between battery and MPPT controller
- Heat shrink
- Cable crimps, ferrules and eyes
- Tyraps
- M5 stainless button heads to align and mechanically fix the solar panel
- M6 stainless button heads to fix the mount to the roof
- M6 tee slot nuts (I made these to suit)
-A couple of counter sunk SCH screws and nuts to mount the MPPT controller

Hope this helps, I've attached the drawing I used
 

Attachments

  • Solar panel mount drawing.pdf
    253.4 KB · Views: 44
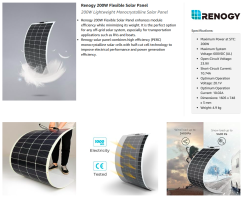
This is brilliant, thank you so much for your help! One further question. I presume that you used this 100W Renogy panel from Amazon. They offer a 200W model with the same dimensions (double the price of course) - any reason not to use this rather than 2 x 100W?

 
Last edited:
This is brilliant, thank you so much for your help! One further question. I presume that you used this 100W Renogy panel from Amazon. They offer a 200W model with the same dimensions (double the price of course) - any reason not to use this rather than 2 x 100W?

I think the brief description at the top of the page is wrong, if you scroll down she's a whopper!

1744283620780.png

There are a lot of the thinner flexible panels out there, they all seem to claim 22-23% efficiency but if you compare the output of the panel by its area they vary by a lot! My only conclusion was that the conditions (intensity of the light source) must not be consistent and that price / area (for a given efficiency) might be a better index of value. You might want to compare the construction as well as some panels may give significantly better performance when partially shaded.

I'll post some data from the controller when I have something useful but in the meantime there is probably someone here on the forum with some more expert advice for you.
 
Well
I think the brief description at the top of the page is wrong, if you scroll down she's a whopper!

View attachment 134528

There are a lot of the thinner flexible panels out there, they all seem to claim 22-23% efficiency but if you compare the output of the panel by its area they vary by a lot! My only conclusion was that the conditions (intensity of the light source) must not be consistent and that price / area (for a given efficiency) might be a better index of value. You might want to compare the construction as well as some panels may give significantly better performance when partially shaded.

I'll post some data from the controller when I have something useful but in the meantime there is probably someone here on the forum with some more expert advice for you.
Well spotted! Did you put any foam type insulation under the Al sheet to protect the roof, either just where fixed or under the entire Al sheet?
 
Hi - can you identify which cable you used? Thanks!
I used a 2.5mm 3core and earth, however, in theory a 1.5mm would be large enough even with two 100w panels, and you only need 2 cores,

I am going to install a switch to be able to either select connecting the panels in parallel or series for when my van is parked with one panel in the shade
 
Well

Well spotted! Did you put any foam type insulation under the Al sheet to protect the roof, either just where fixed or under the entire Al sheet?
I used 30mm wide strips of 3mm thick EPDM rubber (I used solid rubber and not foam as I assumed foam would go flat with time), one down the centre of each ridge - add £8.50 for 5m.
I used strips from front to back to protect the roof and maintain a small gap for a little cooling.
Used some of the Sikaflex to fix the strips to the mounting plate as the adhesive backed rubber was more expensive and I wasn't sure how well it would stand up to the heat generated from the panel.
 
I wouldnt bother with the foam, it collects dirt, tree dust, pollen etc, so leaves a light ‘tide’ mark on the roof when panels are removed (which can removed with T-cut or similar).

Think it’s better to leave the gap open. Have sold our van but used to remove panels once a year to clean the roof properly.
 
I used a 2.5mm 3core and earth, however, in theory a 1.5mm would be large enough even with two 100w panels, and you only need 2 cores,

I am going to install a switch to be able to either select connecting the panels in parallel or series for when my van is parked with one panel in the shade
Thanks again - what did you use to connect the solar panel connectors to the curly cable?
 
For me, I soldered mine and wrapped them in heat shrink, if you prefer you can use the solar connectors MC4, I just found the connectors a tad bulky.
 
Just finished installing a 100W solar panel and thought there might be some interest in a DIY option - I did see the post by MCEv (Moxie) asking for experience of the Solar Campers Solution but didn't want to hijack his post as the DIY route won't be for everyone and by all accounts the Solar Campers Solution is very good if you want a ready to fit kit.
Total price was just under £300 so not cheap! I loved the Califaktur solar module and the AMAG solution but the prices were way out of my reach and so got a local sheet metal firm to fold a mounting panel for me. I managed to find a suitable curly cable for under £20 but after ordering the solar panel and the controller I discovered that the company only had orange cables in stock so I had to get a one off made at great expense by a super helpful company in Ireland (£61 after carriage and taxes!)

View attachment 134494
I order to keep the roof neat I had to chop the plugs off the solar panel - I did test it first but needless to say I suspect this will negate any warranty LOL

View attachment 134495
I opted of a 100W Renogy panel and it was giving 50W here at 5:00 on an April evening so happy with that!

View attachment 134496
I expected the cable route would be straight forward - it was in the end but the back end is double skinned and so it didn't end up taking the expected route.

View attachment 134497

I opted for the 75v, 15W controller incase I fit more panel(s). still overkill I suspect but it's a very nice bit of kit and has an App to monitor and log the solar and battery parameters.

Happy to share the panel mount drawing if anyone else fancies having a go ;-)
Hi - I am going to go down this route (although 300W so three panels). Can I ask a few (more) questions?
- I presume you used Sikaflex as well as bolts to attach the panels to the aluminium sheets? Did you use this all over the panel or just at the edges?
- I presume the sheets and panels curve away from the roof as you tighten the rail bolts (as shown in diagram); is this okay if you have already attached the panel to the Al sheet? What gap do you have between the AL sheet and the roof?
Thanks again - impressed with what you have done.
Hi DGB99

I used Sikaflex across the whole area of the solar panel as the primary fixing and carefully bent the ali mounting plate before bonding the solar panel or fixing to the roof. A bit of my reasoning and experience below;
- I formed (bent) the ali panel, bonded the solar panel and finished the wiring in the bench before fitting to the roof.
- It was very easy to put a smooth bend in the 3mm ali panel, I supported the 'horizontal' sides upside-down on wooden blocks and gently pressed down either side of the centre. The centre should be approx 10mm below the sides (with the panel upside-down!) for the correct curve for the roof.
- As stated I used Sikaflex 522 to bond the solar panel but I also used M5 button heads to locate the solar panel, I supported the ali panel the right way up with the correct curve (100mm above the horizontal sides) before positioning the solar panel and using this as the template for the mounting holes. I drilled (4.2mm) and tapped the ali plate M5 - this give almost 4 threads that is more than enough if you don't get too carried away when tightening the screws (I also used a dab of loctite on the threads).
- After radiusing the corners and drilling holes I ran over both sides of the ali panel with 120 grit on a palm sander to give the paint and the glue a key before washing with warm soapy water and a rub over with alcohol to degrease (I didn't paint under the solar panel and applied the Sikaflex directly to the aluminium).
- I used wiggly lines along the length of the ali panel being careful to space the glue so that when the solar panel was offered up to it there would be no trapped or sealed off air pockets. After fitting the solar panel and pressing it onto the mounting panel I sealed around the edge leaving a 25mm gap on each side. The thinking behind this was to ensure there were no 'trapped' or sealed air pockets that might expand when hot and cause the solar panel to bubble - I've no idea if this is correct or worth doing but I didn't think it could hurt!
- IMPORTANT, As I was doing this on the bench and not in situ I bonded the 2 panels together with the correct curve for the roof and left it to cure overnight. These parts are effectively laminated together and become very much stiffer as a single part and I think you might have problems if you bonded them flat - obviously if you do it on the roof it will be just right but I wanted to get the wiring done before mounting on the roof!
- None of the parts are heavy individually but I was surprised at the weight when all together with the curly cable, etc. Not huge but you will be lifting it at arms length over the roof so worth putting a blanket on the roof to protect it initially.
- I glued 30mm wide x 3mm thick rubber strips to the underside of the ali plate in line with the ribs on the roof to protect it but in the end these strips sat about 3mm clear of the centre of the roof (so about 6mm total clearance and more in the troughs), although not intended I was quite happy with this as it allows for a bit of cooling for the solar panel with is always a good thing.
- I used 4 x M6 button head screws and some home made tee nuts to fix the panel to the roof bars, this is very secure and the panel is extremely rigid with no flex, movement of wind noise.

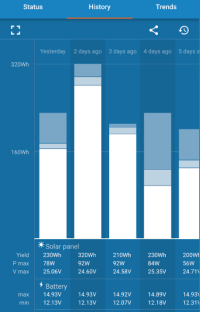
All in all I'm very happy with it and it works very well, just back for Whitby and the North York Moors (highly recommended), we had some good weather as you can see below but we were moving about and not just parked up so I'm guessing the panels may have contributed a bit more had the engine not been running (as I think this increases the battery voltage above the adaptive charge voltage of the solar controller).
92W in April 'up north' and so there's a good chance of seeing the claimed 100W in the summer ;-)

1745492651261.png
 
Many thanks for taking the trouble to write such a detailed answer. Ver much appreciated. Can I just confirm that:
'It was very easy to put a smooth bend in the 3mm ali panel, I supported the 'horizontal' sides upside-down on wooden blocks and gently pressed down either side of the centre. The centre should be approx 10mm below the sides (with the panel upside-down!) for the correct curve for the roof' - so you can use 10mm block either side to do this?
'As stated I used Sikaflex 522 to bond the solar panel but I also used M5 button heads to locate the solar panel, I supported the ali panel the right way up with the correct curve (100mm above the horizontal sides) '
Should this be 10mm rather than 100mm or have I misunderstood?

Thanks again for this - I am doing three panels (300W) so wish me luck!
Hi @DGB99

I actually used 2 short sections of wood about 35mm thick (but only because they were handy) which meant I could flex the ali mount slightly past the 10mm point allowing it to spring back so use whatever parallel spacers you have to hand. The sheet bent surprisingly easily which is probably which is why I overdid it a bit, I left it as I expected it to sag a bit when fitted to the roof - after laminating with the solar panel it didn't but I was quite happy with the slightly larger 6mm gap between the panel and the roof when fitted.
You understood perfectly, 100mm was a typo and it should have read 10mm, soz...
 
Back
Top