2into1
Née T4WFA. Now without Cali :(
Super Poster
Lifetime VIP Member
Cheers but I sensed there was a much cheaper route and I think it's been provided below.


Cheers but I sensed there was a much cheaper route and I think it's been provided below.
Perfect. The forum at its best. ThanksSo here’s the shopping list of parts required - all for under £10 from Screwfix:
1 x 100mm ducting
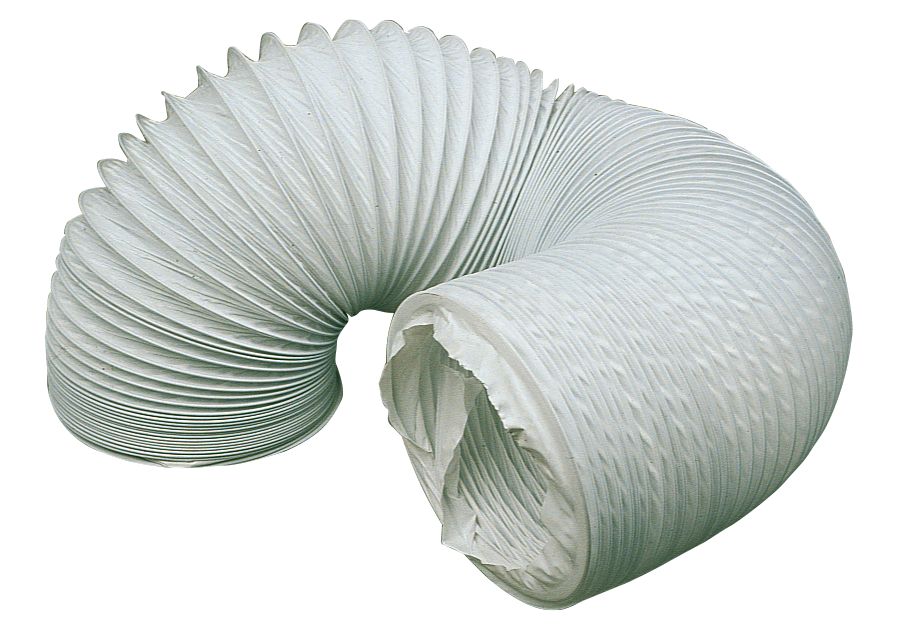
Manrose PVC Flexible Ducting Hose White 3m x 100mm - Screwfix
Order online at Screwfix.com. PVC. For use with 100mm round ducting systems. Suitable for commercial and domestic use. Fire retardant. FREE next day delivery available, free collection in 1 minute.www.screwfix.com
2 x round to rectangular connector 90 degrees elbow bend:
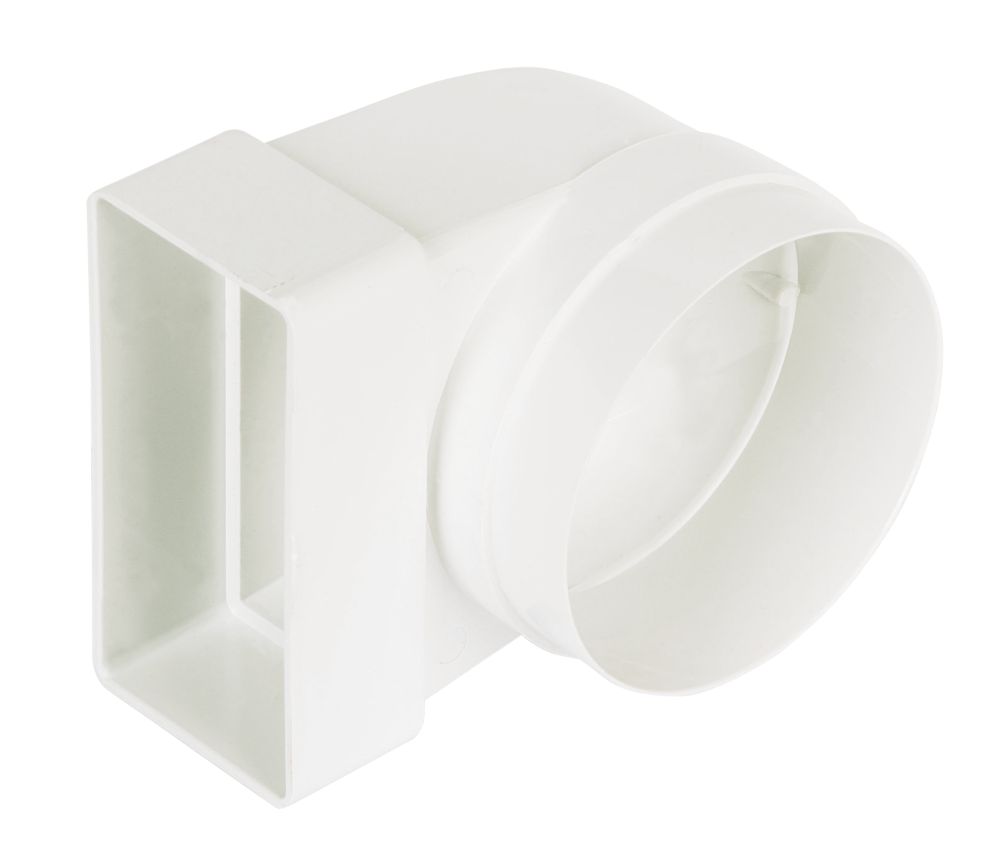
Manrose Round to Rectangular Connector Elbow 90° Bend Adaptor White 100mm - Screwfix
Order online at Screwfix.com. PVC. Adaptor for connecting 110 x 54mm flat channel ducting to 100mm round ducting at a 90° angle. Rectangular end measures 110 x 54mm and is suitable for use with flat channel ducting. Round pipe end measures 100mm diameter and is suitable for use with round...
Modify one of the elbow bends by cutting a section out of it, and file the edges for a nice finish, per following photos. Standard elbow (no cutting) on the left of each photo, modified elbow (after cutting) on right hand side of each photo.
Hopefully helpful
.View attachment 69815View attachment 69816View attachment 69817
Black would look good and you can get black pipe too.@Californication69 & @Camperfamily thanks for the quick and useful responses. Have ordered similair parts, since we don't have 'screwfix' over here, but I'm sure it'll turn out just fine. So thanks! I am considering spray painting the duct ends black to make the whole thing look a bit less DIY. Will post a photo in this thread as soon as the work is done.

I don't have the parts number but in this post you could see clearly all you need : https://vwcaliforniaclub.com/threads/internal-heater-altering-airflow-direction.35909/post-438919It would be great is...
1) someone, or the shop would start selling complete kits, ready to assemble and fit, or
2) we could get a shopping list of part numbers and supplier details, so we could buy the bits ourselves. This was done for the bike rack security and similar projects.
Here's hoping!
Maybe think of having the outlet lower. Heat rise, so you may be missing out on some of the heat.Thank you @Camperfamily
It was you who’s post I saw and created the same.
I did try to go big, 8 inch, but sent it all back and got 6 inch as it fits the night heater slot perfectly.
And yes @ThomasHJ you have to cut a slot out of the 6inch round to rectangular end.
just the bit that stops it going into the vents.
Mine works an absolute treat !
View attachment 69810
View attachment 69811
Tried it @Elly Swanson blows hot / warm on my head and I like a cold head and warm feet !Maybe think of having the outlet lower. Heat rise, so you may be missing out on some of the heat.


Are you doing this project as well @GrumpyGranddad? So far I have received the ducting and the clamps and I have spray painted the ducting ends black (couldnt get black ones). As soon as everything is dried I will start to put it together and take some photosBlack would look good and you can get black pipe too.View attachment 69837
Yes I am ThomasAre you doing this project as well @GrumpyGranddad? So far I have received the ducting and the clamps and I have spray painted the ducting ends black (couldnt get black ones). As soon as everything is dried I will start to put it together and take some photos
Something like this at the bottom to make it a slightly tighter fit. Maybe?Yes I am Thomas
Like you i have the black ducting and am spraying the end pieces black (spraying with a plastic primer first). Ducting end is a nice push fit into the grill at the bottom (although i might add rubber edging. Not sure how i’m going to attach at the top yet - exploring options.


Nice. How are you attaching the suction cup?This was my parts list. Prices include postage where applicable. Total £18.97, plus a couple of zip ties and an angle bracket from the shed.
Round suction cup (£2.20): https://www.ebay.co.uk/itm/200790859945
Top grille (£2.99): https://www.ebay.co.uk/itm/153989061894
Black ducting (£10.79): https://www.amazon.co.uk/dp/B07NWV6TRZ/?tag=unique09f-21
Bottom angle (£2.99): https://www.screwfix.com/p/manrose-...ector-elbow-90-bend-adaptor-white-100mm/96549
The top grille allows you to direct the angle of the flow, but means it still packs up nice and small when not in use:
View attachment 69926
And what size cup did you buy?Nice. How are you attaching the suction cup?

Something like this at the bottom to make it a slightly tighter fit. Maybe?
You can get black re-useable tie-wraps. Best of both worlds!Yes, good idea. I removed the B-pillar vent to see how the duct end fits on the inside. But to be honest, as it is now, it doesnt stay in place in the vent very well. The added paint layers migth help, but perhaps your idea of adding a rubber profile is a smart one.
Must say that the spray paint makes for a nice result. The duct ends now have a mat black finish and look nice.
The use of blac tie-wraps that @haydnw2 suggests is nice because they are black. For now I am using hose clamps though, allowing me to remove the duct ends easily. Perhaps when the thing's finished I will finalize it with black tie-wraps.
Thanks.The cup goes on the painted bodywork above the driver's door. This puts the grille at the same height as the upstairs bed, but the grille then directs airflow out at 45 degrees backwards (as though it's then eventually hitting the roof at 90 degrees, if that makes sense). It's the 45mm cup with metal hook.
I should probably point out that this has tested well, but hasn't been used in anger yet.
View attachment 69927
Got it. Yes, I can’t imagine how you’d get to sleep if your head was too warm. We sleep with heads at the short end and don’t like our heads the other way round at all.Tried it @Elly Swanson blows hot / warm on my head and I like a cold head and warm feet !
Might extend it to a 2 foot wide plastic nozzle and have it by my feet blowing up in the duvet
I’ve not measured it, but I can only speak for my experience which is that it makes a lot of difference.I'm wondering. It seems quite some people are doing or have done this diy. Has anyone taken any measurements? As in, did anyone check what temperature difference the contraption actually makes in the upstairs bed?
I did find some black jubilee clips but, whilst not overly expensive per se, they did push the project cost up disproportionately! £6.88 for a pair. https://www.ebay.co.uk/itm/143540474102 Also, largest size seems to be 100mm so fitting would be touch-and-go I suspect. At that size you seem to be into engine hose clip territory, and everything gets expensive very quickly.The use of blac tie-wraps that @haydnw2 suggests is nice because they are black. For now I am using hose clamps though, allowing me to remove the duct ends easily. Perhaps when the thing's finished I will finalize it with black tie-wraps.


The VW California Club is the worlds largest resource for all owners and enthusiasts of VW California campervans.


