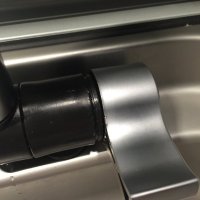
How to Fix Kitchen Tap and Water Pump Problem and solution.

first think you have to check Fuse is ok or not. most of the time broken fuse is the problem .
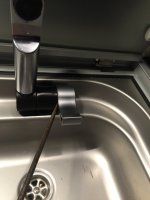
 
Encouraged by all the helpful advice on this thread I decided to tackle my similar issue of no water.

It was an increasingly intermittent problem that developed into zero water but ended up with a very simple process of cleaning the contact points in the micro switch of the tap with fine sandpaper.

Testing the pump first then other components and voltage etc., I was confused when my multi-meter’s audible continuity test would indicate there was contact and disconnect in the micro switch of the tap. However, for some reason the switch wouldn’t conduct the 12V when the contacts were closed. A final attempt to clean the points with sandpaper seems to have done the trick. I don’t know enough about electrics to compare continuity tests with an ability to carry voltage, if anyone else has advice on that, it’d be much appreciated.

I have now reassembled the tap etc. but thought I’d post a couple of pictures of the process to access the micro-switch as it can be done in situ. I would suggest taking out the fuse before starting.

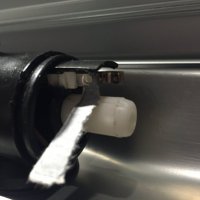
Gently ease the tap handle off by inserting a screwdriver and levering the right. This exposes the micro switch and in the picture I have inserted a small piece of sand paper and carefully used this on both sides of the contact.
IMG_0776.JPG IMG_0777.JPG IMG_0780.JPG
 
I think one of the first jobs I'm going to do on my new cali is install a relay on the pump line to stop the microswitch from burning out.
 
Last edited:
Encouraged by all the helpful advice on this thread I decided to tackle my similar issue of no water.

It was an increasingly intermittent problem that developed into zero water but ended up with a very simple process of cleaning the contact points in the micro switch of the tap with fine sandpaper.

Testing the pump first then other components and voltage etc., I was confused when my multi-meter’s audible continuity test would indicate there was contact and disconnect in the micro switch of the tap. However, for some reason the switch wouldn’t conduct the 12V when the contacts were closed. A final attempt to clean the points with sandpaper seems to have done the trick. I don’t know enough about electrics to compare continuity tests with an ability to carry voltage, if anyone else has advice on that, it’d be much appreciated.

I have now reassembled the tap etc. but thought I’d post a couple of pictures of the process to access the micro-switch as it can be done in situ. I would suggest taking out the fuse before starting.

Gently ease the tap handle off by inserting a screwdriver and levering the right. This exposes the micro switch and in the picture I have inserted a small piece of sand paper and carefully used this on both sides of the contact.
View attachment 16461 View attachment 16462 View attachment 16463

When doing this process is it necessary to remove the relevant fuse first, to avoid any electrical issues?

Thanks

Edited - sorry ignore the above I noticed you did cover this - thanks


Sent from my iPhone using Tapatalk
 
After a bit of trial and error with a pump that was going "intermittent", I have found that keeping the pump wet when the van is not is use will keep it running sweet. I just flush the tank, before I use it, and leave a small amount in the bottom of the tank when I am done.
 
Would that risk any damage from freezing in winter though?
 
After a bit of trial and error with a pump that was going "intermittent", I have found that keeping the pump wet when the van is not is use will keep it running sweet. I just flush the tank, before I use it, and leave a small amount in the bottom of the tank when I am done.

Agree with you, you could always flush out with a milton solution
 
Yes, we can have a copy on forum and copy in downloads for people to print out.

Was this ever made into a PDF as I can't find it in Downloads?

I have the 'no water at tap' problem now.
 
Read the reply written by Tim Hook (reply #52).
I've done it twice.

Disconnect the wire under the sink to the tap.
"Turn the water on" then pull the small lever straight off.
Be careful with the micro switch witch can actually fall apart. Very small pices but possible to put together again if you find all smal pices.
My micro switch could easily be pulled of by gently manipulate it with a small screw driver and carefully pull the cable with it. This will make it little bit easier to clean.
God eysite and light will help.
I cleaned my micro switch just like Tim, with a piece of sandpaper. Mine was 1500 grit which is pretty fine sandpaper. Pulled it threw 5-10 times on each side.
Cleaned/rinsed with electro-spray.
Done
Works fine now.
 
Thanks for that but I won't be doing it myself, I used to do all my own bike (motorcycle) maintenance but age and arthritis make it too awkward now, I just thought if there was something I could print off it might be a good thing to pass on to someone who will do the job for me.
 
Hi, my tap stopped working and I followed your extremely helpful advice and tips.

However the tap still isn't working, so I tested the old pump I had replaced using my car battery and it worked just fine but it won't work in the Cali. I've got 12 volts at the connector when I switch the tap on but nothing happens. It's the same with the new pump. This makes no sense to me. Can anybody offer suggestions as to what I should try next. I am at a total loss.

Thanks.
 
What happens if you short cut the two pins in the electric connector under the sink (the wiring to the tap)..?
 
Yes, it is easy to find. Right under the sink and the tap. If the pump start pumping water to the sink when you short cut the two pins, then there is still a problem with the micro switch. Clean it again, and make sure there is good contact. You can often read 12 V but as soon as the pump engage /consuming amps the V will drop...which means the micro switch acting like a bottle neck...
 
No water in my kitchen tap..!
5 amp fuse is ok.
Removed the pump and hooked it up to a 12 v supply and it worked. Water is coming out of the tap.
Measured the bare cabels coming from the tap (with tap started)(without the pump connected) and read 12 volt current.
Reconnected everything again (cabels from tap connected to the pump), but the pump isn't working. Now I measure only 0,8 volt...! The tap makes a click when I turn it on.
What is going on here?

(I have noticed the last months that the tap water is loosing pressure...and now no water at all).
Yes, it is easy to find. Right under the sink and the tap. If the pump start pumping water to the sink when you short cut the two pins, then there is still a problem with the micro switch. Clean it again, and make sure there is good contact. You can often read 12 V but as soon as the pum
Yes, it is easy to find. Right under the sink and the tap. If the pump start pumping water to the sink when you short cut the two pins, then there is still a problem with the micro switch. Clean it again, and make sure there is good contact. You can often read 12 V but as soon as the pump engage /consuming amps the V will drop...which means the micro switch acting like a bottle neck...

Thanks for the advice. That would make sense. When I tested the connection earlier today with the pump attached the voltage was much lower, which supports this.

I was just reading your earlier post and you seemed to have the same issue. I was about to ask you what the solution was in the end. I guess it was cleaning the microswitch. Thanks again.
 
Sorry Eddie can't help with your query but was just dropping on to thank all who have contributed to the sink pump replacement posts. Ours had been dicky for a year, ceasing then working again when the little impeller blade on the base of the pump was helped round by hand. Encouraged by the comprehensive info on here i decided to brave replacing the pump on Friday evening and was successful so thanks to all.

For info I tackled the "feeding the new wire back through the tight rubber seal" by cutting off 6 inches of wire from the old pump, slitting it lengthways and removing the brown and blue wires from inside, that made the casing thinner so you could easily feed it back into the tank from above, pull most of it through the washer and push the new blue and brown wire ends into the leading end of the casing and then pull the 6 inch section gently back out through the washer from above, using pliers to grip it once the brown and blue ends are coming through. Hope the description makes sense.

A real sense of joy when it all worked again, matched only by the same sense when I used the forum to work out that the fact that my elec hookup wouldn't work and show the plug icon on the screen at the front was only due to a loose connection with the kettle like plug to the box of tricks which sits under the fridge. So my thanks again for that little gem of information. I would say it's helped me save money but I know I'll just use any saving to justify another van accessory...
 
Hi thanks for everybody's help so far. It is definitely the tap micro-switch. I have tried sanding it and using contact cleaner. It now works intermittently at least. I think replacement is the answer. Has anyone ever attempted this?
 
Replaced my pump last week. Used the hammer and piece of wood technique to remove lid. A bit scary but it worked. It helps to use a piece of tape or similar to mark the original position of the lid so that you can tell that you are actually moving it as I had to tap mine around by about quarter to half a turn before it moved easily.

New pump cost me £19 from eBay.

Used a small amount of Vaseline on the gland (applied using a cotton bud) to make it easy to pass the new cable through. Then you can easily pull through without pliers and you won't bloody your knuckles.

Used bullet crimps (set of crimps and tool available from Halfords at a good price) to connect the wires back together. Easier, neater and possibly more reliable than terminal blocks (or soldering).

Hope that helps people. I couldn't have done it without the help of the earlier posts so thanks. Took about 30 mins to open up the first time and prove the pump was burnt out (the smell of burnt insulation lingers and is unmistakable) and 30 mins to fit new pump when it arrived. Very satisfying!
 
hi all, any ideas why my tap does not draw water from a full fresh water tank? At first it sounded like there was air in the system, with intermittent delivery of water and now nothing. I can here the micro switch when turning tap on but nothing else happens.

I've looked at the tank's pump and nothing looks odd there.

Any suggestions would be very much appreciated before I take it to the vw garage.

Many thanks in advance.

Alan
 
First thing I would do is take the pump out and test it's working .
 
Any suggestions would be very much appreciated before I take it to the vw garage.
Yes don't
 
Is that easy enough to do Jeff, re wiring and connections?
The wires will unclip then you need to take the top off water tank pull pump out . You could try turning the little bit on bottom of pump might get it going . Hardest bit is getting lid off you need to make a tool. I used a length of 2 x 1and to bolts to get on the fins of the lid . There is a very good description on here somewhere try the search button.
 

VW California Club

Back
Top