Buy all your VW California Accessories at the Club Shop Visit Shop

Khyam LED light pack (awning led strip) and how to fit.

larrylamb

larrylamb

Cali owner.
Super Poster
VIP Member
Messages
3,820
Location
Uk
Vehicle
T5 SE 140
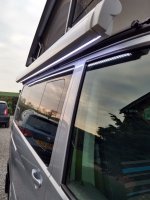
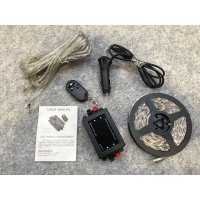
After purchasing this kit at the NEC motorhome show I have finally got around to fixing it to the Cali. Very pleased with the results. khyam-vanlite-lighting-pack-p1256-3646_image.jpgThe kit comes with a 12v plug supply with built in switch and a remote control for on-off and dimming of the led strip. I wanted to integrate the wiring with the 12v Cali lighting supply so I didn't have wires hanging around but also to do this with minimum alteration to the Cali itself.
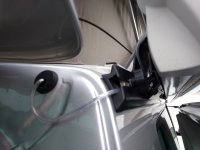
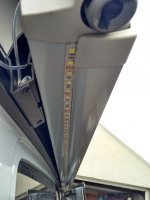
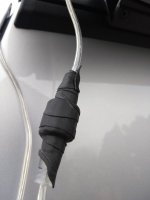
The strip was self adhesive and fixed to the underside of the awning. Both end caps were removed and slight notches cut into the caps to fit over the led strip. The strip has a screw in connector to connect to the lead from the dimmer unit. This weatherproof connector was given extra protection with self sealing rubber tape and positioned within the awning bracket.IMG_20181124_141806032.jpgIMG_20181124_142250346.jpg The cable was then fed through a vent?? hole and after a bit of fishing around located in the space above the rear interior light. Working through the high level cupboard and the boot area the interior light was popped out. I wanted to use the supply to this light as my power source.
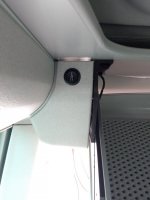
As the led unit is remote controlled I wanted to avoid any possible current drain when the Cali wasn't being used so I sourced a small switch to isolate the power supply to the unit. After checking behind the trim a small (19-20mm) was drilled to accept the discreet but handy switch.
IMG_20181124_130243789.jpg
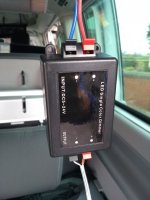
The switch and control unit was wired into the interior light and using self adhesive velcro tape the unit was fixed to the trim to stop any rattles.IMG_20181124_131904220.jpgIMG_20181124_131920742.jpg
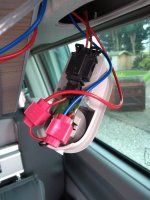
Refit the interior light and all you can see is the new small switch.
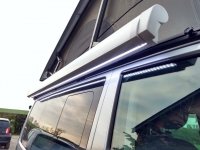
Works well and I can use the remote from the house to switch on and off/dim.IMG_20181124_130323609_HDR.jpgIMG_20181124_130330798_HDR.jpg IMG_20181124_141038108_HDR.jpgIMG_20181124_141046051_HDR.jpg
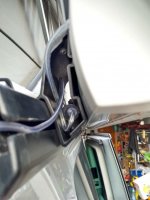
 
That is a really neat solution.

Just a note to say that the 'Vent' is actually the gutter drain tube for the inner roof gutter exposed when the pop top roof is up. It is connected to the small square shaped rubber bung at back edge of the gutter by a small section of rubber tubing.
I found this out to my cost after a previous owner had used this 'vent' tube to add an after market aerial through it.
First night of heavy rain with the roof up and water pouring down the inside wall panels!
Either that or park nose down. A short section of washing machine/dishwasher cold water fill tube is exactly the right bore to fit between the 2 if it is missing.
This thread on roof solar panel wiring gives a way to use the tailgate wiring rubber boot to get access inside. https://vwcaliforniaclub.com/threads/removable-drill-free-solar-installation-in-a-beach.14349/

Hope that helps.
 
I also have this and it’s great. However I have found it is on occasions turning its self on.

I don’t know if a neighbour has a remote with the same frequency. I have had to disconnect it and will reconnect when I eventually start using it.
 
That is a really neat solution.

Just a note to say that the 'Vent' is actually the gutter drain tube for the inner roof gutter exposed when the pop top roof is up. It is connected to the small square shaped rubber bung at back edge of the gutter by a small section of rubber tubing.
I found this out to my cost after a previous owner had used this 'vent' tube to add an after market aerial through it.
First night of heavy rain with the roof up and water pouring down the inside wall panels!
Either that or park nose down. A short section of washing machine/dishwasher cold water fill tube is exactly the right bore to fit between the 2 if it is missing.
This thread on roof solar panel wiring gives a way to use the tailgate wiring rubber boot to get access inside. https://vwcaliforniaclub.com/threads/removable-drill-free-solar-installation-in-a-beach.14349/

Hope that helps.
I will check that as i pulled the rubber bung out and nothing was attached to it, thanks
 
452875000.png

yes, looks like i have entered using bung 19 which should be attached to the drain pipe 4. Doh, need to change that then. @Drpps thanks for the heads up.
 
Thats the one! Dishwasher hose for '4' if its missing unless anyone has found an alternative.
 
I like it Larry, i like the switch and the neatness of
everything.
The one thing i´m not sure about is the feeding
of the wires through the drain hole.
 
I like it Larry, i like the switch and the neatness of
everything.
The one thing i´m not sure about is the feeding
of the wires through the drain hole.
Yeah, I know. I will be changing it. :thumb
 
Thanks larrylamb, you inspired me to fit mine. I took the wire through the tail light grommet (tail light comes off with two screws). The wire was then fed to the power outlet under the sliding seat with the control unit sitting in the cup holder. I usually hide things away but wanted good reception for the remote control. Light output is impressive & its great that you can dim them using the remote :thumb
 
Thanks larrylamb, you inspired me to fit mine. I took the wire through the tail light grommet (tail light comes off with two screws). The wire was then fed to the power outlet under the sliding seat with the control unit sitting in the cup holder. I usually hide things away but wanted good reception for the remote control. Light output is impressive & its great that you can dim them using the remote :thumb
Excellent, just waiting for the rain to stop to alter my wiring route. Yes, the remote and dimming is excellent.:thumb
 
After purchasing this kit at the NEC motorhome show I have finally got around to fixing it to the Cali. Very pleased with the results.
Very neat.

We have an external 12 volt supply terminating just inside the awning casing. A next step will be to install external lighting. At the moment we have to fit it each time we camp.


Follow my blog: www.au-revoir.eu
 
Update, cable was removed from roof drainpipe, refed through the hole in bodywork and the drain reinstated with a small notch in the side of the grommet for the cable. Drain tested and working perfectly, small blob of silicone around the cable now for added protection against water ingress. Happy days. Thanks for the drain advice chaps. :thumb
 
Great info, thanks all. I bought this kit recently whilst on offer (30% off) but yet to fit. Thanks all who contributed above, most helpful :thumb
 
All fitted today and look great.

But now just one problem the Kitchen unit LED lights now work off the cab interior light switch. They come one when opening the door and go off when closed. The switch does not control them anymore.

Any one any ideas? I removed and refitted the fuse some don't know if that messed with any logic.
Try this:
Turn front cab lights to auto (come on when front doors open)
Press the top button twice on the side of the unit (ensure cab light is on)

The light strip should flash, indicating its either on or off (when doors open)
 
Try this:
Turn front cab lights to auto (come on when front doors open)
Press the top button twice on the side of the unit (ensure cab light is on)

The light strip should flash, indicating its either on or off (when doors open)
Wow didn't even know you could do that. worked a treat thanks.
 
Thanks larrylamb, you inspired me to fit mine. I took the wire through the tail light grommet (tail light comes off with two screws). The wire was then fed to the power outlet under the sliding seat with the control unit sitting in the cup holder. I usually hide things away but wanted good reception for the remote control. Light output is impressive & its great that you can dim them using the remote :thumb

How did you secure the power cable running from the led lights to the tail light cluster, could you post some photos
 
After purchasing this kit at the NEC motorhome show I have finally got around to fixing it to the Cali. Very pleased with the results. View attachment 39862The kit comes with a 12v plug supply with built in switch and a remote control for on-off and dimming of the led strip. I wanted to integrate the wiring with the 12v Cali lighting supply so I didn't have wires hanging around but also to do this with minimum alteration to the Cali itself.
The strip was self adhesive and fixed to the underside of the awning. Both end caps were removed and slight notches cut into the caps to fit over the led strip. The strip has a screw in connector to connect to the lead from the dimmer unit. This weatherproof connector was given extra protection with self sealing rubber tape and positioned within the awning bracket.View attachment 39863View attachment 39864 The cable was then fed through a vent?? hole and after a bit of fishing around located in the space above the rear interior light. Working through the high level cupboard and the boot area the interior light was popped out. I wanted to use the supply to this light as my power source.
As the led unit is remote controlled I wanted to avoid any possible current drain when the Cali wasn't being used so I sourced a small switch to isolate the power supply to the unit. After checking behind the trim a small (19-20mm) was drilled to accept the discreet but handy switch.
View attachment 39867
The switch and control unit was wired into the interior light and using self adhesive velcro tape the unit was fixed to the trim to stop any rattles.View attachment 39868View attachment 39869
Refit the interior light and all you can see is the new small switch.
Works well and I can use the remote from the house to switch on and off/dim.View attachment 39870View attachment 39871 View attachment 39872View attachment 39873
Just to confirm that by hard wiring Khyam LED you loose the remote on/off function and the ability to dim the lights with the remote
 
Just to confirm that by hard wiring Khyam LED you loose the remote on/off function and the ability to dim the lights with the remote
Don't understand why, unless you have not included the control/dimmer box in your hard wiring? Mine is "hard wired" and still works with full functionality.
Agree with Mr T, my remote still works and dimming.
 
Don't understand why, unless you have not included the control/dimmer box in your hard wiring? Mine is "hard wired" and still works with full functionality.
I have included the control box, but for some reason the remote has no effect on the light

As others have done, taken live feed from back of roof light to control box (via 2amp in-line fuse).
Negative from control box goes via on/off swich to negative terminal on roof light switch
Just had a though, did i have the control box the right way around
Could be your remote, have you checked the battery is in correctly?
 
I have included the control box, but for some reason the remote has no effect on the light

As others have done, taken live feed from back of roof light to control box (via 2amp in-line fuse).
Negative from control box goes via on/off swich to negative terminal on roof light switch
Just had a though, did i have the control box the right way around
All working ok now, had control box the wrong way around, note to self, wear your bloody glasses:embarrased
 
I also have this and it’s great. However I have found it is on occasions turning its self on.

I don’t know if a neighbour has a remote with the same frequency. I have had to disconnect it and will reconnect when I eventually start using it.
I have same issue so fitted a neat switch in the boot so i can turn them off when at home, also prevents the rf receiver draining the battery.
 
Back
Top