Buy all your VW California Accessories at the Club Shop Visit Shop

solar panel (removable) on T5 facelift (waiting roof rot work)

Ours is not one of Roger's kits but basically the same setup.
British GP at Silverstone a couple of years ago four days without hookup and batteries still at 60%. Fridge on 5 and interior lights on together with LEDS in the awning and radio on (wired into LB before someone tells me it runs of the starter battery). Weather was fairly gloomy so happy enough with that.
It doesn't have to be sunny to work, obviously the brighter the better.
 
briwy, is the wiring of radio to LB permanent or selectable with a switch? Can you use the radio without the ignition on? I want to do the same but not quite sure how..
 
We have one of Rogers kits. We usually run the fridge on setting 4, use the heater and use the interior and awning LED lights as required. Up until now (about 60 nights in 12 months) we haven't stayed in one place for more then 2 nights and the lowest reading has been 80%.

In the winter the fridge hardly kicks in but you use the heater more and the lights are on longer and of course the sun is lower down and weaker.

In the summer the fridge works harder but you don't have the heater on and the lights are on for shorter period of time but the sun is higher and stronger.

Hope this helps.
 
briwy, is the wiring of radio to LB permanent or selectable with a switch? Can you use the radio without the ignition on? I want to do the same but not quite sure how..

Permanent. Yes you can use the radio without the ignition on same as standard.
It still turns off after 20 minutes though as this is controlled by the Canbus and I haven't got round to sorting it out yet. There is a member on here whao has had it done and I think it has a switch to turn the canbus connection off.
This thread shows how I wired the radio (and front accessory sockets) to the leisure battery.
https://vwcaliforniaclub.com/threads/flat-battery-and-4-motion.8554/
 
Roger do you have any info on solar panels you have fitted to a beach please? Wondering how panel wiring would work with the leisure battery under the passenger seat.
 
Roger do you have any info on solar panels you have fitted to a beach please? Wondering how panel wiring would work with the leisure battery under the passenger seat.
Same question for me.
Thanks all
Ignazio
 
Hi all,

I have a whole set of pictures to share on how I fitted one of Roger's kits.
Will post them this week.
 
Here are some shots of the control panel from one of Rogers 100w panel kits.

Traveled to mid Wales from Leicester on Friday evening. The fridge was set on 4 all the time and we had the heater on level 2 for 5 hours with about 1 hour of lights and we charged 2 android phones.
This is the control panel at 9.30am on Saturday morning. It was a clear blue sky and the panel was facing south east.
20160423_095416_zpsj4cinppj.jpg


xxxxxxxxxxxxxxxxxxxxxxxxxxxxxxxxxxxxxxxxxxxxxxxxxxxxxxxxxxxxxxxxxxxxxxxxxxxxxxxxxxxxxxxxxxxxxxxxxxxxxx

Van parked all day Saturday fridge on 4, heater on for about 4 hours on level 2 in the evening and about 1 hour of lights and again 2 android phones charged overnight.
This is the panel on Sunday morning at 10am in bright sunshine with some clouds.
20160424_092541_zpstxmxzhuk.jpg


On each morning there are plenty of volts and amps going into the leisure batteries and well on the way to being charged.
Hope this is useful information for somebody.
 
Hi all,

Here's my "story" with installing our solar panel, plus a series of pics.
(1.JPG 2.JPG 3.JPG 4.JPG 5.JPG 6.JPG 7.JPG 1.JPG 2.JPG 3.JPG 4.JPG 5.JPG 6.JPG 7.JPG Part 1)

First of all, my compliments to Roger Donoghue.
He sells complete kits with everything on it. All well packaged and wrapped. I had mine shipped from the UK to Belgium. All arrived in one piece. There were wooden sticks to make sure the solar panel itself would not bend.
In addition, the explanation on how to install is really clear. I had asked Roger a couple of question that later turned out to be answered in the installation papers (lesson learned: read everything before asking).

Even if you're not technical, you can do this. Really.

I've added a series of pics that illustrates how I handled it all. Picture name and number correspond with explanations.
  1. The whole kit laid out on the kitchen table
  2. The cable for the monitoring unit that I was able to lead through the big closet (Lesson learned: the cable has a little label indicating which side should go where; of course I did it the other way around. Not a problem, but reading that tiny label would have been better; the connector gets a bit squeezed the way I did it).
  3. Same cable inside the big cupboard.
  4. The MPPT thing (needed to manage the voltage from the panels). I mounted it as high as possible in the rear cupboard (the one you access through the trunk/back of the Cali); I glued it, so there was no need to drill anything.
  5. Back to the inside, kitchen side. This is the base for the inside monitoring unit. This I also glued (make sure you first stick the cable in...)
  6. These are the cables that go from the MPPT unit to the leisure battery. I managed to lead them behind the existing panels without removing anything. I did use a bit of tape to stick them together so they wouldn't get stuck while fiddling them through.
  7. Connecting the two cables from #6 to one of the leisure batteries. We have two. This one is located in the back, at the bottom of the rear cupboard. I had to remove the battery in order to connect the wires. Easy.
  8. All cables connected to the MPPT unit, including the two cables coming from the solar panel.
  9. Using Rogers system to position the solar panel. The panel we have is super light; around 1 KG I would think. It's flexible and easy to glue on.
  10. Same
  11. Same
  12. Here you see a close-up on how I managed to lead the cables from the solar panel through the rubber of the trunk inside. I did piers a tiny hole in the rubber. So far have not had any leakage (knock on wood), even though we have had quite a bit of rain after installing and using it.
  13. Same, but different angle.
  14. Happily charging in Ile de Ré, France
With moderate sun, panel facing down, using the fridge, the heater, and lights (all in moderation) the batteries never went below 70%.

Thanks Roger for all the help.

PS I realized I couldn't upload all the pics in one go. So this post has 7, Part 2 has the other 7.
 
Great detailed pictures, thanks a lot! I thought all of Roger's drill-free kits had a panel in a tiny frame, not glued like this one. Looking at it, I think I also prefer this glued version because of wind and possible noise.. and because it looks less fragile. Are all MY 2015 and later cali's corrosion free? Too early to tell?

Could you make one more picture: view from the panel with the cable mounted through the tail gate.. in these pictures it's not connected.
 
Could you make one more picture: view from the panel with the cable mounted through the tail gate.. in these pictures it's not connected.[/QUOTE]
Thinking the same. Final cable set up?
Ps. The panel is super!
 
Can't imagine VW will be very impressed if you want your roof repainting with a panel bonded on.

because of wind and possible noise.. and because it looks less fragile.

No wind noise at all from my removable panel and it is held firmly by the cross bars. Please be aware that solar panels can get very hot and overheat shortening their life if air is not allowed to circulate freely on all sides.
 
Can't imagine VW will be very impressed if you want your roof repainting with a panel bonded on.
This is certainly true. Question I have is if MY 2015 and later still have roof corrosion issues? They must have fixed it by now...
No wind noise at all from my removable panel and it is held firmly by the cross bars. Please be aware that solar panels can get very hot and overheat shortening their life if air is not allowed to circulate freely on all sides.
Yes but glued to a california roof, that's a gigantic heat sink which will be cooled by the same wind so I don't really worry about that. White cali is probably best though.
 
This is certainly true. Question I have is if MY 2015 and later still have roof corrosion issues? They must have fixed it by now...

Yes but glued to a california roof, that's a gigantic heat sink which will be cooled by the same wind so I don't really worry about that. White cali is probably best though.
Solar panels can fail in time and thats when the fun begins. Yes , the roof is a giant heat sink - when moving - and a giant heat trap when static.
 
Solar panels can fail in time and thats when the fun begins. Yes , the roof is a giant heat sink - when moving - and a giant heat trap when static.

Agree. We had a panel fail after about two years of use. I was just about to bond it to the roof as it was a temporary fit initially. Glad I didn't, kept the original frame and replaced the panel, about half an hours work. Dread to think what it would have been like to replace if it was bonded on.

Regarding heat, the panels are more efficient if there is some cooling air running below them. I doubt a Cali roof works as a heat sink, not thick enough and there is a layer of bonding/paint between the roof and the panel which would act as an insulator as well.
 
Solar panels can fail in time and thats when the fun begins. Yes , the roof is a giant heat sink - when moving - and a giant heat trap when static.
Not just when moving. Heat sinks just spread heat to a large mass and surface. To cool them down you need temperature difference to outside air and ideally also airflow, but that's not a must.
For the framed solar panel mounted on a cali roof, very little airflow will happen if the cali is standing still. There's just 1 centimeter(?) between the panel and the roof and the hot air can only leave efficiently (chimney effect) if the panel is mounted at an angle or the car is moving.

Agree the paint is a bit of insulation with flexible panels, but it's very thin. If I touch my dark gray car which has been in the sun, it seems to transfer heat fairly well. For adhesive, there exist thermal conducting adhesives specifically made for this type of panels. The overall mass and surface of metal to dissipate heat to is comparable (perhaps 1kg difference, and 1m2).
They're sticking these types of panels to black flat roofs.

I do follow the arguments about roof corrosion, life expectancy, replacing a glued panel etc though.
But if a framed panel had to be replaced after 2 years as well .. I hope this was just bad luck.

Guess I will wait a bit and see / hear what happens in practice with the different panel types. As we use the cali about once a week for driving to work, batteries are being topped up anyway and on our camping trips I will turn on the engine from time to time, for now.
 
Could you make one more picture: view from the panel with the cable mounted through the tail gate.. in these pictures it's not connected.
Thinking the same. Final cable set up?
Ps. The panel is super![/QUOTE]


I'm not exactly sure what angle you mean?
Isn't it the picture #12 that I described in my earlier post here?
 
Could you make one more picture: view from the panel with the cable mounted through the tail gate.. in these pictures it's not connected.
Thinking the same. Final cable set up?
Ps. The panel is super![/QUOTE]

Is this what you are both looking for? Roger installed mine last week and he made a small cut in the rubber piece that holds all the wires and fed the cable through this cut from the top, but attached to a carrier wire, through here. He then pushed the carrier wire through the place where all the other wires go through. He picked this up on the inside and pulled the other wire through, then disconnected it, cut the ends and fixed then to the MPPT.
Finally he put some tape around the place that he had made the small incision. He left slack there for the extra needed when you put the roof up. Hope this helps. Simon
P1040127.JPG P1040128.JPG
 
It's swings and roundabouts with the stick on vs bolt on panels.

The bolt on kit makes the DIY side super easy, and there is no permanency to the installation. I've never had any reports of wind noise, on any of my kits or installations, and it's a quertion that is asked a lot pre-purchase, so I'd have heard by now.

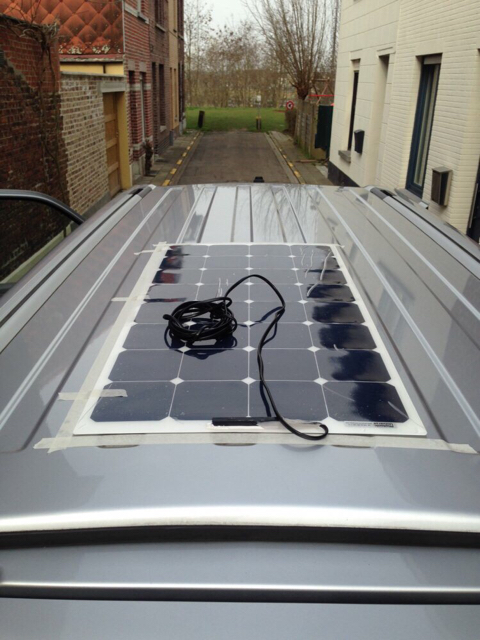
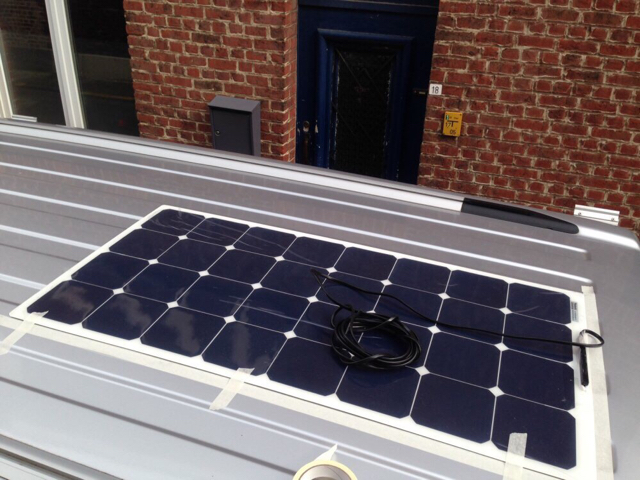
The stick on kit is more popular with non cali owners, or, cali owners who want to use the whole of the roof bar space while travelling, then slide their luggage out of the way (I assume). This is a more permanent installation.

I've removed one stick on panel from a VW with a reimo roof. Just one so far, in 4 years. That was because a garage installed it and damaged (kinked) the panel (it was clearly visible). The customer came back to me. By rights I could have charged him, but me being me, I removed it and put a new one on, for free. One loss in four years and I'm not going to quibble ;-)

Lesson learnt. I now photo all panels that go out to garages to be installed :)

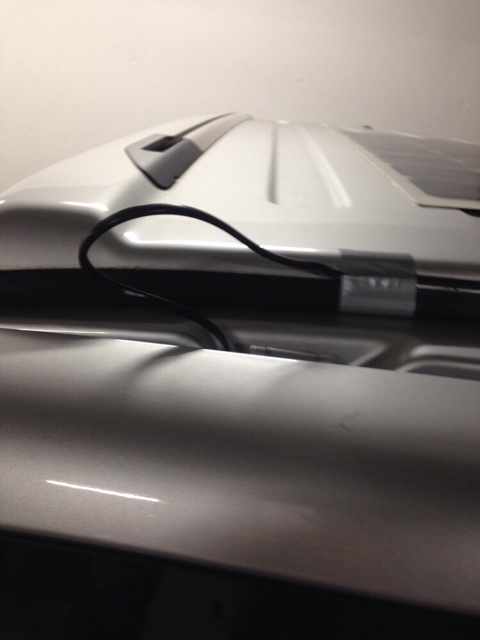
The removal was fairly tough, but it took around an hour to remove and replace. I used a long blade, sliding under the panel, through the Sikaflex. Starting at one side, then partially lifting, working through the middle, then the other side. I opened the black connector block and desoldered the cables from teh panel.

I then removed the panel, and then spent a little while with the same blade, scraping as much of the sika off as possible. At this stage, if you didn't want another panel you'd certainly need either a large decal to cover the mess, or a respray.

The new panel wnt straight over the old location and you'd never be the wiser (and resoldered the new wires to the new panel).

It's very doable, not fun, but not a nightmare.
 
Thinking the same. Final cable set up?
Ps. The panel is super!

Is this what you are both looking for? Roger installed mine last week and he made a small cut in the rubber piece that holds all the wires and fed the cable through this cut from the top, but attached to a carrier wire, through here. He then pushed the carrier wire through the place where all the other wires go through. He picked this up on the inside and pulled the other wire through, then disconnected it, cut the ends and fixed then to the MPPT.
Finally he put some tape around the place that he had made the small incision. He left slack there for the extra needed when you put the roof up. Hope this helps. Simon
View attachment 13532 View attachment 13533[/QUOTE]
Thanks. I wanted to see the final situation with panel fixed on the roof and the cable that runs down on the edge and the down inside. So there is a 15cm cable free before the hole and inside. Right?
dd60d4ec876a2e274db6a94e82b81d99.jpg
3570ef2857bd0d60f03872ad9df10fbf.jpg
3208207c941535277f01170d1e60b0f7.jpg
 
Is this what you are both looking for? Roger installed mine last week and he made a small cut in the rubber piece that holds all the wires and fed the cable through this cut from the top, but attached to a carrier wire, through here. He then pushed the carrier wire through the place where all the other wires go through. He picked this up on the inside and pulled the other wire through, then disconnected it, cut the ends and fixed then to the MPPT.
Finally he put some tape around the place that he had made the small incision. He left slack there for the extra needed when you put the roof up. Hope this helps. Simon
View attachment 13532 View attachment 13533
Thanks. I wanted to see the final situation with panel fixed on the roof and the cable that runs down on the edge and the down inside. So there is a 15cm cable free before the hole and inside. Right?
dd60d4ec876a2e274db6a94e82b81d99.jpg
3570ef2857bd0d60f03872ad9df10fbf.jpg
3208207c941535277f01170d1e60b0f7.jpg
[/QUOTE]
There has to be enough slack to go to the plug on the panel when the roof is full extended at the back. You can see on my photo that it is curled inside near the hinge, but it is a lot more than 15cms. I think that Roger ran the cable from the panel across the roof with the roof up, into the rubber pipe that feeds inside the van. You can always pull any excess inside and shorten the wire, it is more difficult to make it longer. If you send Roger a PM I'm sure he will come back to you and advise what length of wire to allow before the MPPT.
 
Yes, that bit of cable has to stay there because the roof rises.
In a way it would be nice if it was kind of that old spring-telephone cable; the curled one.
But this is fine.

To get the solar panel cable inside, I pierced a hole in that rubber. Piercing the hole ensures a tight rubber fit around the cable. For extra security I added a bit of silicon glue.

BTW there is no whistling sound when I drive at all.
Very happy with it so far (I wouldn't know why this would change).
Thanks Roger for the help (even long distance).
 

Similar threads

M
Replies
9
Views
570
Roger Donoghue
Roger Donoghue
Monty-Wilf bus
Replies
10
Views
2K
Roger Donoghue
Roger Donoghue
OllieCollieCali
Replies
3
Views
401
Californication69
Californication69
Back
Top