spare wheel - when was the last time you looked at yours..?

steve_b

steve_b

Lifetime VIP Member
Messages
375
Location
North Devon
Vehicle
T5 SE 130
I decided to spend the bank holiday weekend playing "Mr. routine maintenance" - and inspired by something I saw here I tried to get the spare out and check it - the wheel has been in the carrier for the 18 months that we have owned the Cali (2008 SE).

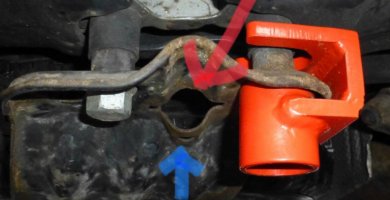
It started well, the left hand of the two bolts holding the spare cage was easy, the right hand one was, shall we say , rather stiff. A good drowning in WD40 , leaving and then carrying on and I got more turns out of it - but this bolt seemed to be endless. The further I lowered it the stiffer it got. More WD40, a wire brush to try and clean the threads, back up and down. Left overnight drowned in WD40. By this time I have bruises on my elbows from bracing myself on the floor whilst pulling on a spanner and am in fear of my life if it slipped off or let got as I would be catapulted across the concrete with terrifying force.

More WD 40, I managed to extend my ratchet spanner by use of the hole end of a regular spanner round the shaft. I tried to be gentle but the ratchet just blew up and sent me flying. More WD40 overnight, more wire brushing, pulling on a long 19mm spanner with my feet on the edge of the boot pillar the bolt starts to... starts to.. starts to bloody bend. If this bolt was any normal length then it would have been removed 5 times by now, I must have 50mm of thread visible below the flexible bushing which itself is about 30mm.

So I finally give up, take it up the road to a garage who gets the bolt out but takes 10 minutes - he had to drive it in and out several times with a massive impact gun and said he was afraid that the head was going to shear off before the bolt came out - but eventually it did and now I can admire my rusty as hell spare wheel.

So a key lesson - do try and remove the spare once in a while to keep the bolt threads clean, to give you at least a fighting chance of getting it off if you need to. I spend 2 days with all of my tools and a can of WD40 and still failed.

And if anyone has a spare bolt lying around where they replaced theirs with a locking one, do let me know as I am in need of one. Considering the force required to undo it I am loathe to get a locking one that depends on 3 metal pins in my hour of need ...
I’m not sure if you are aware, but the L hand bolt is not supposed to be removed.
Remove R Hand bolt.
Slacken L hand bolt.
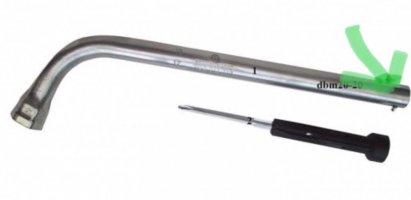
Use Wheel Wrench handle in the slot on the end of the wheel carrier to lift and move to the R the carrier so the L hand bolt head disengages and lower the carrier.

6406B002-73B4-4734-87BA-E8790B9B2AEB.jpeg96E3E5AD-0C9A-42A9-A83A-F129A3F9425A.jpeg
 
ah yes, I wasn't clear - the left hand bolt moved easily, and down enough to be able to clear the carrier if I could get the right hand one out.. I didn't remove it
 
If you're Bridport way, I've got my original one in the garage...
 
If you're Bridport way, I've got my original one in the garage...
Thanks, offer appreciated, but I just ordered one from ebay. Worth checking that your locking one can be removed though in case that has seized up!
 
For future reference, with the spare on a Cali being exposed the way it is, it's best to give both the inner and outer surfaces of the wheel a liberal coating of Waxoyl or better still Dinotrol wax anti corrosion treatment when the vehicle is new (however, IMO it's never too late to do this job). Also do the bolts, the carrier and everything else underneath except the brake discs and pads, exhaust and diesel parking heater. The latter is not visible as it's protected by a cover which I have never removed. Inspect once or twice a year for signs of corrosion and re coat when and where necessary. Give all fixings a squirt otherwise some will corrode and fail in time leading to rattles etc.

Dintrol can be purchased online in large aerosol cans and is applied using a plastic handle/applicator which they will also supply. Dinitrol comes in various forms to suit different applications e.g box sections, engine etc and is usually either black or clear. I always use clear. From memory the last time I did it I used four cans of Dinitrol 1000 clear, to coat everything. I pre warm the tins in a bucket of hotish water then shake well before use. I find that it's better to do this task after first jet washing the underside thoroughly several days before to remove any mud etc and have always combined it with an inspection when changing from winter to summer wheels/tyres. However, since I now run all season tyres I'm going to have to make a point of doing it every spring and autumn.

Just ensure the underside is dry and make sure to protect the brakes by sticking a large plastic bag over the entire disc braking contact surface and the caliper when spraying the brakes, suspension and undercarrige and leave the exhaust and parking heater off the spray list.

I usually do each corner in turn by jacking, supporting and removing the wheel. Then I do the underside thoroughly by runing each end of the vehicle in turn, up onto ramps. The body shell is galvanised so should be alright, never the less I usually spray everything, body shell and all. The important stuff is everything painted black underneath as it will rust. This isn't a major issue as these parts are usually made of very stout stuff so surface rust is not a big issue except that I don't like to see it. Also when the vehicle needs work it makes things so much easier if everything isn't corroded to hell. So I spray the springs, swinging arms, brake back plates, engine subframe, half shafts, anti roll bars etc etc. To be on the safe side spray everything except the aforementioned exceptions. It may just be me but I find this product protects for longer and covers way better than Waxoyl ever does.

The spare wheel will look really grubby if you ever need to use it but at least it won't be coated in thick rust.
 
Last edited:
Thanks, offer appreciated, but I just ordered one from ebay. Worth checking that your locking one can be removed though in case that has seized up!
Has only been on a matter of weeks when both bolts were greased :thumb
 
Removed mine a few weeks ago, I always try to remove the spare occasionally with the tools that are supplied in the plastic cover of the jack. That way I know that if need be I should be able to extract the wheel and change it on the roadside.
 
For future reference, with the spare on a Cali being exposed the way it is, it's best to give both the inner and outer surfaces of the wheel a liberal coating of Waxoyl or better still Dinotrol wax anti corrosion treatment when the vehicle is new (however, IMO it's never too late to do this job). Also do the bolts, the carrier and everything else underneath except the brake discs and pads, exhaust and diesel parking heater. The latter is not visible as it's protected by a cover which I have never removed. Inspect once or twice a year for signs of corrosion and re coat when and where necessary. Give all fixings a squirt otherwise some will corrode and fail in time leading to rattles etc.

Dintrol can be purchased online in large aerosol cans and is applied using a plastic handle/applicator which they will also supply. Dinitrol comes in various forms to suit different applications e.g box sections, engine etc and is usually either black or clear. I always use clear. From memory the last time I did it I used four cans of Dinitrol 1000 clear, to coat everything. I pre warm the tins in a bucket of hotish water then shake well before use. I find that it's better do this task after first jet washing the underside thoroughly several days before to remove any mud etc and have always combined it with an inspection when changing from winter to summer wheels/tyres. However, since I now run all season tyres I'm going to have to make a point of doing it every spring and autumn.

Just ensure the underside is dry and make sure to protect the brakes by sticking a large plastic bag over the entire disc braking contact surface and the caliper when spraying the brakes, suspension and undercarrige and leave the exhaust and parking heater off the spray list.

I usually do each corner in turn by jacking, supporting and removing the wheel. Then I do the underside thoroughly by runing each end of the vehicle in turn, up onto ramps. The body shell is galvanised so should be alright, never the less I usually spray everything, body shell and all. The important stuff is everything painted black underneath as it will rust. This isn't a major issue as these parts are usually made of very stout stuff so surface rust is not a big issue except that I don't like to see it. Also when the vehicle needs work it makes things so much easier if everything isn't corroded to hell. So I spray the springs, swinging arms, brake back plates, engine subframe, half shafts, anti roll bars etc etc. To be on the safe side spray everything except the aforementioned exceptions. It may just be me but I find this product protects for longer and covers way better than Waxoyl ever does.

The spare wheel will look really grubby if you ever need to use it but at least it won't be coated in thick rust.
You might want to take a look at this - and the 50:50 samples of various rust treatments - the Bilt Hamber stuff is very impressive http://www.bilthamber.com/media/downloa ... 13-001.pdf - see page 31. See untreated metal further up
 
You might want to take a look at this - and the 50:50 samples of various rust treatments - the Bilt Hamber stuff is very impressive http://www.bilthamber.com/media/downloa ... 13-001.pdf - see page 31. See untreated metal further up
Thanks for the link Scoobz1. Unfortunately I can't get it to open. :( I may have seen it before though. Does it feature an indepth long term test of various similar products on steel test plates? If memory serves, these plates were treated with product and exposed to salt water spray. There after they were all checked at ever increasing long term intervals for corrosion.

I assume that the Bilt Hamber product came out best in class?

I haven't checked our van recently but I gave it a comprehensive treatment when new and thanks to covid, it's only done 3900 miles in the last nineteen months. So I expect I'll still find it in good order.

I'll take a look at the Bilthamber treatment online. I already use their clay and have been quite impressed with their service. :thumb
 
I decided to spend the bank holiday weekend playing "Mr. routine maintenance" - and inspired by something I saw here I tried to get the spare out and check it - the wheel has been in the carrier for the 18 months that we have owned the Cali (2008 SE).

It started well, the left hand of the two bolts holding the spare cage was easy, the right hand one was, shall we say , rather stiff. A good drowning in WD40 , leaving and then carrying on and I got more turns out of it - but this bolt seemed to be endless. The further I lowered it the stiffer it got. More WD40, a wire brush to try and clean the threads, back up and down. Left overnight drowned in WD40. By this time I have bruises on my elbows from bracing myself on the floor whilst pulling on a spanner and am in fear of my life if it slipped off or let got as I would be catapulted across the concrete with terrifying force.

More WD 40, I managed to extend my ratchet spanner by use of the hole end of a regular spanner round the shaft. I tried to be gentle but the ratchet just blew up and sent me flying. More WD40 overnight, more wire brushing, pulling on a long 19mm spanner with my feet on the edge of the boot pillar the bolt starts to... starts to.. starts to bloody bend. If this bolt was any normal length then it would have been removed 5 times by now, I must have 50mm of thread visible below the flexible bushing which itself is about 30mm.

So I finally give up, take it up the road to a garage who gets the bolt out but takes 10 minutes - he had to drive it in and out several times with a massive impact gun and said he was afraid that the head was going to shear off before the bolt came out - but eventually it did and now I can admire my rusty as hell spare wheel.

So a key lesson - do try and remove the spare once in a while to keep the bolt threads clean, to give you at least a fighting chance of getting it off if you need to. I spend 2 days with all of my tools and a can of WD40 and still failed.

And if anyone has a spare bolt lying around where they replaced theirs with a locking one, do let me know as I am in need of one. Considering the force required to undo it I am loathe to get a locking one that depends on 3 metal pins in my hour of need ...
Is your tyre the original? If so it could be 13-14 years old. Everyone forgets about the spare and how old it is. It’s probably perfectly ok but worth giving it a good check.
 
I haven't had ours off, just over 2 years old and the wheels didn't come off for the service so doubt they check the spare ? A job for Monday.
Anyone wrapped the spare in plastic rather than coat the wheel, any downsides to doing that ?
 
I haven't had ours off, just over 2 years old and the wheels didn't come off for the service so doubt they check the spare ? A job for Monday.
Anyone wrapped the spare in plastic rather than coat the wheel, any downsides to doing that ?
Got a 4x4 wheel cover on mine, open at the top so no condensation. exhaust heat dries it, fitted a heat shield just in case vinyl gets melted or worse. Before and after winter removal with clean/polish.
 
Got a 4x4 wheel cover on mine, open at the top so no condensation. exhaust heat dries it, fitted a heat shield just in case vinyl gets melted or worse. Before and after winter removal with clean/polish.
sounds like a plan, like the top open idea but might stick with the plastic, cheaper.
 
I haven't had ours off, just over 2 years old and the wheels didn't come off for the service so doubt they check the spare ? A job for Monday.
Anyone wrapped the spare in plastic rather than coat the wheel, any downsides to doing that ?
Yes, unless it's completely sealed the moisture will get inside the plastic and will rust the wheel. The only way to stop corrosion is to prevent moisture, salt and air getting to it. A layer of wax is an ideal barrier but may need topping up from time to time. The alternative is an alloy wheel.
 
Thanks for the link Scoobz1. Unfortunately I can't get it to open. :( I may have seen it before though. Does it feature an indepth long term test of various similar products on steel test plates? If memory serves, these plates were treated with product and exposed to salt water spray. There after they were all checked at ever increasing long term intervals for corrosion.

I assume that the Bilt Hamber product came out best in class?

I haven't checked our van recently but I gave it a comprehensive treatment when new and thanks to covid, it's only done 3900 miles in the last nineteen months. So I expect I'll still find it in good order.

I'll take a look at the Bilthamber treatment online. I already use their clay and have been quite impressed with their service. :thumb
Borris you got it one - basically bar one of other brands, which is difficult to apply (needs considerable amount of heat) the Bilt Hamber one walks it. The main / well known brands look awful by comparison. Copy of pdf/report sent via PM
 
Remember whatever you coat the spare wheel with it should be easily removable from the bolt holes (possibly in the most inhospitable conditions) so as not to affect the tightening of the bolts if/when the wheel needs to be fitted to the vehicle.
But the cone shaped holes are possibly the most important parts of the wheel that should not become rusty as rust there makes tightening the wheel bolts is impossible onto the rust resulting in the wheel coming loose when used.
It's always worth stopping and checking wheel bolt tightness after a few miles on a newly fitted spare wheel.
 
Also, beware that if your spare is a different make, that some tyres are unidirectional tread patterns whilst others are not. eg; Michelin Cross Climate are unidirectional. Doesn't mean a bidirectional tyre cannot be used as a spare but should be used as a get you home spare.
 
Copper grease the threads on the carrier bolts & swap the steel for a matching alloy.
 
I find it's far easier to park in a station carpark and let some theiving toe rag remove the bolts for me. Free at the time, but costs a little later when you need a spare wheel... and I carry a compressor + tyre gunk! :mad:
 
Back
Top