- Home
- Forums
- VW California T5 T6 & T6.1 Specific Sections
- VW California T5,T6 & T6.1 Specific Sections
- Audio & Navigation
You are using an out of date browser. It may not display this or other websites correctly.
You should upgrade or use an alternative browser.
You should upgrade or use an alternative browser.
nclarke8
VIP Member
- Messages
- 43
- Vehicle
- T7 California Ocean 4 Motion
Fred, the TR version doesn't have the crossover (just a capacitor in the wiring to the tweeter) so i used the existing wiring to make life easy. The original tweeter has a flylead on it that i cut off and soldered to the new tweeter wiring. For the door speaker i chopped out the connector from the broken speakers and again soldered to new speaker. ie vehicle wiring is original.
fred
Lifetime VIP Member
- Messages
- 397
- Vehicle
- T5 SE 140
@nclarke8 you're right - looking carefully at the OEM tweeters I just spotted the capacitor which serves as a crossover / low pass filter. Cool - so I can use the existing speaker cable to the door mounted crossover and (assuming it doesn't already exist) I just need to route a little bit of cabling from the crossover back through the door and up in to the dash mount tweeter. Cheers.
What size is that sub speaker? 8"?
What size is that sub speaker? 8"?
Abnomynous
Prefers company of cows over electrical sockets
- Messages
- 43
- Vehicle
- T5 SE 174 4Motion
Would be very interesting if you could document building and installation of the sub, with measurements and pictures.Hopefully have underseat sub install done soon.
I'm planning something in this manner myself and have gotten great inspiration from this informative thread.
(For instance I'm debating how to approach the unidentified and volume consuming electrical connections under right hand seat.)
Many thanks!
nclarke8
VIP Member
- Messages
- 43
- Vehicle
- T7 California Ocean 4 Motion
Fred, there isn't a crossover in the door, unless you fit one as part of the more expensive component speakers. I didn't want to run the extra cables so went with the cheaper TR series.
Yes its a 8" Sub. 10" subs all seem to require a much larger box and with the extra cabling under our seats there really isn't room.
Abnomynous, Will attach an Autocad drawing and a few more pics when i'm home. For the cables i just took them out of the oversize support bracket and laid them to the back of the seat base.
Note i had previously ran the power feed across from the Leisure battery under passenger seat and fed component cable and switch on lead from the headunit under the carpet (pretty big job)
Jaydub
VIP Member
Yes the ones I used had a seperate crossover which you can see on the box in the first picture along with new speaker cable.The crossovers are mounted in the door panels and new cables ran to the tweeters in the dash. Intersesting nclarke8 that the new speakers out punched the active sub under the seat.i will have to think carefully what I install under their.
nclarke8
VIP Member
- Messages
- 43
- Vehicle
- T7 California Ocean 4 Motion
Abnomynous, Attached is a PDF of the measurements I used. As the seat base is sloping so is the box to maximise the internal space.
8" subwoofer (already had it) and its original box internal volume was just under 10 litres The internal volume of the new box is pretty close to the 10 litres as well. Most 8" subs that i found online require this volume or slightly more.
The Amplifier is a pioneer GM-A3602 that I got from amazon. I picked it as it the narrowest one (180 mm) that I could find and a known make.
A few more pics of building it. The sides were glued and screwed to the base. the internal joints were then sealed with Decorators caulk. The wadding from original box then glued in place. Holes drilled for speaker terminals and speaker cable sealed in place.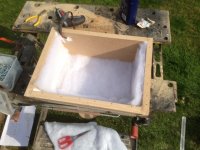
Underneath was routed for;
Slots at front for going over the seat base strengthening plate near the front bolts
Central(ish) hole where the Earth point is under the carpet (its actually pushes the carpet up so the box wobbled)
rear cut-out to route the vehicle cables easier.
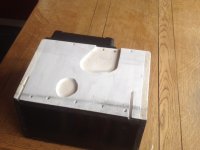
Top glued and screwed as per the sides and then painted
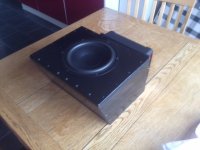
8" subwoofer (already had it) and its original box internal volume was just under 10 litres The internal volume of the new box is pretty close to the 10 litres as well. Most 8" subs that i found online require this volume or slightly more.
The Amplifier is a pioneer GM-A3602 that I got from amazon. I picked it as it the narrowest one (180 mm) that I could find and a known make.
A few more pics of building it. The sides were glued and screwed to the base. the internal joints were then sealed with Decorators caulk. The wadding from original box then glued in place. Holes drilled for speaker terminals and speaker cable sealed in place.

Underneath was routed for;
Slots at front for going over the seat base strengthening plate near the front bolts
Central(ish) hole where the Earth point is under the carpet (its actually pushes the carpet up so the box wobbled)
rear cut-out to route the vehicle cables easier.

Top glued and screwed as per the sides and then painted

Attachments
Abnomynous
Prefers company of cows over electrical sockets
- Messages
- 43
- Vehicle
- T5 SE 174 4Motion
That is immensely helpful nclarke8! 
I already have a pretty decent 9 kilo 10" woofer laying around in my old volvo, but agree that it probably wont be happy with about 10 liters. Either i'll copy your design, stuff it with insulation and see what happens, or i'l give fiberglass a try. Just to in the end settle for a more suitable but less "free" 8" alternative.
Will have a look how much clearance for excursion there is to swivel seat above.
And, if i may be so bold to ask, where there any especially tricky parts to routing signal and power cables from head unit and auxiliary battery that might be useful to keep in mind?
nclarke8
VIP Member
- Messages
- 43
- Vehicle
- T7 California Ocean 4 Motion
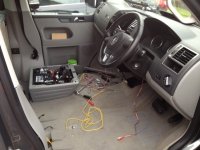
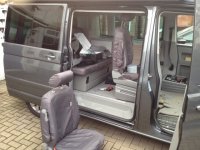
Abnomynous. No its not a difficult job just time consuming and got to be willing to take off lots of trim, remove the drivers seat etc.
Lower dash trim Off
Head unit loosened
Drivers seat and base removed
Passenger seat Removed and base loosened
Lower B post trim removed, requires upper to be moved slightly
remove drivers Step trim
lift up Door Seal
you should now be able to lift carpet enough to feed cables from headunit down and follow existing cable former between the seats and to the hole in capet under drivers seat
Take a fused feed from the Leisure battery under carpet across to hole in Carpet under drivers seat
Add earth to point under carpet next to same hole.
Put it all back together and test !!
(note to test with drivers seat airbag disconnected turn ignition On and Off quickly so that the ECU doesn't have chance to log the fault. Goes without saying do NOT reconnect ths connection with Ignition ON)
Pics from when i did it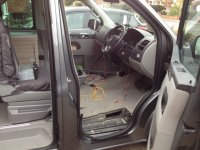


Abnomynous
Prefers company of cows over electrical sockets
- Messages
- 43
- Vehicle
- T5 SE 174 4Motion
 Bloody magnificent!
Not very fond of plastic clips, but my phobia is manageable.
fred
Lifetime VIP Member
- Messages
- 397
- Vehicle
- T5 SE 140
Stage 2 complete here, front and rear.
Couple of notes for anyone considering this:
Couple of notes for anyone considering this:
- Mdf speaker rings are available on ebay
- You'll need 4.8mm x 16mm or 20mm rivets to refit the front rings.
- There's plenty of space to mount crossovers behind the dashboard. Behind the canbus interface on the right, and to the left of the glovebox are good locations.
- Don't skimp on sound deadening.
- Instead of resetting the door card clips (see removing/refitting the door card instructions) you can just buy replacement clips on ebay for pennies.
- I chose to fit the new tweeters in the old mounts which required some Dremel time.
- You may want to port the rear cupboard and / or angle the speakers forward to improve the soundstage
- The benefit of upgrading your rear speakers is very small IMO
- There's no point in reusing existing speaker wiring for fronts, it's actually easier to rewire with new speaker cable
Last edited:
fred
Lifetime VIP Member
- Messages
- 397
- Vehicle
- T5 SE 140
Just completed stage 3 upgrade, 10" 2 ohm JLA 10TW-1 sub and JLA xd500 amp. Cabinet from Absolut5. It's a snug fit but I managed to get it all fitted cleanly under the driver's seat. The transformation in the soundstage, sound quality and sheer power is absolutely stunning. When run from the measly 18w from the HU the JLA component speakers were disappointing, when amped with a clean signal they really come alive. I'm tempted to fit another amp to drive the rears now!
Very pleased that I did this, cheers @nclarke8 for the pics and tips of your install.
Very pleased that I did this, cheers @nclarke8 for the pics and tips of your install.
Last edited:
reserves
Super Poster
VIP Member
Just completed stage 3 upgrade, 10" 2 ohm JLA 10TW-1 sub and JLA xd500 amp. Cabinet from Absolut5. It's a snug fit but I managed to get it all fitted cleanly under the driver's seat. The transformation in the soundstage, sound quality and sheer power is absolutely stunning. When run from the measly 18w from the HU the JLA component speakers were disappointing, when amped with a clean signal they really come alive. I'm tempted to fit another amp to drive the rears now!
Very pleased that I did this, cheers @nclarke8 for the pics and tips of your install.
Sounds great! (I bet
Did you put the amp under the passenger seat, or under the drivers seat with the sub?
fred
Lifetime VIP Member
- Messages
- 397
- Vehicle
- T5 SE 140
No pics unfortunately as I was working on the bus in my underground car park and the light wasn't good enough. The finished install is completely stealth.
Installing sub and amp required removal of both seats and loosening the seat mounting cages to run a 4 AWG power cable from the leisure battery. There's a channel just in front of the handbrake between the front seats. There's an earth point under the driver's seat so you only need to run one of the power leads across the seats.
The main challenge was finding space for the amp; there's zero room under the passenger seat. In the end I mounted it to the front of the sub enclosure (under the driver's seat) so it sits in the small gap at the front of the seat mount cage (facing the pedals). (In @nclark8 's picture above, the amp is where the white label is on the seat cage). The xd500 is about 20mm taller than the sub enclosure so I dropped it 10mm by shaving off some of the carpet insulation (it's quite thick) and used a pair of small L brackets to secure the amp to the top / front of the enclosure. This, together with power cabling still left it 20mm proud of the enclosure which required removal of 50mm off the front of the (absolut5 supplied, carpeted) MDF panel that holds the enclosure in position. Power and earth cables have additional plastic sleeving to protect against any long term chafing on the seat cage or from rotating the seat.
All speaker and remote cabling run away from the amp in the other direction, up the outside of the driver's side footwell up to where the canbus port is. I also ran an amp remote control to the glovebox to keep the dash completely clean.
Most people would be quite satisfied with an 8" 4 ohm sub and a cheaper amp, to be honest my install isn't for everyone as I could have achieved similar (but not the same) results for about a third of the cost. But I'm playing lossless audio, I DJ (and travel with other DJs) occasionally and I couldn't pass up the chance to be able to listen to the kind of music I like to listen to in a way it was designed to be heard.
nclarke8
VIP Member
- Messages
- 43
- Vehicle
- T7 California Ocean 4 Motion
Glad to of been assistance 
It was the picks of Absolut5 Subs on the vwT4forum that tempted me to do mine, and boy that must be a tight fit as on normal vans they can have the Amp on the passenger side with loads of space to play with.
That was the sub I was going to get if my 8" didn't sound good enough as its the same 10ish litres needed.
fred
Lifetime VIP Member
- Messages
- 397
- Vehicle
- T5 SE 140
reserves
Super Poster
VIP Member
Stage 2 complete here, front and rear.
Couple of notes for anyone considering this:
- Mdf speaker rings are available on ebay
- You'll need 4.8mm x 16mm or 20mm rivets to refit the front rings.
- There's plenty of space to mount crossovers behind the dashboard. Behind the canbus interface on the right, and to the left of the glovebox are good locations.
- Don't skimp on sound deadening.
- Instead of resetting the door card clips (see removing/refitting the door card instructions) you can just buy replacement clips on ebay for pennies.
- I chose to fit the new tweeters in the old mounts which required some Dremel time.
- You may want to port the rear cupboard and / or angle the speakers forward to improve the soundstage
- The benefit of upgrading your rear speakers is very small IMO
- There's no point in reusing existing speaker wiring for fronts, it's actually easier to rewire with new speaker cable
Very useful.
Can I ask how many door clips needed? Is it 6 per door? Annoying that they seem to sell in packs of 10 on eBay
fred
Lifetime VIP Member
- Messages
- 397
- Vehicle
- T5 SE 140
@reserves Yeah, 6 per door but buy 10 and you'll have 4-5 left over after doing both doors. Some clips seem to destroy themselves on removal, others are fine. If anyone's contemplating a speaker upgrade then send me a PM as I've spare L-brackets and rivets i can post you.
I've just bought a JL Audio xd200/2 amp to drive the rear speakers, fitting that this weekend
I've just bought a JL Audio xd200/2 amp to drive the rear speakers, fitting that this weekend
Last edited:
reserves
Super Poster
VIP Member
@reserves Yeah, 6 per door but buy 10 and you'll have 4-5 left over after doing both doors. Some clips seem to destroy themselves on removal, others are fine. If anyone's contemplating a speaker upgrade then send me a PM as I've spare L-brackets and rivets i can post you.
I've just bought a JL Audio xd200/2 amp to drive the rear speakers, fitting that this weekend
Thanks
I'm fitting these custom fit speakers http://www.rainbow-audio.de/en/speaker/intelligence-line/vw/ so think I just need the MDF rings and the rivets, what are the L-brackets for you mention?
Last edited:
fred
Lifetime VIP Member
- Messages
- 397
- Vehicle
- T5 SE 140
that's a lot of speaker! (pricey too!). what amp / sub are you planning?
L brackets: I had to buy 25 of these to fit the xd500 to the Absolut5 enclosure http://www.screwfix.com/p/angle-braces-self-colour-19-x-19-x-1-2mm-pack-of-50/67412
I only needed 2
L brackets: I had to buy 25 of these to fit the xd500 to the Absolut5 enclosure http://www.screwfix.com/p/angle-braces-self-colour-19-x-19-x-1-2mm-pack-of-50/67412
I only needed 2
reserves
Super Poster
VIP Member
that's a lot of speaker! (pricey too!). what amp / sub are you planning?
L brackets: I had to buy 25 of these to fit the xd500 to the Absolut5 enclosure http://www.screwfix.com/p/angle-braces-self-colour-19-x-19-x-1-2mm-pack-of-50/67412
Yeah, they are, managed to get them at a really good deal though
Going for the Dream 2 amp I think http://www.rainbow-audio.de/en/amplifier/dream/ has speaker inputs which should work well with the original head unit, which doesn't have pre-outs or even a remote wire
fred
Lifetime VIP Member
- Messages
- 397
- Vehicle
- T5 SE 140
Nice. you might think about a Dream 4 which gives you the option to bridge a pair of channels to drive a sub if you later decide to fit one, or if you want to upgrade the rear speakers. Dimensions look almost the same and only £30 more expensive.
fred
Lifetime VIP Member
- Messages
- 397
- Vehicle
- T5 SE 140
one more thing - it's a good idea to secure the speaker wire away from the window mechanism so that it doesn't get caught the first time you raise / lower your windows. Removing and refitting the speakers just for that would be disappointing.
fred
Lifetime VIP Member
- Messages
- 397
- Vehicle
- T5 SE 140
Rear amp finally in. Have fallen in love with my little bus again 

W
warny15
- Messages
- 43
- Vehicle
- T5 SE 140
Quick question, How did you remove the drivers Step trim, I can figure this one out and don't want to force it ..... cheers
Similar threads
- Replies
- 2
- Views
- 2K
- Home
- Forums
- VW California T5 T6 & T6.1 Specific Sections
- VW California T5,T6 & T6.1 Specific Sections
- Audio & Navigation

About us
The VW California Club is the worlds largest resource for all owners and enthusiasts of VW California campervans.


